
Last updated on: May 27, 2023
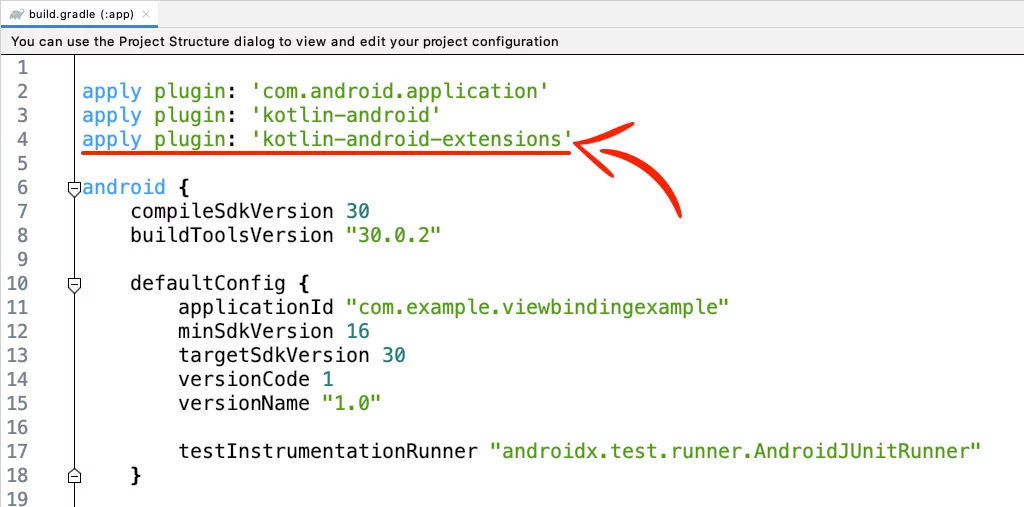
In Android Studio 4.1+, when you create a new Kotlin project and try to connect an XML layout file with your .kt file using Kotlinx synthetic, you’ll see you can’t do it anymore.
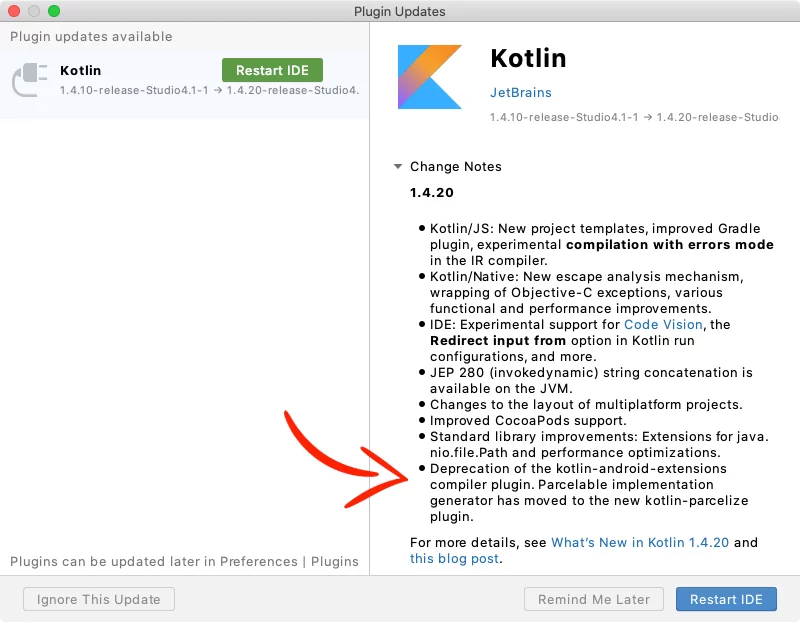
This is because they removed the plugin ‘Kotlin Android Extensions‘ as JetBrains deprecated it in the 1.4.20 version of Kotlin.
Now, the alternatives are:
- ButterKnife
findViewById()- View Binding
Contents
Enabling View Binding
In your module-level build.gradle file, add the following code to enable view binding.
android {

    // ...

    buildFeatures {
        viewBinding true
    }
}Code language: Swift (swift)
This automatically will create binding classes for each XML file present in that module.

For example, if an XML file name is activity_main.xml, the generated binding class will have the name of this file in Pascal case and the word ‘Binding‘ at the end.
So the binding class will be ActivityMainBinding
If you don’t want to generate a binding class for a specific XML file, add the attribute tools:viewBindingIgnore="true" in the root layout like that:
<RelativeLayout
    ...
    tools:viewBindingIgnore="true">

    // ...

</RelativeLayout>Code language: HTML, XML (xml)
Using View Binding in Activities
To use View Binding in Activity, create an instance of the binding class, get the root view, and pass it to setContentView().
class MainActivity : AppCompatActivity() {

    private lateinit var binding: ActivityMainBinding

    override fun onCreate(savedInstanceState: Bundle?) {
        super.onCreate(savedInstanceState)
        binding = ActivityMainBinding.inflate(layoutInflater)
        val view = binding.root
        setContentView(view)

        // ...

    }
}Code language: Kotlin (kotlin)
Now, you can reference your views like that:
binding.myButton.setOnClickListener { // Button Tapped }
binding.myTextView.text = "View Binding is the best!"Code language: Swift (swift)
Using View Binding in Fragments
There are two methods to use View Binding in Fragments:
• Inflate: You do the layout inflation and the binding inside the onCreateView method.
• Bind: You use an alternative Fragment() constructor that inflates the layout, and you do the binding inside the onViewCreated method
Inflate method
In the onCreateView method, inflate your layout file and create the binding instance:
class DemoInflateFragment : Fragment() {

    private var fragmentDemoBinding: FragmentDemoBinding? = null

    override fun onCreateView(inflater: LayoutInflater, container: ViewGroup?, savedInstanceState: Bundle?): View? {
        val binding = FragmentDemoBinding.inflate(inflater, container, false)
        fragmentDemoBinding = binding

        binding.myButton.setOnClickListener {
             // Button Tapped
        }

        binding.myTextView.text = "View Binding is the best!"

        return binding.root
    }
}Code language: Kotlin (kotlin)
Because Fragments continue to live after the View has gone, it’s good to remove any references to the binding class instance:
class DemoInflateFragment : Fragment() {

    //...

    override fun onDestroyView() {
        fragmentDemoBinding = null
        super.onDestroyView()
    }

}Code language: Kotlin (kotlin)
Bind method
At the top of your file, in the Fragment() constructor, add your XML layout file and create the binding inside the onViewCreated method (NOT the onCreateView):
class DemoBindFragment : Fragment(R.layout.fragment_demo) {

    private var fragmentDemoBinding: FragmentDemoBinding? = null

    override fun onViewCreated(view: View, savedInstanceState: Bundle?) {
        super.onViewCreated(view, savedInstanceState)
        val binding = FragmentDemoBinding.bind(view)
        fragmentDemoBinding = binding

        binding.myButton.setOnClickListener { // Button Tapped }
        binding.myTextView.text = "View Binding is the best!"

    }
}Code language: Kotlin (kotlin)
Like I said before in the Inflate method, remove any references in the fragment’s onDestroyView() method:
class DemoBindFragment : Fragment(R.layout.fragment_demo) {

    // ...

    override fun onDestroyView() {
        fragmentDemoBinding = null
        super.onDestroyView()
    }
}Code language: Kotlin (kotlin)
Using View Binding in RecyclerView Adapter
To use View Binding in your RecyclerView adapter, add the binding class in your ItemViewHolder, and set the root layout:
class Items_RVAdapter(private var itemsCells: ArrayList<String?>) : RecyclerView.Adapter<RecyclerView.ViewHolder>() {

     // ..

    class ItemViewHolder(var viewBinding: ItemRowBinding) : RecyclerView.ViewHolder(viewBinding.root)

    // ...

}Code language: Kotlin (kotlin)
Next, in the onCreateViewHolder method, do the layout inflation and return the ItemViewHolder with the binding.
class Items_RVAdapter(private var itemsCells: ArrayList<String?>) : RecyclerView.Adapter<RecyclerView.ViewHolder>() {

    // ...


    override fun onCreateViewHolder(parent: ViewGroup, viewType: Int): RecyclerView.ViewHolder {
        val binding = ItemRowBinding.inflate(LayoutInflater.from(parent.context), parent, false)
        return ItemViewHolder(binding)
    }

    // ...

}Code language: Kotlin (kotlin)
And at the end, on the onBindViewHolder, you can reference any of the views through the binding of the holder:
class Items_RVAdapter(private var itemsCells: ArrayList<String?>) : RecyclerView.Adapter<RecyclerView.ViewHolder>() {

    // ...

    override fun onBindViewHolder(holder: RecyclerView.ViewHolder, position: Int) {
        val itemViewHolder = holder as ItemViewHolder
        itemViewHolder.viewBinding.itemtextview.text = itemsCells[position]
    }
}Code language: Kotlin (kotlin)
You can find the final project here
If you have any questions, please feel free to leave a comment below