
Last updated on: May 27, 2023
Let’s start by defining what an architecture pattern, or design pattern, is in simple terms.
When you first begin building iOS apps, you may write all of your code in one file, typically in the View (UIViewController). However, as your app grows in complexity, you may find yourself scrolling up and down a lengthy file of 2000 lines or more just to understand what you wrote.
This is where architecture patterns come in to address the problem. By using an architecture pattern, you can break up this massive file into smaller, more manageable sections, making it easier to maintain, test, and scale your code.
Today, we will be exploring the MVVM architecture pattern, which stands for Model-View-ViewModel. In this tutorial, I will guide you through implementing the MVVM pattern and organizing your project with folders.
Our project will involve retrieving employee data from a JSON and displaying it in a UITableView using a custom UITableViewCell. Let’s get started!

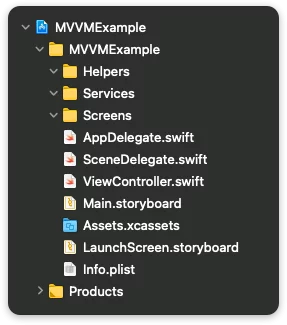
This is how the structure of the project will look after organizing and implementing MVVM.

Contents
Creating the Folders
Let’s start by creating the folders Helpers, Services, and Screens.

After that, the your project will look like this:
Creating the MVVM Folders
The Screens folder contains all the screens of our app. So, for example, if you have a screen with the title ‘My Profile’, then, inside the Screens folder, create a new folder with the name MyProfile, and inside that folder, make the folders Model, View, and ViewModel.
Using this method, you’ll keep everything you want in the same place!
In this example, we have the screen Employees, and we moved the ViewController file inside the View and renamed it to EmployessViewController

Tip: If you use the same file in different places, you can create a Common folder and have the file inside there.
Creating the TableView Cell and the TableView
Before we implement the MVVM pattern, let’s make the UITableViewCell and UITableView.
UITableViewCell
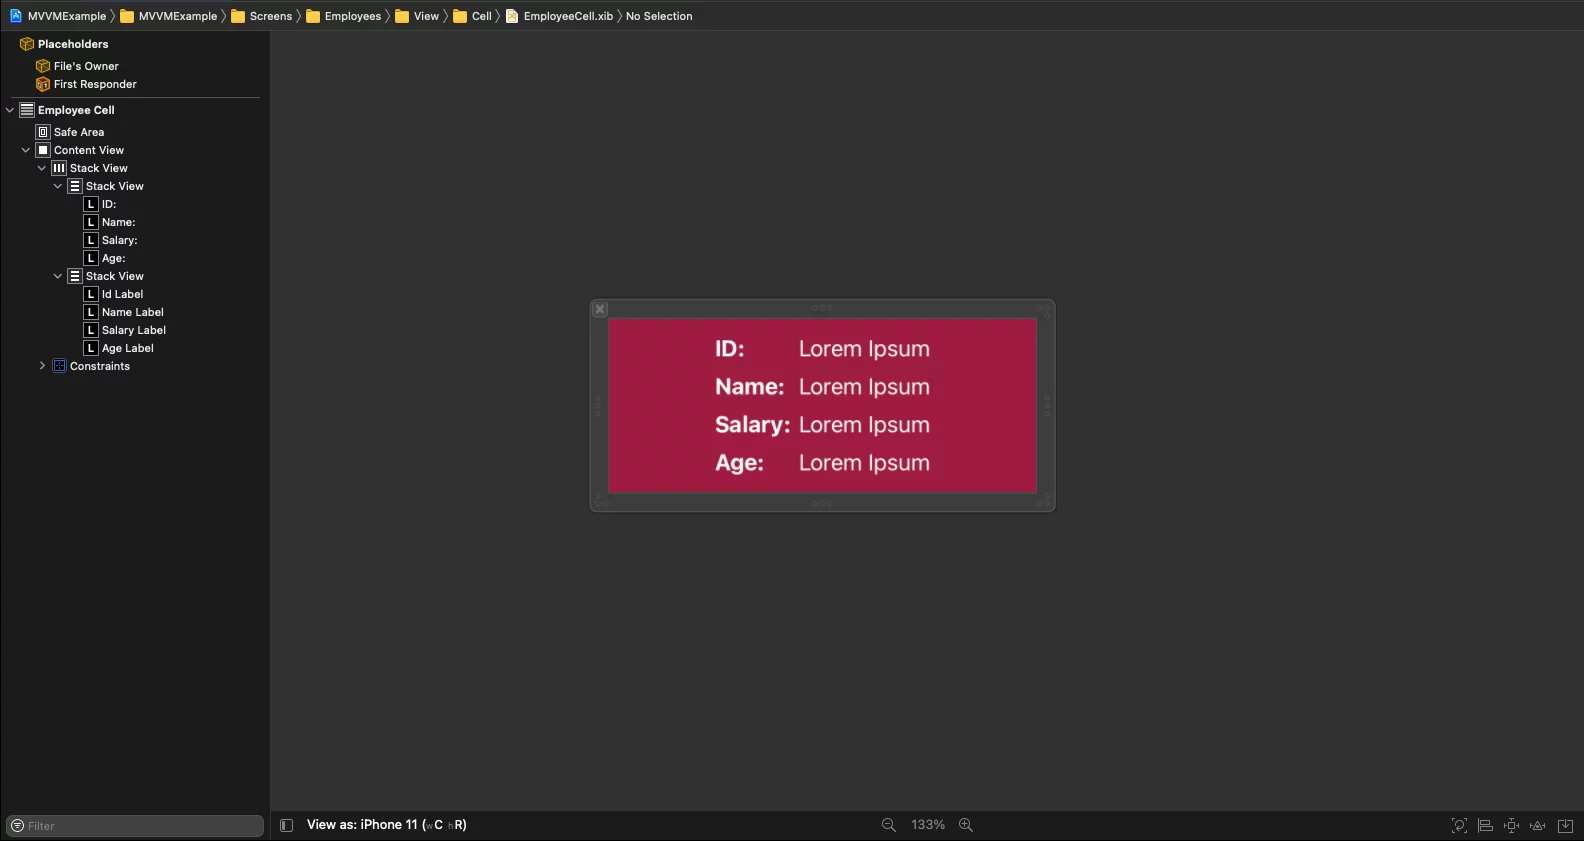
Inside the View folder, create a new folder with the name Cell, and inside this folder, create a UITableViewCell with the name EmployeeCell and a XIB file.


In this .xib file, we have UILabels inside a UIStackView to display the ID, Name, Salary, and Age of an employee.
Now, inside the EmployeeCell.swift file, add the constants identifier, and nib.
These classes will help us later to register the cell in the UITableView without using hardcoded strings.
class EmployeeCell: UITableViewCell {
    @IBOutlet weak var idLabel: UILabel!
    @IBOutlet weak var nameLabel: UILabel!
    @IBOutlet weak var salaryLabel: UILabel!
    @IBOutlet weak var ageLabel: UILabel!

    static var identifier: String { return String(describing: self) }
    static var nib: UINib { return UINib(nibName: identifier, bundle: nil) }

    override func awakeFromNib() {
        super.awakeFromNib()
        initView()
    }

    func initView() {
        // Cell view customization
        backgroundColor = .clear

        // Line separator full width
        preservesSuperviewLayoutMargins = false
        separatorInset = UIEdgeInsets.zero
        layoutMargins = UIEdgeInsets.zero
    }

    override func prepareForReuse() {
        super.prepareForReuse()
        idLabel.text = nil
        nameLabel.text = nil
        salaryLabel.text = nil
        ageLabel.text = nil
    }
}Code language: Swift (swift)
UITableView
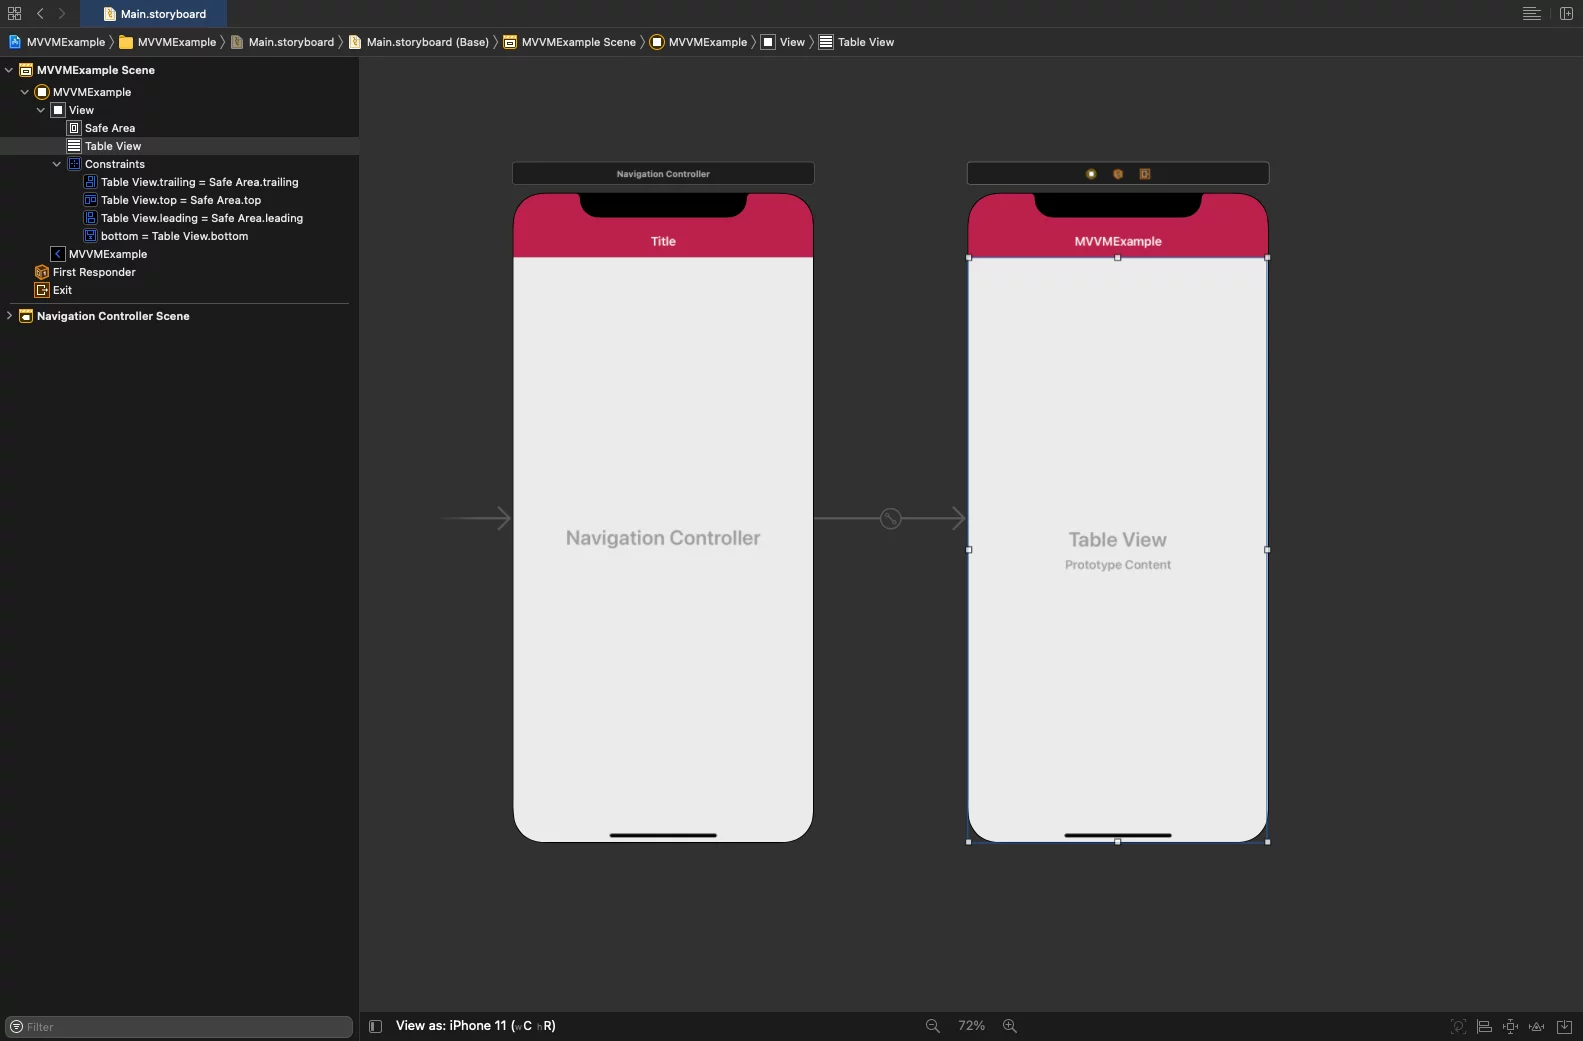
In the Main.storyboards add a UITableView inside a UIViewController
In the EmployeesViewController.swift file we add two methods, initView() and initViewModel().
Inside the initView(), we do all the things that have to do with the tableview’s customization and preparation, like background color, register cell e.t.c
In the initViewModel(), we create the closures from the ViewModel (We’re going to add them later in the tutorial).
class EmployeesViewController: UIViewController {
    @IBOutlet weak var tableView: UITableView!

    override func viewDidLoad() {
        super.viewDidLoad()
        initView()
        initViewModel()
    }

    func initView() {
        // TableView customization
        tableView.delegate = self
        tableView.dataSource = self
        tableView.backgroundColor = UIColor(#colorLiteral(red: 0.6196078431, green: 0.1098039216, blue: 0.2509803922, alpha: 1))
        tableView.separatorColor = .white
        tableView.separatorStyle = .singleLine
        tableView.tableFooterView = UIView()
        tableView.allowsSelection = false

        tableView.register(EmployeeCell.nib, forCellReuseIdentifier: EmployeeCell.identifier)
    }

    func initViewModel() {
        /* Add code later */
    }
}

// MARK: - UITableViewDelegate

extension EmployeesViewController: UITableViewDelegate {
    func tableView(_ tableView: UITableView, heightForRowAt indexPath: IndexPath) -> CGFloat {
        return 130
    }
}

// MARK: - UITableViewDataSource

extension EmployeesViewController: UITableViewDataSource {
    func tableView(_ tableView: UITableView, numberOfRowsInSection section: Int) -> Int {
        return 0
    }

    func tableView(_ tableView: UITableView, cellForRowAt indexPath: IndexPath) -> UITableViewCell {
        guard let cell = tableView.dequeueReusableCell(withIdentifier: EmployeeCell.identifier, for: indexPath) as? EmployeeCell else { fatalError("xib does not exists") }
        return cell
    }
}Code language: Swift (swift)
Creating the Model for the JSON Data
In this example, we’re getting the ID, Name, Age, and Salary of the employees from a JSON. To decode that JSON data, we’re gonna need to create a model.
Inside the Model folder, create a new swift file with the name Employee
Tip: If your JSON is very complex and hard for you to create the model manually, use app.quicktype.io to generate it.
typealias Employees = [Employee]

// MARK: - Employee
struct Employee: Codable {
    let id: String
    let employeeName: String
    let employeeSalary: String
    let employeeAge: String

    enum CodingKeys: String, CodingKey {
        case id
        case employeeName = "employee_name"
        case employeeSalary = "employee_salary"
        case employeeAge = "employee_age"
    }
}Code language: Swift (swift)
Helpers
Now, let’s see the Helpers folder.
As the name says, this folder contains files that will help us write less code during the development.
In this example, we have a file with the name HttpRequestHelper. Inside this class, we have a GET method that takes as parameters a URL, the request parameters (If they exist), and an HTTP Header and returns the results with the escaping closure complete.
enum HTTPHeaderFields {
    case application_json
    case application_x_www_form_urlencoded
    case none
}

class HttpRequestHelper {
    func GET(url: String, params: [String: String], httpHeader: HTTPHeaderFields, complete: @escaping (Bool, Data?) -> ()) {
        guard var components = URLComponents(string: url) else {
            print("Error: cannot create URLCompontents")
            return
        }
        components.queryItems = params.map { key, value in
            URLQueryItem(name: key, value: value)
        }

        guard let url = components.url else {
            print("Error: cannot create URL")
            return
        }
        var request = URLRequest(url: url)
        request.httpMethod = "GET"

        switch httpHeader {
        case .application_json:
            request.setValue("application/json", forHTTPHeaderField: "Content-Type")
        case .application_x_www_form_urlencoded:
            request.setValue("application/x-www-form-urlencoded", forHTTPHeaderField: "Content-Type")
        case .none: break
        }


        // .ephemeral prevent JSON from caching (They'll store in Ram and nothing on Disk)
        let config = URLSessionConfiguration.ephemeral
        let session = URLSession(configuration: config)
        session.dataTask(with: request) { data, response, error in
            guard error == nil else {
                print("Error: problem calling GET")
                print(error!)
                complete(false, nil)
                return
            }
            guard let data = data else {
                print("Error: did not receive data")
                complete(false, nil)
                return
            }
            guard let response = response as? HTTPURLResponse, (200 ..< 300) ~= response.statusCode else {
                print("Error: HTTP request failed")
                complete(false, nil)
                return
            }
            complete(true, data)
        }.resume()
    }
}Code language: Swift (swift)
Services
The Services (or Networking) folder contains the files with the requests we are sending to a server.
Here we create a file with the name EmployeesService, and we’re using the GET method from the HttpRequestHelper to create the request.
protocol EmployeesServiceProtocol {
    func getEmployees(completion: @escaping (_ success: Bool, _ results: Employees?, _ error: String?) -> ())
}

class EmployeesService: EmployeesServiceProtocol {
    func getEmployees(completion: @escaping (Bool, Employees?, String?) -> ()) {
        HttpRequestHelper().GET(url: "https://raw.githubusercontent.com/johncodeos-blog/MVVMiOSExample/main/demo.json", params: ["": ""], httpHeader: .application_json) { success, data in
            if success {
                do {
                    let model = try JSONDecoder().decode(Employees.self, from: data!)
                    completion(true, model, nil)
                } catch {
                    completion(false, nil, "Error: Trying to parse Employees to model")
                }
            } else {
                completion(false, nil, "Error: Employees GET Request failed")
            }
        }
    }
}Code language: Swift (swift)
ViewModel
In this folder, we have the files that do all the business logic and don’t have any UIKit references, so it’s very easy to test.
Inside the ViewModel folder, create two new swift files with the name EmployeeCellViewModel and EmployeesViewModel.

EmployeeCellViewModel
In the file EmployeeCellViewModel, we create a struct with all the properties for the cell.
struct EmployeeCellViewModel {
    var id: String
    var name: String
    var salary: String
    var age: String
}Code language: Swift (swift)
EmployeesViewModel
In this file, we start by initializing the EmployeeService.
class EmployeesViewModel: NSObject {
    private var employeeService: EmployeesServiceProtocol

    init(employeeService: EmployeesServiceProtocol = EmployeesService()) {
        self.employeeService = employeeService

    // ...

}Code language: Swift (swift)
Then create a new method getEmployees, to get the employees’ data from the JSON using the employeeService.
If the request is successful, we will pass the JSON model to the fetchData method.
class EmployeesViewModel: NSObject {

    // ...

    func getEmployees() {
        employeeService.getEmployees { success, model, error in
            if success, let employees = model {
                self.fetchData(employees: employees)
            } else {
                print(error!)
            }
        }
    }

   // ...

}Code language: Swift (swift)
class EmployeesViewModel: NSObject {
// ...
var reloadTableView: (() -> Void)?
var employees = Employees()
var employeeCellViewModels = [EmployeeCellViewModel]() {
didSet {
reloadTableView?()
}
}
func fetchData(employees: Employees) {
self.employees = employees // Cache
var vms = [EmployeeCellViewModel]()
for employee in employees {
vms.append(createCellModel(employee: employee))
}
employeeCellViewModels = vms
}
// ...
}Code language: Swift (swift)Inside the fetchData method, we’re looping through the items list, and we create a new list of the cell’s view model using the createCellModel method.
class EmployeesViewModel: NSObject {

    // ...

    func createCellModel(employee: Employee) -> EmployeeCellViewModel {
        let id = employee.id
        let name = employee.employeeName
        let salary = "$ " + employee.employeeSalary
        let age = employee.employeeAge

        return EmployeeCellViewModel(id: id, name: name, salary: salary, age: age)
    }

    // ...

}Code language: Swift (swift)
Lastly, we create another method and return the cell view model for the current IndexPath.
class EmployeesViewModel: NSObject {
    // ...

    func getCellViewModel(at indexPath: IndexPath) -> EmployeeCellViewModel {
        return employeeCellViewModels[indexPath.row]
    }

}Code language: Swift (swift)
View
Back in the View folder, at the EmployeesViewController file, add the ViewModel, call the getEmployees method, and create the reloadTableView closure to update the tableView when it is called.
class EmployeesViewController: UIViewController {
    @IBOutlet weak var tableView: UITableView!

    lazy var viewModel = {
        EmployeesViewModel()
    }()

    // ...

    func initViewModel() {
        viewModel.getEmployees()
        viewModel.reloadTableView = { [weak self] in
            DispatchQueue.main.async {
                self?.tableView.reloadData()
            }
        }
    }
}
Code language: Swift (swift)
Next, in the numberOfRowsInSection, return the number of cell view models, and in the cellForRowAt, call the getCellViewModel method to get the view model of the current cell.
extension EmployeesViewController: UITableViewDataSource {
    func tableView(_ tableView: UITableView, numberOfRowsInSection section: Int) -> Int {
        return viewModel.employeeCellViewModels.count
    }

    func tableView(_ tableView: UITableView, cellForRowAt indexPath: IndexPath) -> UITableViewCell {
        guard let cell = tableView.dequeueReusableCell(withIdentifier: EmployeeCell.identifier, for: indexPath) as? EmployeeCell else { fatalError("xib does not exists") }
        let cellVM = viewModel.getCellViewModel(at: indexPath)
        cell.cellViewModel = cellVM
        return cell
    }
}Code language: Swift (swift)
Getting the ViewModel in the Cell
Back in the TableViewCell (EmployeeCell), once the cellViewModel receives the data, the labels get updated.
class EmployeeCell: UITableViewCell {
    @IBOutlet weak var idLabel: UILabel!
    @IBOutlet weak var nameLabel: UILabel!
    @IBOutlet weak var salaryLabel: UILabel!
    @IBOutlet weak var ageLabel: UILabel!

    class var identifier: String { return String(describing: self) }
    class var nib: UINib { return UINib(nibName: identifier, bundle: nil) }

    var cellViewModel: EmployeeCellViewModel? {
        didSet {
            idLabel.text = cellViewModel?.id
            nameLabel.text = cellViewModel?.name
            salaryLabel.text = cellViewModel?.salary
            ageLabel.text = cellViewModel?.age
        }
    }

    // ...
}Code language: Swift (swift)
You can find the final project here
If you have any questions, please feel free to leave a comment below