Last updated on: May 27, 2023
Today, I will show you how to integrate the ‘Sign in with Apple‘ button into your Android app in 3 steps.
In this tutorial, you will learn:
- How to set up your Apple Developer Account to use a ‘Sign in with Apple’ button on Android
- How to set up a backend server and use it as a Callback URL
- Create a ‘Sign in with Apple’ button to your Android app and get the user’s info (First name, Last name, Email, User ID).
Contents
Before we start
Before we start, I want to explain how the authentication flow goes because it’s more complicated than other social logins, like ‘Login with Twitter’ or ‘Login with Facebook’
First, when the user presses the ‘Sign In with Apple’ button, a WebView Dialog pop-up.
After they fill their data and give access to your app, Apple sends a POST request on the backend server.
The backend server returns the Authorization Code + User’s Info (First name, Last name, and Email) + Client Secret through URL.
The app “catches” this URL and displays the user’s info.
Next, we take the Authorization Code and Client Secret and exchange it for an Access Token.
This Access Token is inside a JSON, along with an ID Token.
We take the ID Token, and we split it into pieces, with a dot (.) as a separator, and we take the 2nd part.
Last, we decode this string (JSON Web Token) to get the User’s ID.
Step 1: Set up your app in the Apple Developer Account
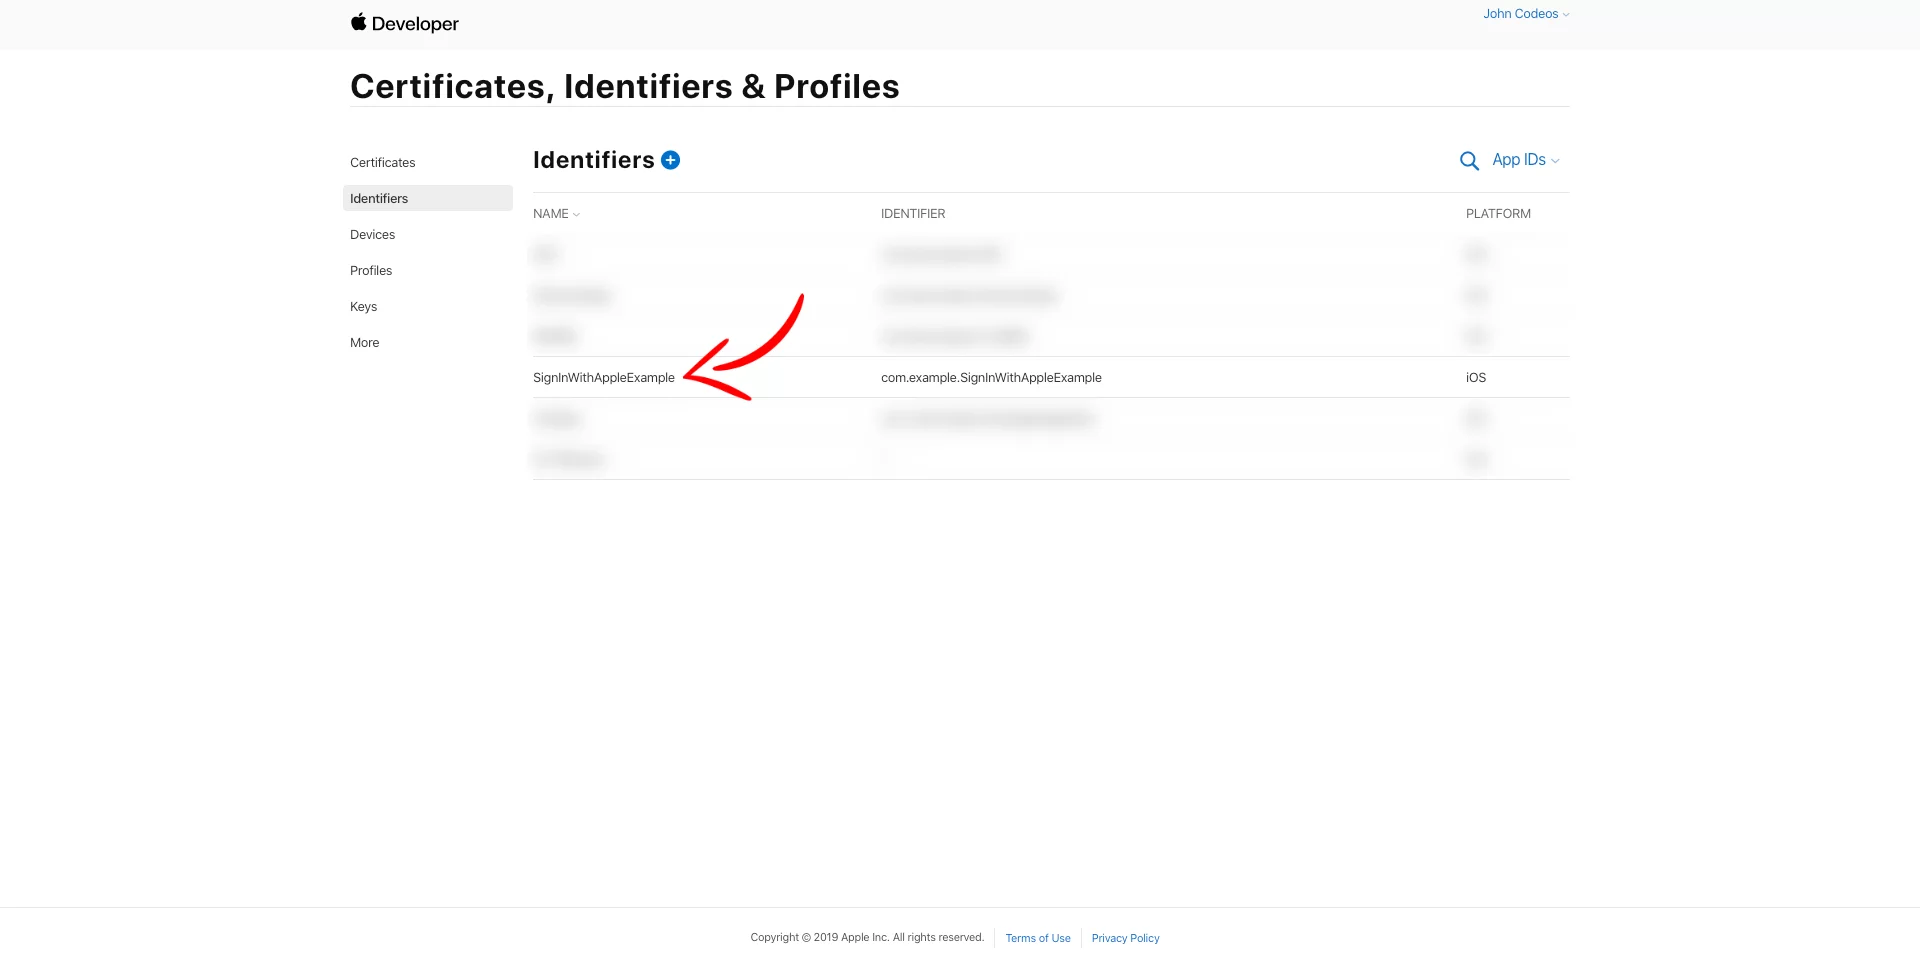
Go into your Apple Developer Account, choose Certificates, Identifiers & Profiles, Identifiers on the left side, and then your app from the list.
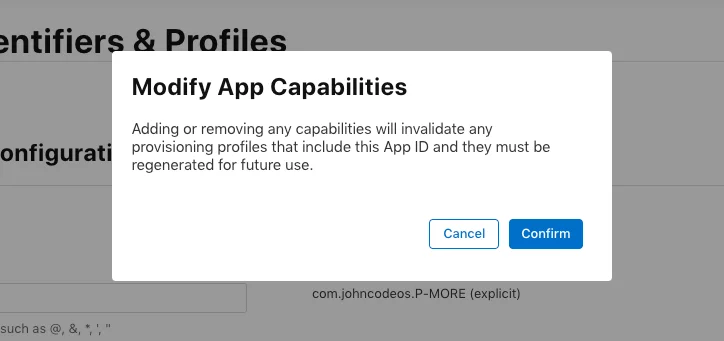
On the list Capabilities, enable Sign In with Apple, press Edit, choose Enable as a primary App ID, and press Save.

Press Save again and Confirm.
Now, go back and choose Keys on the left side.
Create a new key by pressing the + button next to the ‘Keys’ title.
Give a name and enable Sign In with Apple by ticking the box.

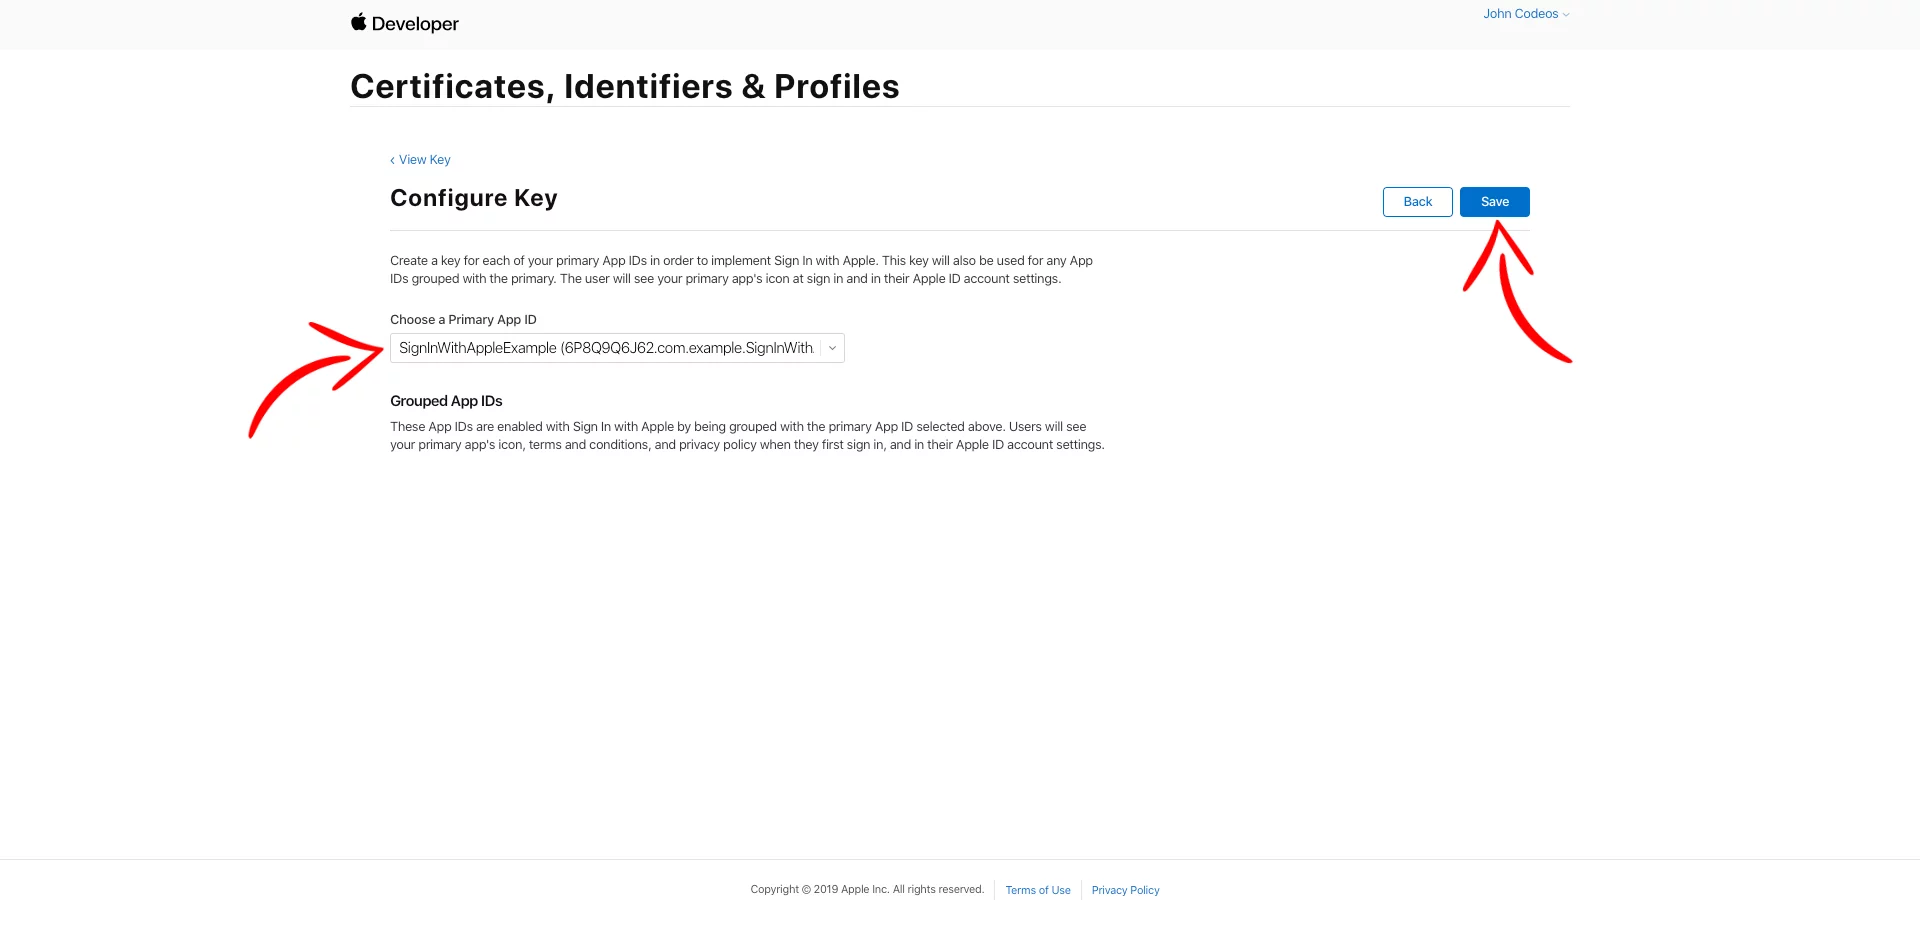
Press Configure and choose your Primary App ID and press Save.
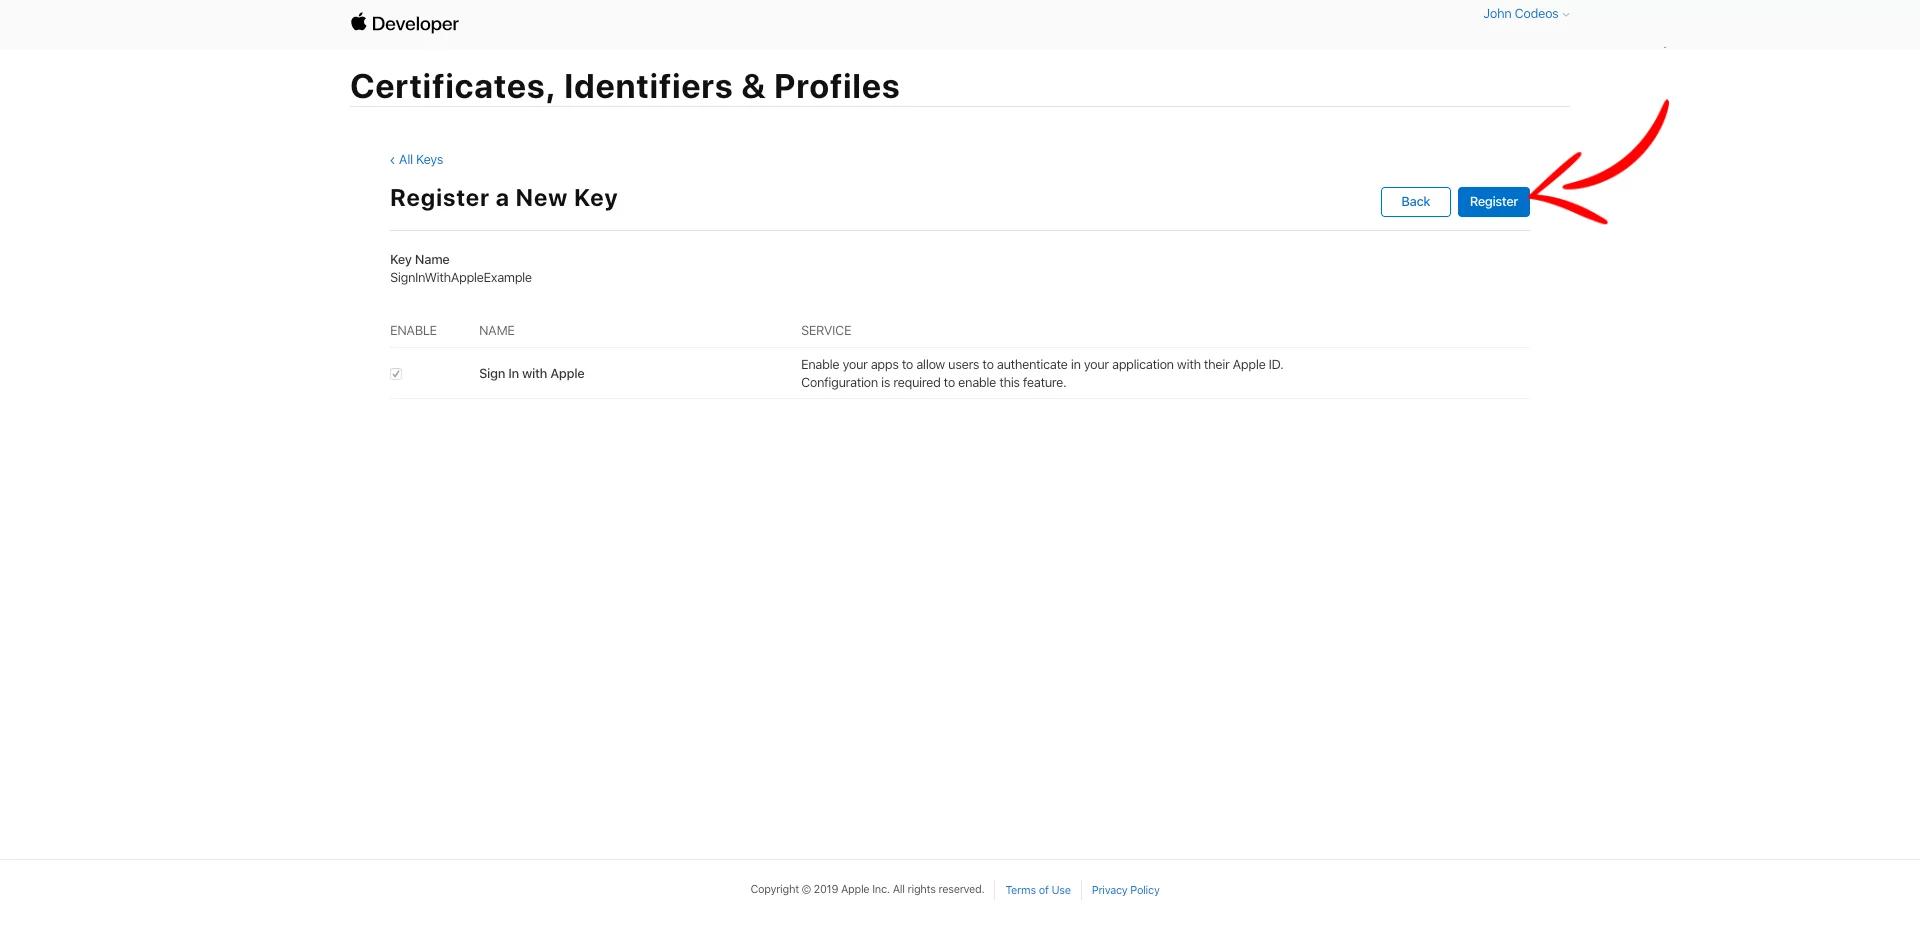
Press Continue, on the next page, press Register, and then Download. Keep that .p8 file. You’re gonna need that later…

‘Sign in with Apple‘ gives the users the option to hide their email address when they log in.
To contact those users, you need to set up a domain and a contact email in your Apple Developer Account.
Choose More from the left menu and press Configure.
In the next page, add your domain and email and press Register on both

To verify the domain, press Download and download the .txt file.
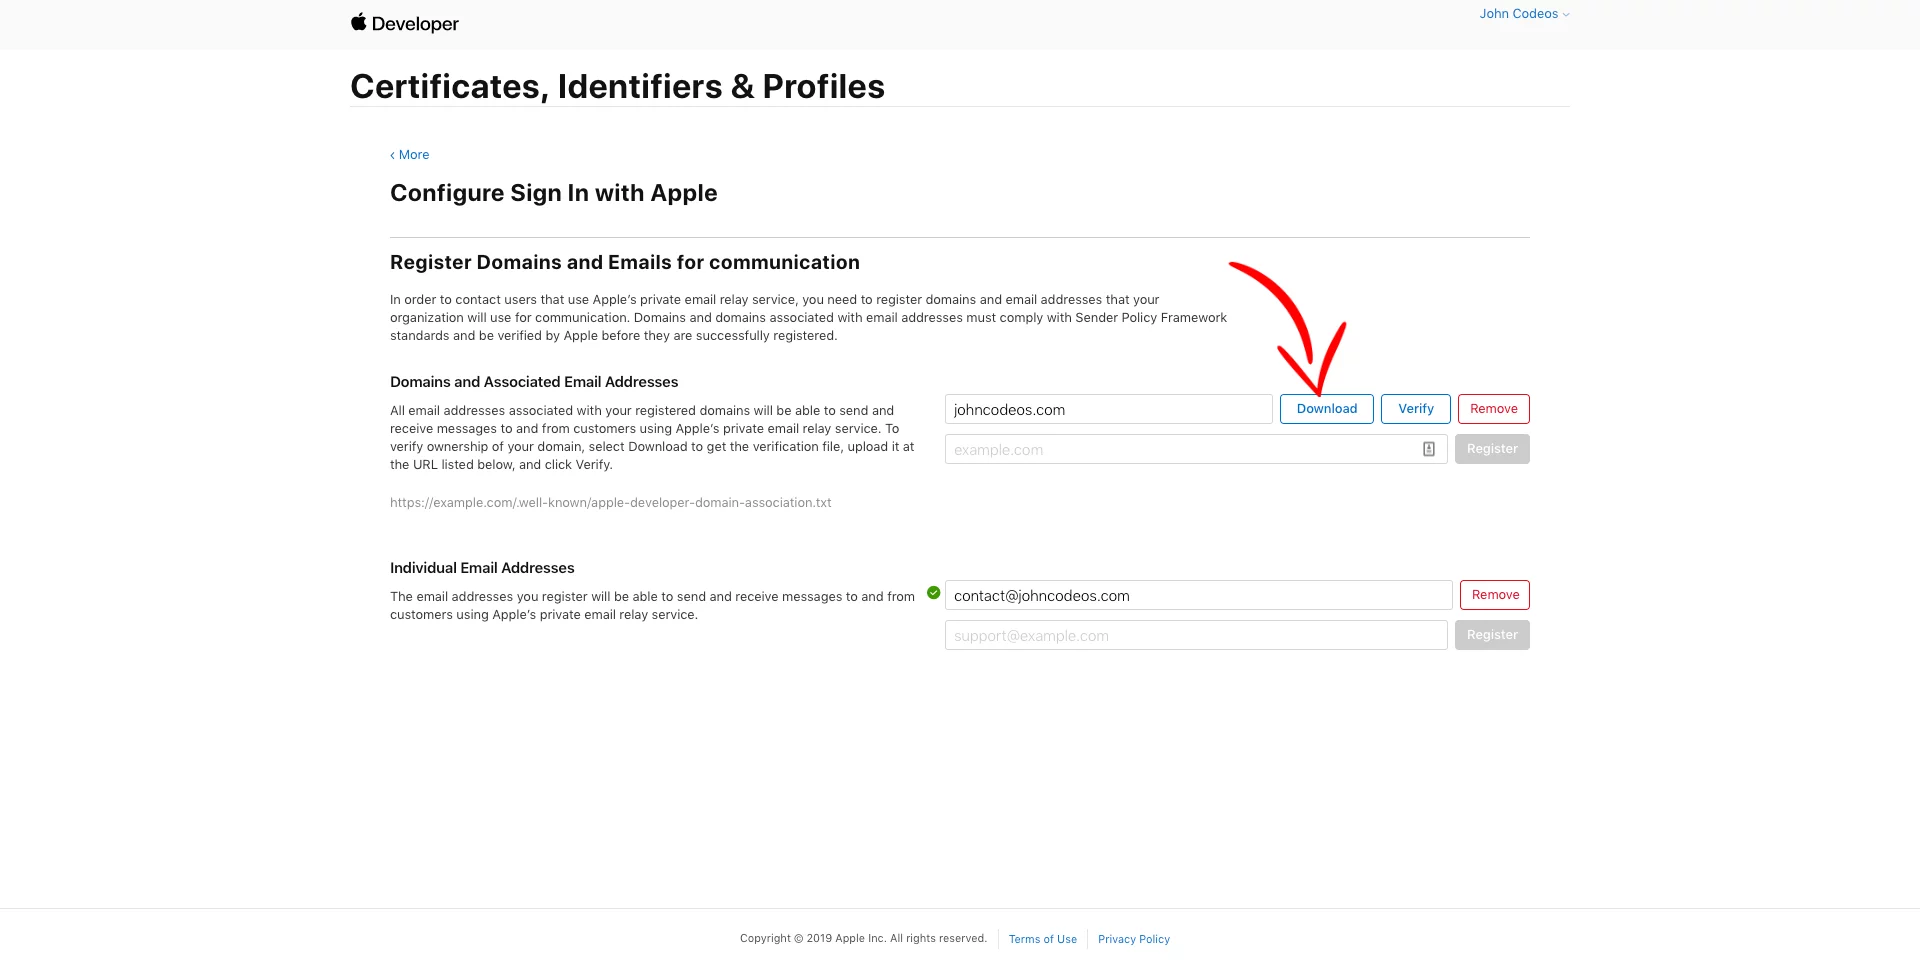
Go into your website’s FTP server, create a folder with a name .well-known (yes, with the dot in front) and paste it inside.
To test if it’s working, type: https://PUT_YOUR_DOMAIN_HERE.com/.well-known/apple-developer-domain-association.txt and check if a text comes out as a result.
After that, go back and press Verify. (It might take a while until Apple ‘see’ the file on your server.)
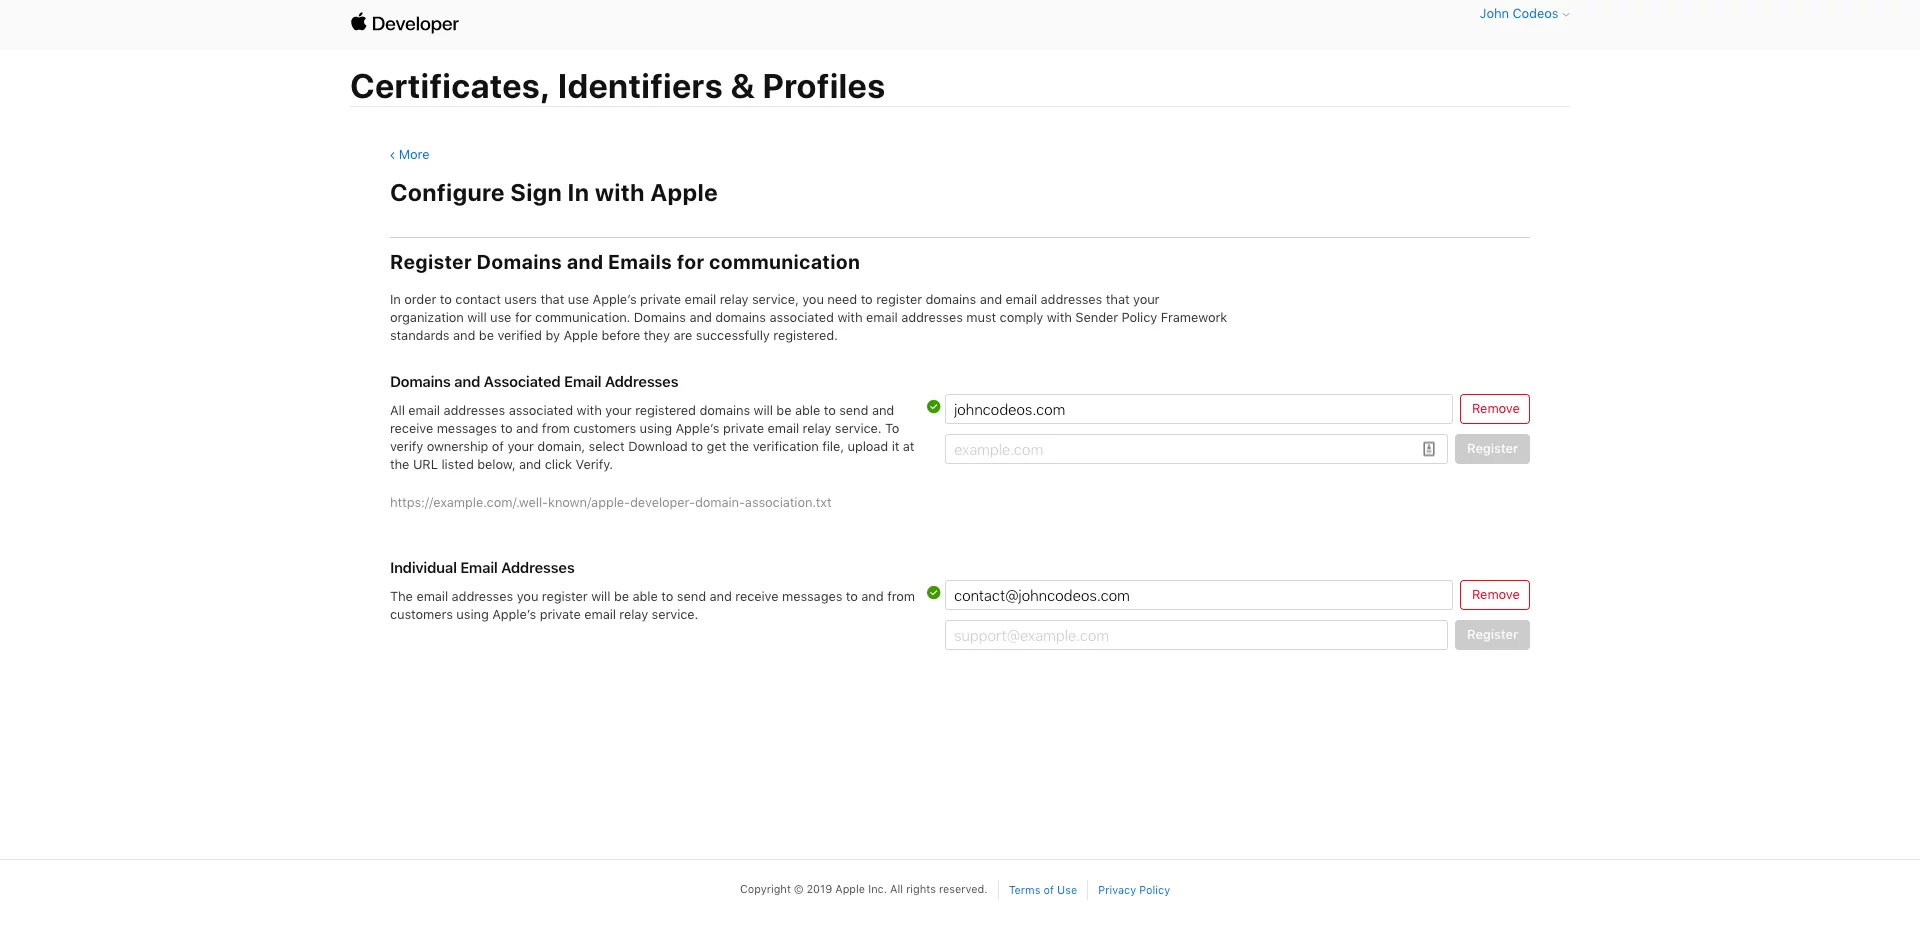
If everything is ok, you’ll see the following page:
Now you have to create a Service ID.
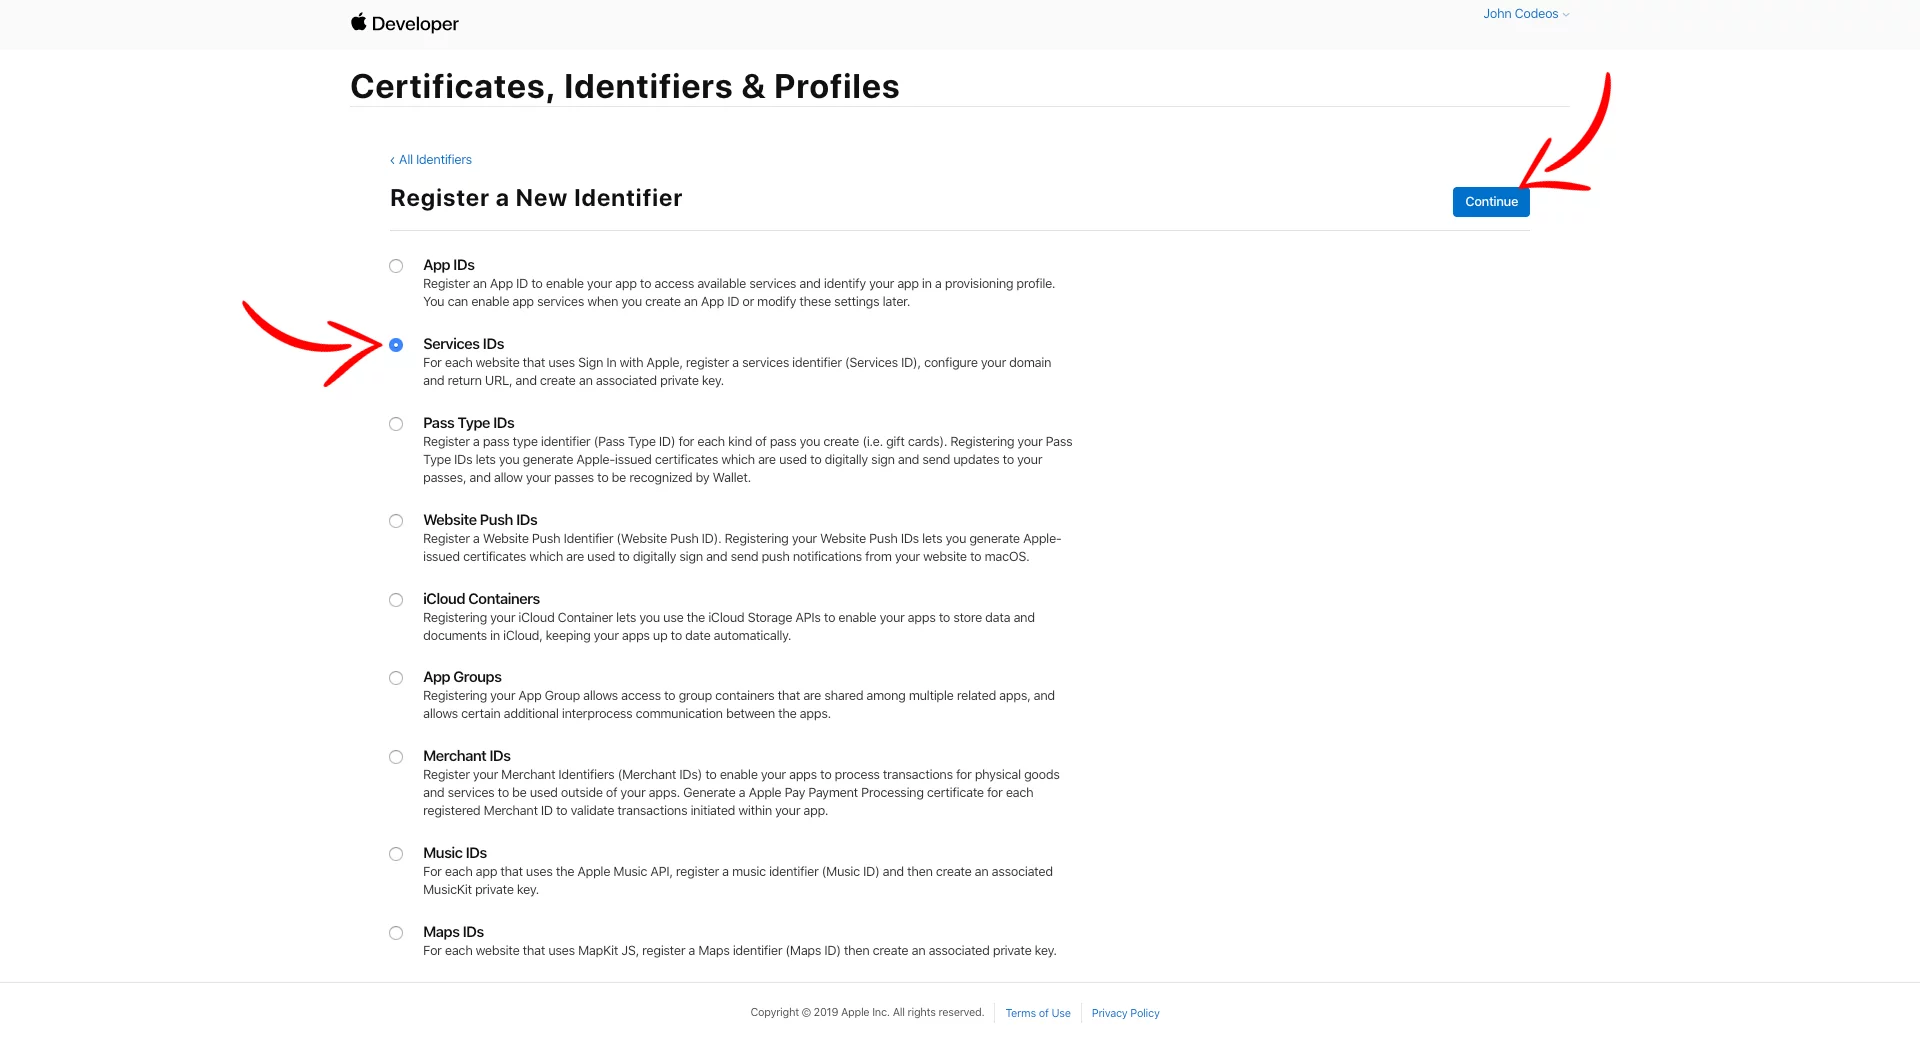
Go back and choose Identifiers on the left menu and then press the plus button.
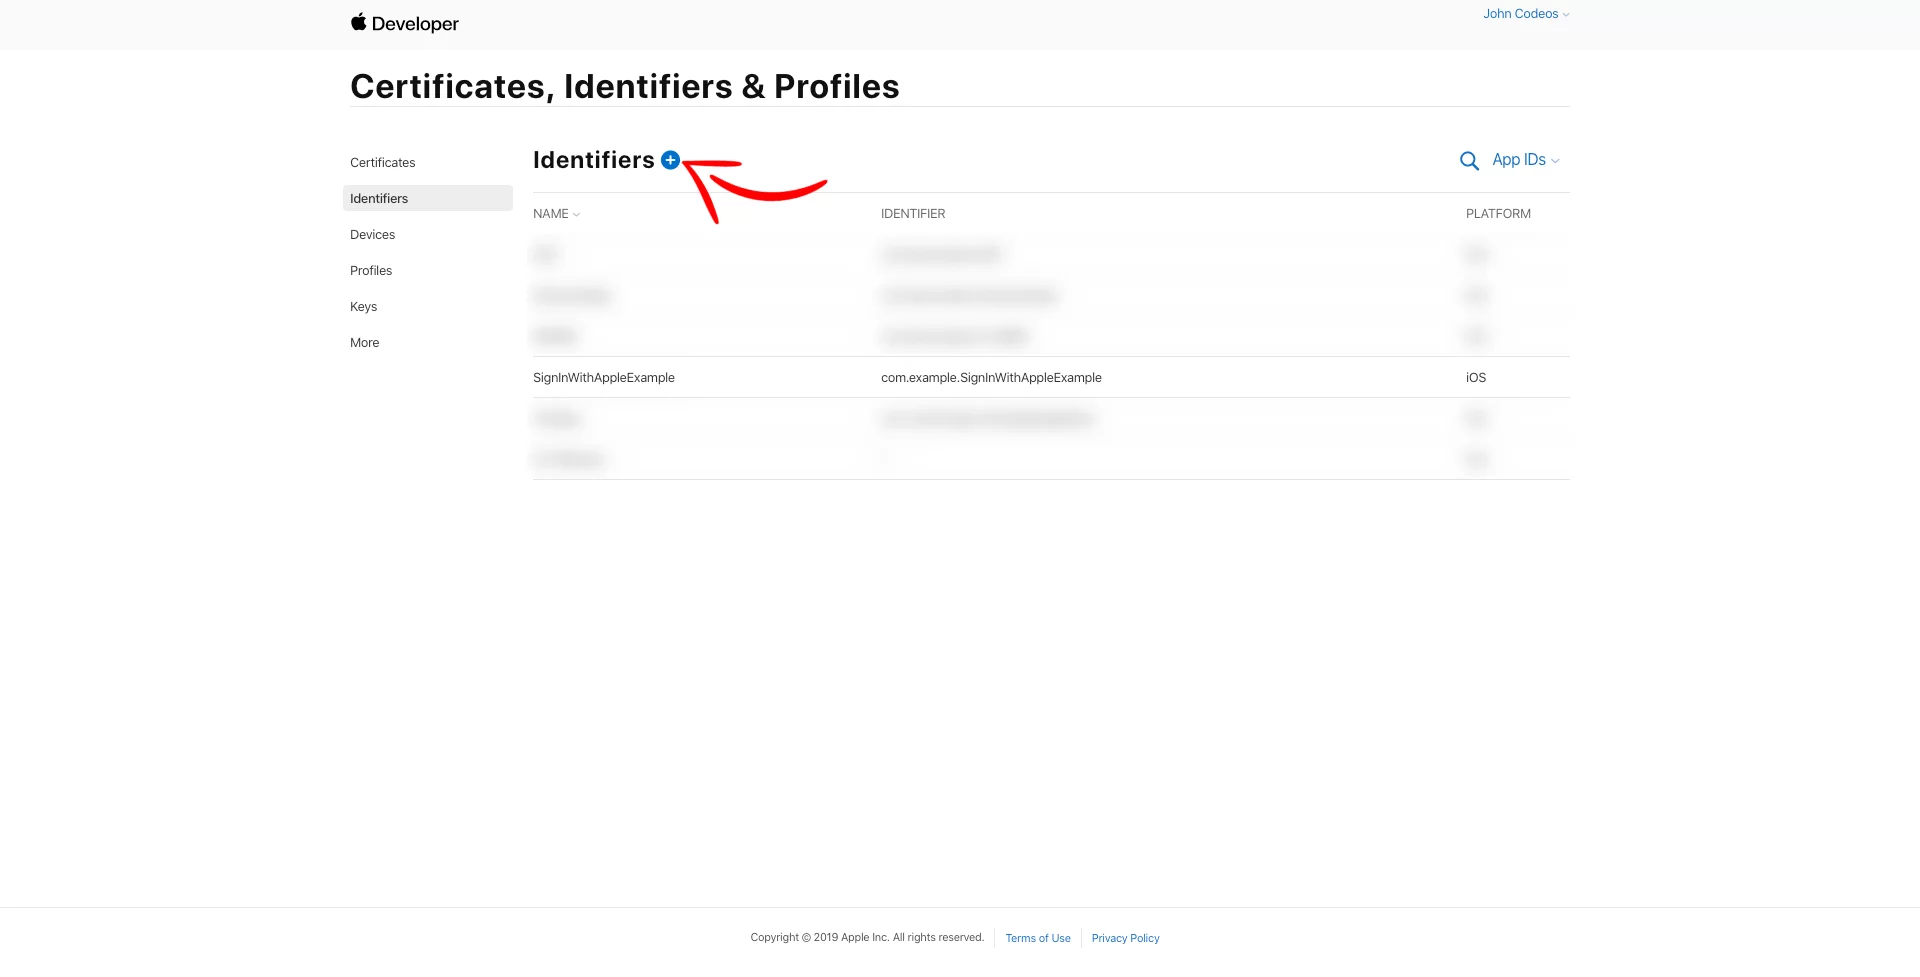
On the next page, choose Service IDs and press Continue
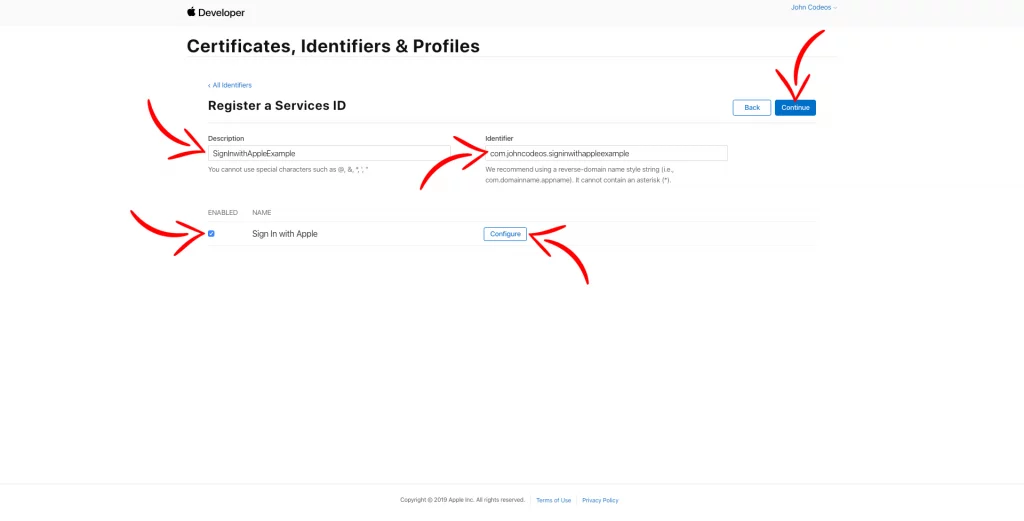
Next, add a name for your Service ID in the Description field, put an identifier(It’s recommended to put your domain name in reverse, like com.johncodeos, and at the end add your app name), enable the Sign In with Apple, and press Configure.
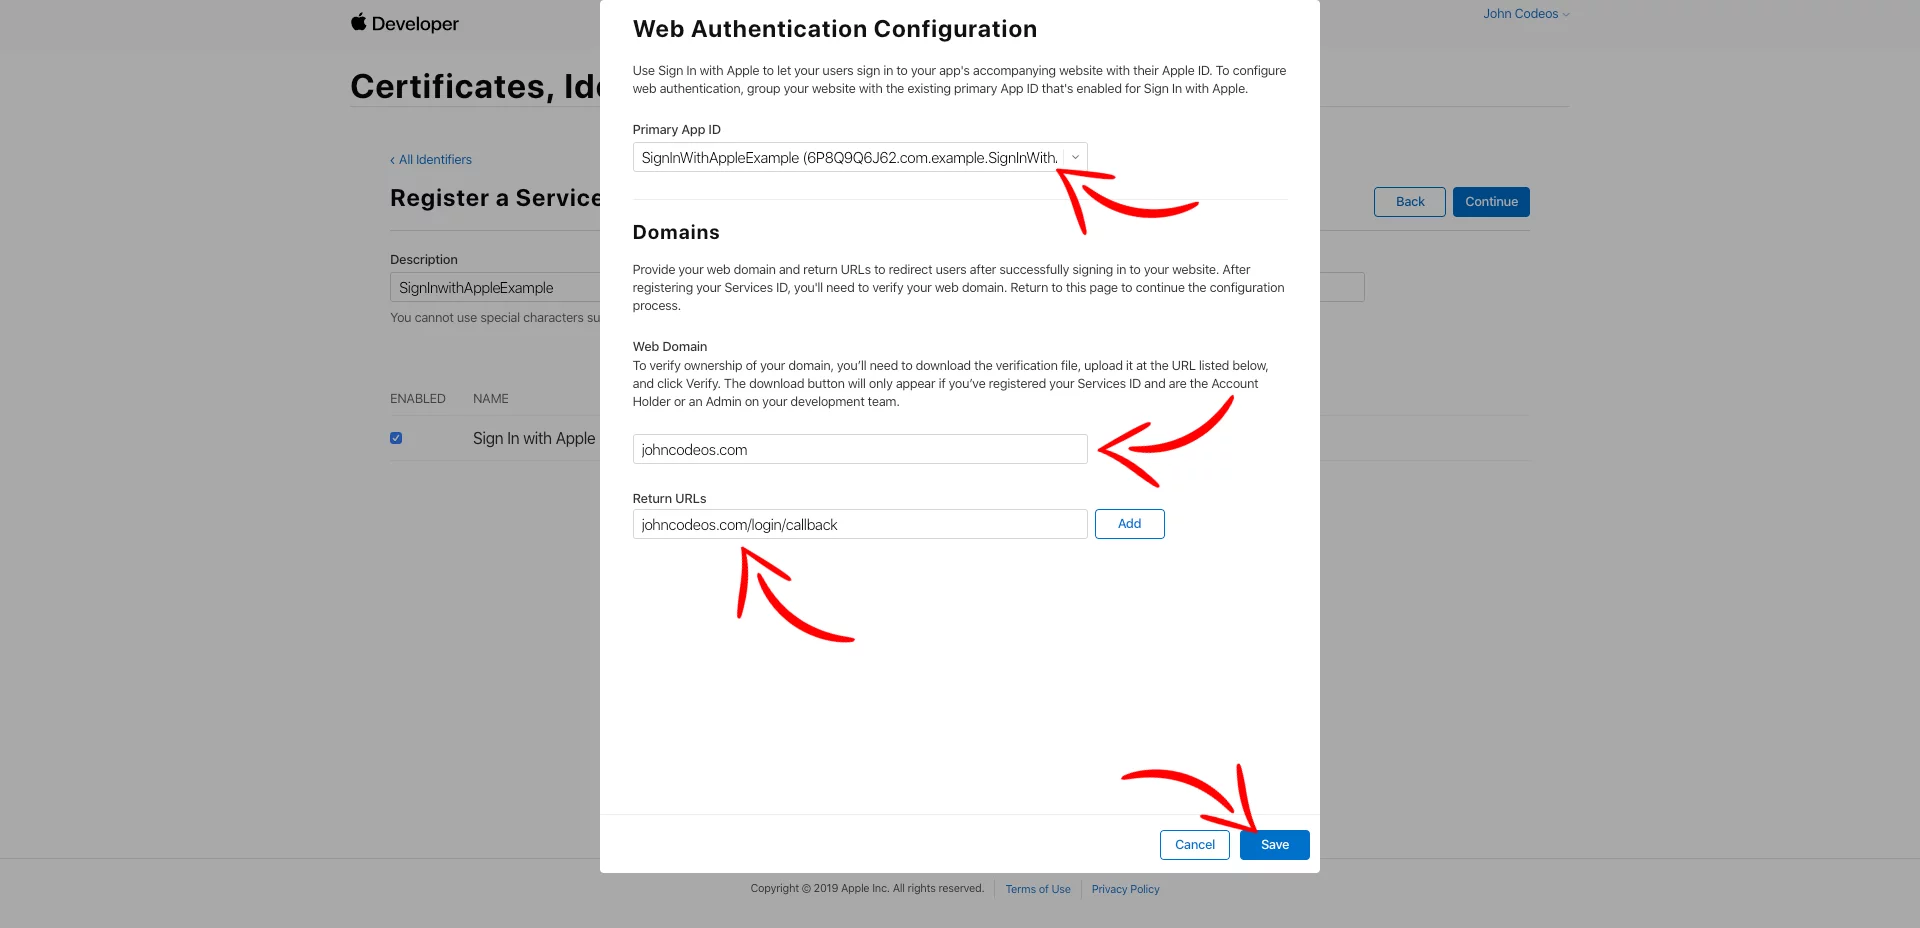
In the new window, choose your Primary App ID, add your verified domain name, your Callback URL in the Return URLs field (I’ll show you later how to set up your backend server), press Save, and then Continue.
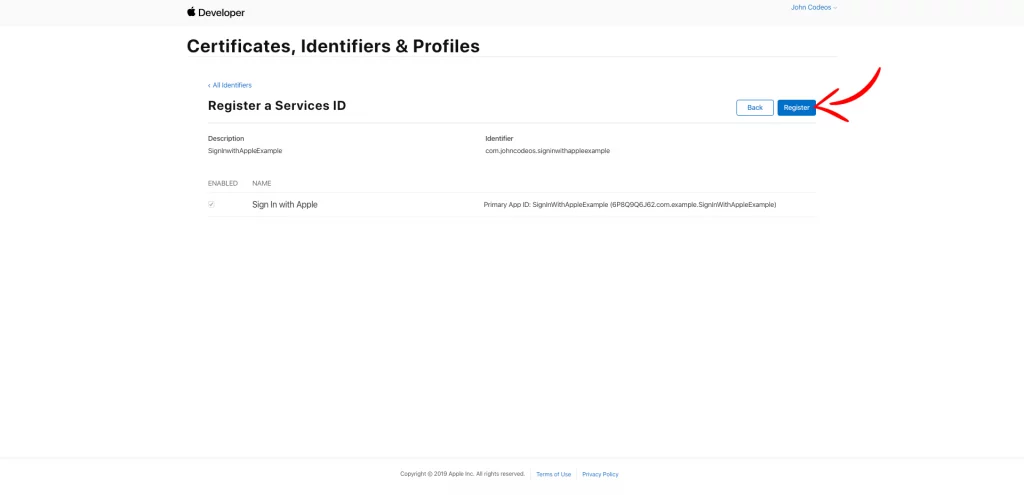
Press Register
Step 2: Setup the backend server
When the user gives access to the app, Apple makes a POST request to the Callback URL you added before.
To ‘catch’ user’s info and authorization code, you need to have a back-end server.
I already made a Node Js app to run on your backend server.
I suppose you already have a server (I’m using a $5 droplet from DigitalOcean) with Node Js and Nginx installed.
Login to your server through the Terminal and run the next command.
$ git clone https://github.com/johncodeos-blog/SignInWithAppleBackendServer sign-in-with-appleCode language: Swift (swift)
Change the directory and install the app.
$ cd sign-in-with-apple
$ npm install
Edit the .env file
$ nano .env
How to get the Private Key .p8 file
Copy the .p8 file you downloaded before (when you created the Key) and paste it inside the sign-in-with-apple folder through FTP. Copy the name of the file including the extension .p8 and replace the YOUR_PRIVATE_KEY_FILE
How to get the Key ID
Go into your Apple Developer Account, select Certificates, Identifiers & Profiles, choose Keys on the left, and then select your app from the list. On the new page, copy the Key ID and replace the YOUR_KEY_ID
How to get the Team ID
Go into your Apple Developer Account, choose Membership from the left menu, copy the Team ID and replace the YOUR_TEAM_ID

How to get the Service ID
Go into your Apple Developer Account, choose Certificates, Identifiers & Profiles, then choose Identifiers on the left, change to Service IDs on the top right corner, and copy the IDENTIFIER and replace the YOUR_SERVICE_ID

After all that, your file will look like this.

Save the file by pressing control+X, then press Y and Enter
Now, you can start the Node Js app by running the following command inside the sign-in-with-apple folder.
$ npm start
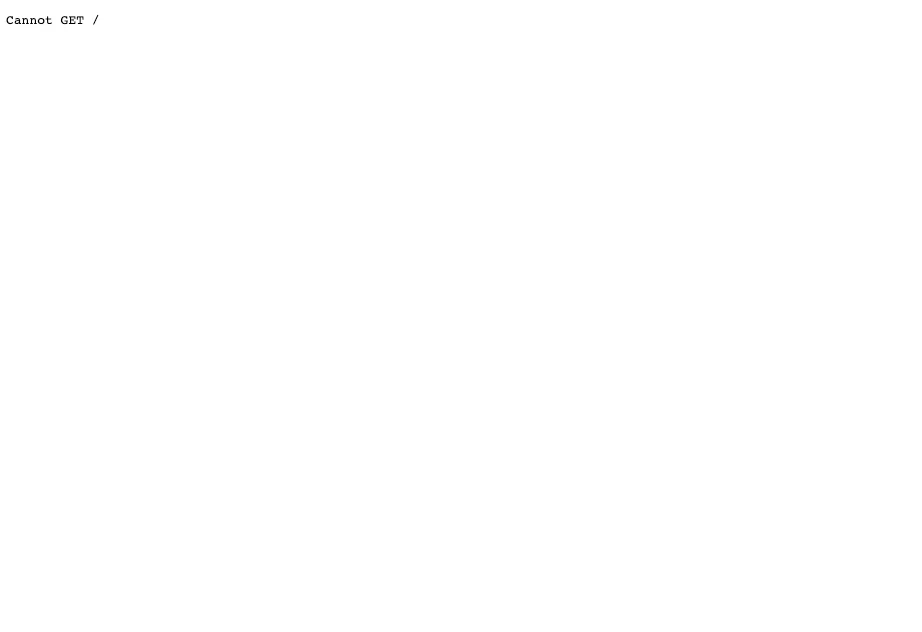
You can test if everything setup correctly by visiting the URL: http://ADD_YOUR_SERVER_IP_HERE:3000 and you’ll see the text Cannot GET / at the top left of your page.
Apple doesn’t allow IP’s or localhost as a Callback URL, so you need to use a domain name.
Stop the app from running by pressing control+C and run the following command.
$ sudo nano /etc/nginx/sites-available/ADD_YOUR_DOMAIN_NAME.comInside the server brackets add the following.
server {
        # ...
        location /login/callback {
                proxy_set_header X-Real-IP $remote_addr;
                proxy_set_header X-Forwarded-For $proxy_add_x_forwarded_for;
                proxy_set_header X-NginX-Proxy true;
                proxy_pass http://localhost:3000/callback;
                proxy_ssl_session_reuse off;
                proxy_set_header Host $http_host;
                proxy_redirect off;
        }
        # ...
}Code language: Swift (swift)
Save the file and restart the Nginx server.
$ sudo /etc/init.d/nginx restartCode language: Swift (swift)Go back and run the app again, and test if it’s working by visiting the URL: https://MY_DOMAIN_NAME.com/login/callback
To keep the app running, even if you close the terminal, install the process manager pm2
$ npm install pm2 -gAfter you installed pm2, run the following command in your root folder…
$ nano ecosystem.json…and paste the following code inside.
{
  "apps": [
    {
      "name": "sign-in-with-apple-server",
      "script": "/root/sign-in-with-apple",
      "watch": false,
      "env": {
        "PRIVATE_KEY_FILE": "YOUR_PRIVATE_KEY_FILE",
        "KEY_ID": "YOUR_KEY_ID",
        "TEAM_ID": "YOUR_TEAM_ID",
        "SERVICE_ID": "YOUR_SERVICE_ID",
        "PORT": 3000
      },
      "merge_logs": true,
      "cwd": "/root"
    }
  ]
}Code language: Swift (swift)
Replace all the fields, as you did in the .env before and save it.
Now you can run the app again with the following command.
$ pm2 start ecosystem.json
To keep the app running, even when the server restarts, run the following command.
$ pm2 saveStep 3: Add ‘Sign in with Apple’ Button
Go to the build.gradle file of your project and add the following dependency:
dependencies {
    // ...
    implementation 'org.jetbrains.kotlinx:kotlinx-coroutines-android:1.4.0'
    // ...
}Code language: Kotlin (kotlin)
Then, add a Button to your XML file. In this example, we have a button in the middle of the activity_main.xml
<?xml version="1.0" encoding="utf-8"?>
<RelativeLayout xmlns:android="http://schemas.android.com/apk/res/android"
    xmlns:tools="http://schemas.android.com/tools"
    android:layout_width="match_parent"
    android:layout_height="match_parent"
    android:background="@color/colorPrimaryDark"
    tools:context=".MainActivity">
    <Button
        android:id="@+id/apple_login_btn"
        android:layout_width="wrap_content"
        android:layout_height="wrap_content"
        android:layout_centerInParent="true"
        android:background="@drawable/rounded_corners"
        android:drawableStart="@drawable/apple_icon"
        android:drawablePadding="8dp"
        android:padding="8dp"
        android:text="Sign In with Apple"
        android:textAllCaps="false"
        android:textColor="@android:color/black"
        android:textStyle="bold" />
</RelativeLayout>Code language: HTML, XML (xml)
Create a new Kotlin object file by right-clicking your app’s package name on the left side and go New > Kotlin File/Class
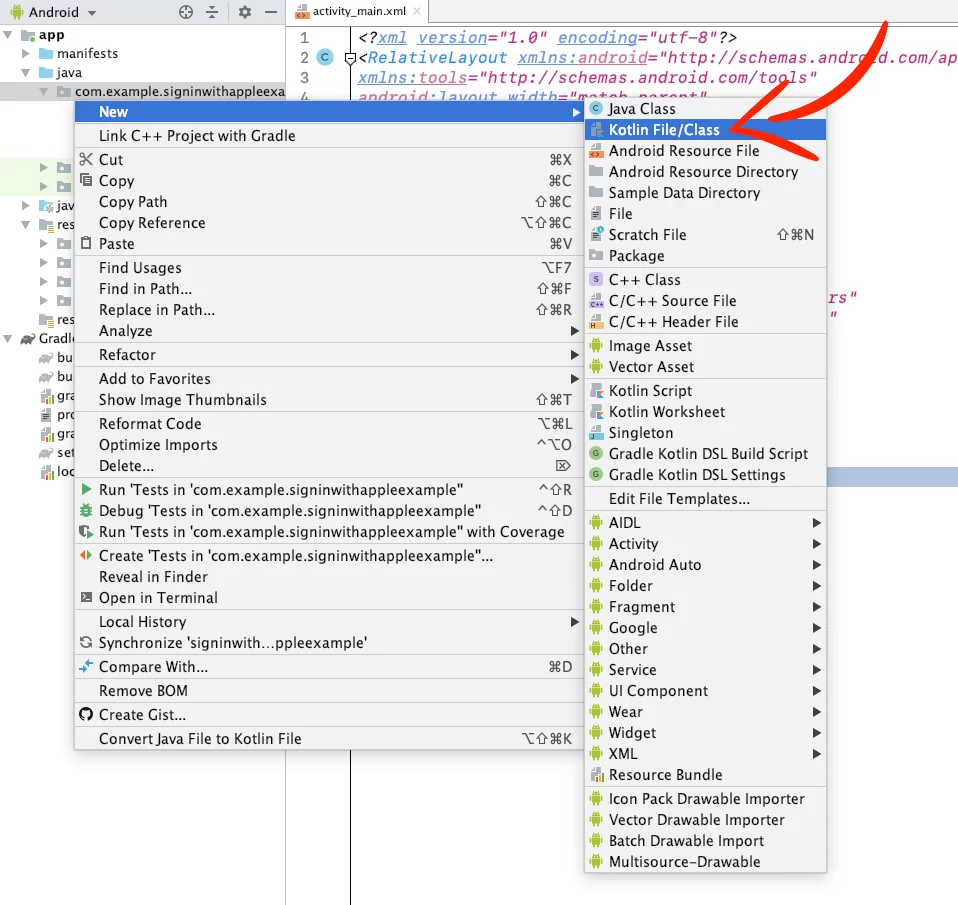
Give it the name AppleConstants, choose Object and press OK.

Inside the new file, copy and paste the following code and replace the CLIENT_ID (Service ID) and REDIRECT_URI with yours.
object AppleConstants {
    val CLIENT_ID = "MY_CLIENT_ID"
    val REDIRECT_URI = "MY_REDIRECT_URI"
    val SCOPE = "name%20email"
    val AUTHURL = "https://appleid.apple.com/auth/authorize"
    val TOKENURL = "https://appleid.apple.com/auth/token"
}Code language: Kotlin (kotlin)
In your AndroidManifest.xml file, add internet permission.
<uses-permission android:name="android.permission.INTERNET" />Code language: HTML, XML (xml)In the Kotlin class of your Activity (In this example is the MainActivity), add a listener to your button, and create a Dialog with a WebView inside.
lateinit var appleAuthURLFull: String
lateinit var appledialog: Dialog
lateinit var appleAuthCode: String
lateinit var appleClientSecret: String
override fun onCreate(savedInstanceState: Bundle?) {
    super.onCreate(savedInstanceState)
    setContentView(R.layout.activity_main)
    val state = UUID.randomUUID().toString()
    appleAuthURLFull =
            AppleConstants.AUTHURL + "?client_id=" + AppleConstants.CLIENT_ID + "&redirect_uri=" + AppleConstants.REDIRECT_URI + "&response_type=code&scope=" + AppleConstants.SCOPE + "&response_mode=form_post&state=" + state
    apple_login_btn.setOnClickListener {
        setupAppleWebviewDialog(appleAuthURLFull)
    }
}
// Show 'Sign in with Apple' login page in a dialog
@SuppressLint("SetJavaScriptEnabled")
fun setupAppleWebviewDialog(url: String) {
    appledialog = Dialog(this)
    val webView = WebView(this)
    webView.isVerticalScrollBarEnabled = false
    webView.isHorizontalScrollBarEnabled = false
    webView.webViewClient = AppleWebViewClient()
    webView.settings.javaScriptEnabled = true
    webView.loadUrl(url)
    appledialog.setContentView(webView)
    appledialog.show()
}Code language: Kotlin (kotlin)
This WebView uses a custom WebViewClient, named AppleWebViewClient.
This helps to ‘catch’ the URL with the Authorization Code, First name, Last name, Email, and Client Secret after the user has given access to your app.
IMPORTANT: Only when the user gives access to your app for the first time the callback URL returns the user’s info (First name, Last name, and Email). All the other times, it only returns the Authorization Code and the Client Secret. This is the way ‘Sign in with Apple’ works.
// A client to know about WebView navigation
// For API 21 and above
@Suppress("OverridingDeprecatedMember")
inner class AppleWebViewClient : WebViewClient() {
    @TargetApi(Build.VERSION_CODES.LOLLIPOP)
    override fun shouldOverrideUrlLoading(view: WebView?, request: WebResourceRequest?): Boolean {
        if (request?.url.toString().startsWith(AppleConstants.REDIRECT_URI)) {
            handleUrl(request?.url.toString())
            // Close the dialog after getting the authorization code
            if (request.url.toString().contains("success=")) {
                appledialog.dismiss()
            }
            return true
        }
        return true
    }
    // For API 19 and below
    override fun shouldOverrideUrlLoading(view: WebView, url: String): Boolean {
        if (url.startsWith(AppleConstants.REDIRECT_URI)) {
            handleUrl(url)
            // Close the dialog after getting the authorization code
            if (url.contains("success=")) {
                appledialog.dismiss()
            }
            return true
        }
        return false
    }
    @SuppressLint("ClickableViewAccessibility")
    override fun onPageFinished(view: WebView?, url: String?) {
        super.onPageFinished(view, url)
        // retrieve display dimensions
        val displayRectangle = Rect()
        val window = this@MainActivity.window
        window.decorView.getWindowVisibleDisplayFrame(displayRectangle)
        // Set height of the Dialog to 90% of the screen
        val layoutParams = view?.layoutParams
        layoutParams?.height = (displayRectangle.height() * 0.9f).toInt()
        view?.layoutParams = layoutParams
    }
    // Check WebView url for access token code or error
    @SuppressLint("LongLogTag")
    private fun handleUrl(url: String) {
        val uri = Uri.parse(url)
        val success = uri.getQueryParameter("success")
        if (success == "true") {
            // Get the Authorization Code from the URL
            appleAuthCode = uri.getQueryParameter("code") ?: ""
            Log.i("Apple Code: ", appleAuthCode)
            // Get the Client Secret from the URL
            appleClientSecret = uri.getQueryParameter("client_secret") ?: ""
            Log.i("Apple Client Secret: ", appleClientSecret)
            //Check if user gave access to the app for the first time by checking if the url contains their email
            if (url.contains("email")) {
                //Get user's First Name
                val firstName = uri.getQueryParameter("first_name")
                Log.i("Apple User First Name: ", firstName ?: "")
                //Get user's Middle Name
                val middleName = uri.getQueryParameter("middle_name")
                Log.i("Apple User Middle Name: ", middleName ?: "")
                //Get user's Last Name
                val lastName = uri.getQueryParameter("last_name")
                Log.i("Apple User Last Name: ", lastName ?: "")
                //Get user's email
                val email = uri.getQueryParameter("email")
                Log.i("Apple User Email: ", email ?: "Not exists")
            }
            // Exchange the Auth Code for Access Token
            requestForAccessToken(appleAuthCode, appleClientSecret)
        } else if (success == "false") {
            Log.e("ERROR", "We couldn't get the Auth Code")
        }
    }
}Code language: Kotlin (kotlin)
Now, you need to exchange the Authorization Code for an Access Token by making a POST request using the Authorization Code, Redirect URI, Client ID (Service ID), and Client Secret you get before.
After the request, you get the Access Token and the ID Token
You split the ID Token using the dot (.) as a separator, and you take the 2nd part.
You decode it using Base64, and you get the User ID as a result along with other user’s info, like email (but you already get that from the URL before).
private fun requestForAccessToken(code: String, clientSecret: String) {
    val grantType = "authorization_code"
    val postParamsForAuth =
        "grant_type=" + grantType + "&code=" + code + "&redirect_uri=" + AppleConstants.REDIRECT_URI + "&client_id=" + AppleConstants.CLIENT_ID + "&client_secret=" + clientSecret
     CoroutineScope(Dispatchers.Default).launch {
        val httpsURLConnection =
            withContext(Dispatchers.IO) { URL(AppleConstants.TOKENURL).openConnection() as HttpsURLConnection }
        httpsURLConnection.requestMethod = "POST"
        httpsURLConnection.setRequestProperty(
            "Content-Type",
            "application/x-www-form-urlencoded"
        )
        httpsURLConnection.doInput = true
        httpsURLConnection.doOutput = true
        withContext(Dispatchers.IO) {
            val outputStreamWriter = OutputStreamWriter(httpsURLConnection.outputStream)
            outputStreamWriter.write(postParamsForAuth)
            outputStreamWriter.flush()
        }
        val response = httpsURLConnection.inputStream.bufferedReader()
            .use { it.readText() }  // defaults to UTF-8
        val jsonObject = JSONTokener(response).nextValue() as JSONObject
        val accessToken = jsonObject.getString("access_token") // Here is the access token
        Log.i("Apple Access Token is: ", accessToken)
        val expiresIn = jsonObject.getInt("expires_in") // When the access token expires
        Log.i("expires in: ", expiresIn.toString())
        val refreshToken = jsonObject.getString("refresh_token") // The refresh token used to regenerate new access tokens. Store this token securely on your server.
        Log.i("refresh token: ", refreshToken)

        val idToken = jsonObject.getString("id_token") // A JSON Web Token that contains the user’s identity information.
        Log.i("ID Token: ", idToken)
        // Get encoded user id by splitting idToken and taking the 2nd piece
        val encodedUserID = idToken.split(".")[1]
        // Decode encoded UserID to JSON
        val decodedUserData = String(Base64.decode(encodedUserID, Base64.DEFAULT))
        val userDataJsonObject = JSONObject(decodedUserData)
        // Get User's ID
        val userId = userDataJsonObject.getString("sub")
        Log.i("Apple User ID :", userId)
    }
}Code language: Kotlin (kotlin)
Checking User’s Logging state
To check the user’s logging state, we need to check the refresh token once a day, as Apple says. If we do it more than once, Apple’s servers may throttle our verify call.
To verify the refresh token, we need to save the Client Secret and the Refresh Token, using SharedPreferences, during the authorization process.
Go to the handleUrl method and add the following lines to save the Client Secret:
// Check webview url for access token code or error
private fun handleUrl(url: String) {
    val uri = Uri.parse(url)
    val success = uri.getQueryParameter("success")
    if (success == "true") {
        // ...
        // Save the Client Secret (appleClientSecret) using SharedPreferences
        // This will allow us to verify if refresh Token is valid every time they open the app after cold start.
        val sharedPref = getPreferences(Context.MODE_PRIVATE)
        sharedPref.edit().putString("client_secret", appleClientSecret).apply()
        // ...
    } else if (success == "false") {
        Log.e("ERROR", "We couldn't get the Auth Code")
    }
}Code language: Kotlin (kotlin)
And for the Refresh Token go to the requestForAccessToken method
private fun requestForAccessToken(code: String, clientSecret: String) {
    val grantType = "authorization_code"
    val postParamsForAuth =
        "grant_type=" + grantType + "&code=" + code + "&redirect_uri=" + AppleConstants.REDIRECT_URI + "&client_id=" + AppleConstants.CLIENT_ID + "&client_secret=" + clientSecret
    CoroutineScope(Dispatchers.Default).launch {
        // ...
        // Save the RefreshToken Token (refreshToken) using SharedPreferences
        // This will allow us to verify if refresh Token is valid every time they open the app after cold start.
        val sharedPref = getPreferences(Context.MODE_PRIVATE)
        sharedPref.edit().putString("refresh_token", refreshToken ?: "").apply()
        // ...
    }
}Code language: Kotlin (kotlin)
After we saved the Client Secret and Refresh Token, create a new method called verifyRefreshToken that returns a Boolean (true=valid, false= invalid)
private suspend fun verifyRefreshToken(): Boolean {
        // Verify Refresh Token only once a day
        val sharedPref = this.getPreferences(Context.MODE_PRIVATE)
        val refreshToken = sharedPref.getString("refresh_token", "")
        val clientSecret = sharedPref.getString("client_secret", "")
        val postParamsForAuth =
            "grant_type=refresh_token" + "&client_id=" + AppleConstants.CLIENT_ID + "&client_secret=" + clientSecret + "&refresh_token=" + refreshToken
        val httpsURLConnection =
            withContext(Dispatchers.IO) { URL(AppleConstants.TOKENURL).openConnection() as HttpsURLConnection }
        httpsURLConnection.requestMethod = "POST"
        httpsURLConnection.setRequestProperty(
            "Content-Type",
            "application/x-www-form-urlencoded"
        )
        httpsURLConnection.doInput = true
        httpsURLConnection.doOutput = true
        withContext(Dispatchers.IO) {
            val outputStreamWriter = OutputStreamWriter(httpsURLConnection.outputStream)
            outputStreamWriter.write(postParamsForAuth)
            outputStreamWriter.flush()
        }
        try {
            val response = httpsURLConnection.inputStream.bufferedReader()
                .use { it.readText() }  // defaults to UTF-8
            val jsonObject = JSONTokener(response).nextValue() as JSONObject
            val newAccessToken = jsonObject.getString("access_token")
            //Replace the Access Token on your server with the new one
            Log.d("New Access Token: ", newAccessToken)
            return true
        } catch (e: Exception) {
            Log.e("ERROR: ", "Refresh Token has expired or user revoked app credentials")
            return false
        }
    }Code language: Kotlin (kotlin)
As I said at the beginning, we need to call this method only once a day.
We can do this by checking the current time to see if 24 hours have passed from the previous call.
suspend fun isLoggedIn(): Boolean {
    val sharedPref = this.getPreferences(Context.MODE_PRIVATE)
    val expireTime = sharedPref.getLong("verify_refresh_token_timer", 0)
    val currentTime = System.currentTimeMillis() / 1000L // Check the current Unix Time
    if (currentTime >= expireTime) {
        // After 24 hours validate the Refresh Token and generate new Access Token
        val untilUnixTime = currentTime + (60 * 60 * 24) // Execute the method after 24 hours again
        sharedPref.edit().putLong("verify_refresh_token_timer", untilUnixTime).apply()
        return verifyRefreshToken()
    } else {
        return true
    }
}Code language: Kotlin (kotlin)
Last, in the onCreate call the isLoggedIn method to check if the refresh token is valid or not every time the app starts.
class MainActivity : AppCompatActivity() {
    override fun onCreate(savedInstanceState: Bundle?) {
        super.onCreate(savedInstanceState)
        setContentView(R.layout.activity_main)
        // ...
        CoroutineScope(Dispatchers.Default).launch {
            val results = CoroutineScope(Dispatchers.IO).async { isLoggedIn() }
            val result = results.await()
            if (result) {
                // Show the Activity with the logged in user
                Log.d("LoggedIn?: ", "YES")
            } else {
                // Show the Home Activity
                Log.d("LoggedIn?: ", "NO")
            }
        }
    }
}Code language: Kotlin (kotlin)
Revoking access
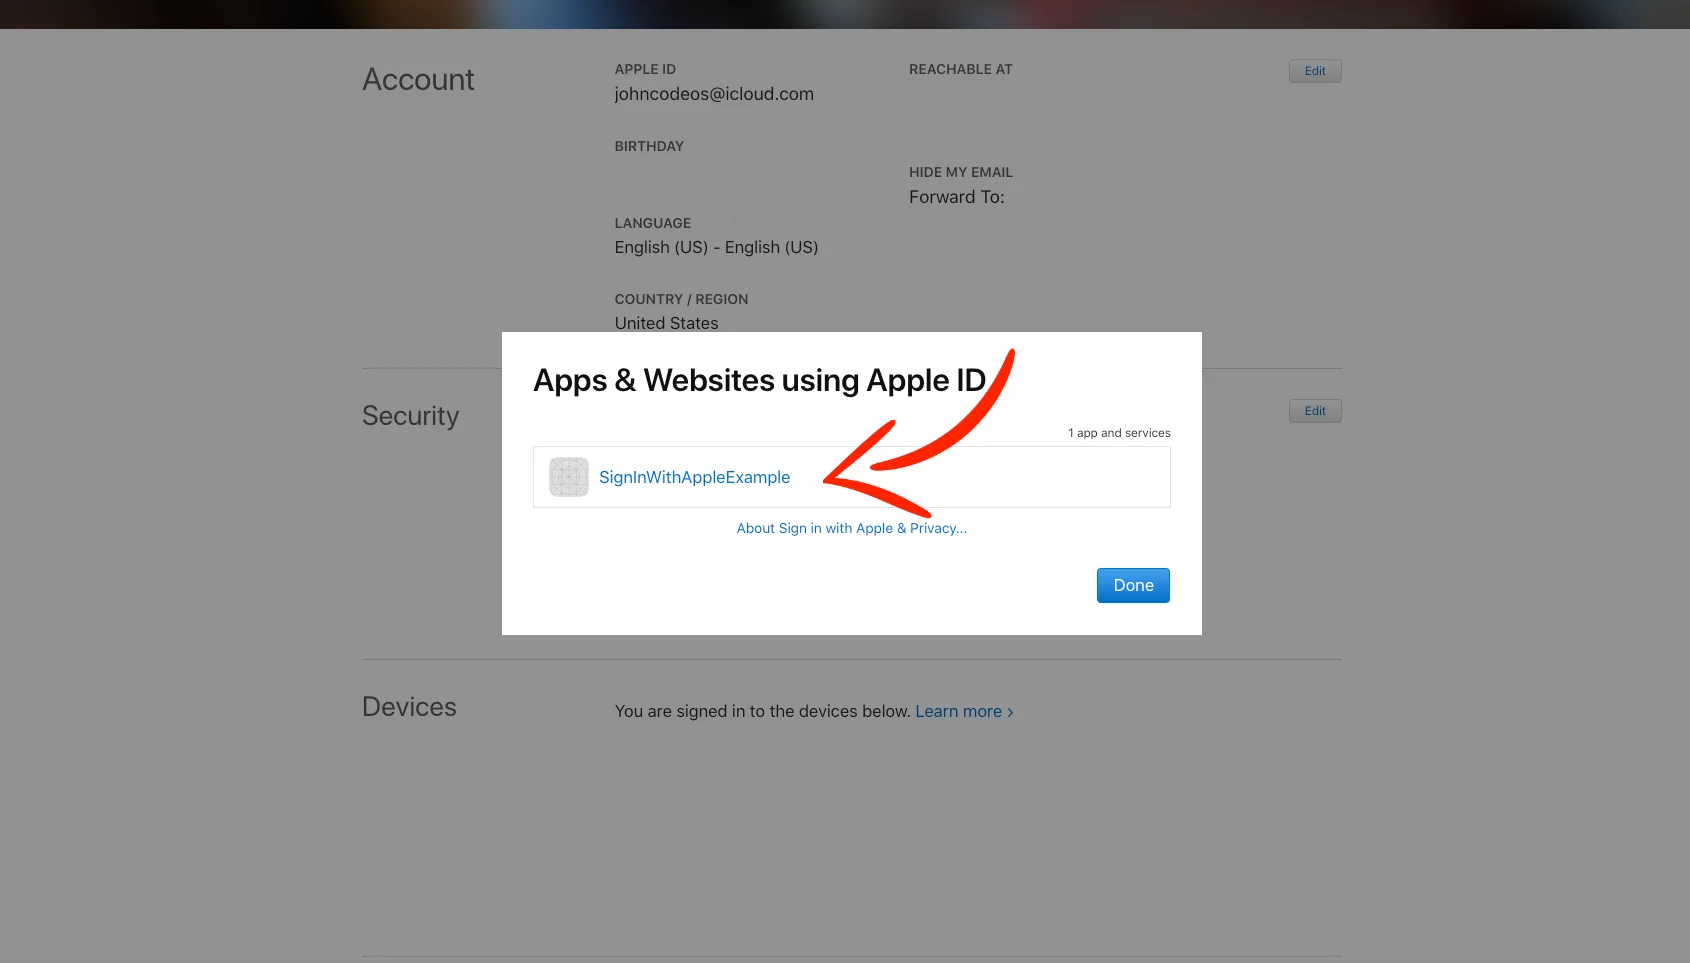
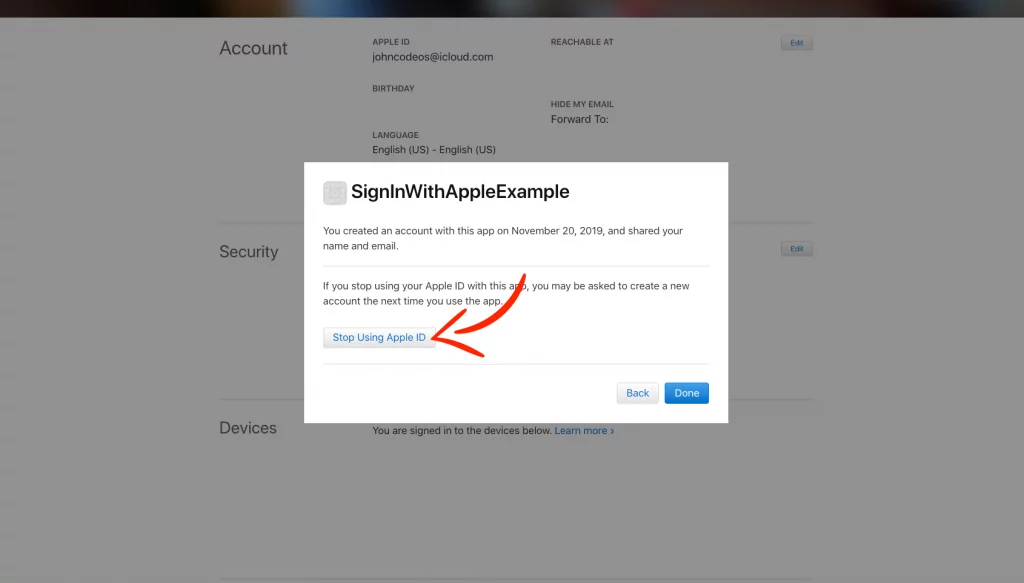
If you want to test the authorization process or the validation or the refresh token again, revoke the app permissions from your Apple ID by going to http://appleid.apple.com, log in with your account, under the APPS & WEBSITES USING APPLE ID press Manage…, choose your app, and press Stop Using Apple ID.
You can find the final project here
If you have any questions, please feel free to leave a comment below