
Last updated on: May 27, 2023
Today, I’m going to show you how to add a UICollectionView inside UITableView.
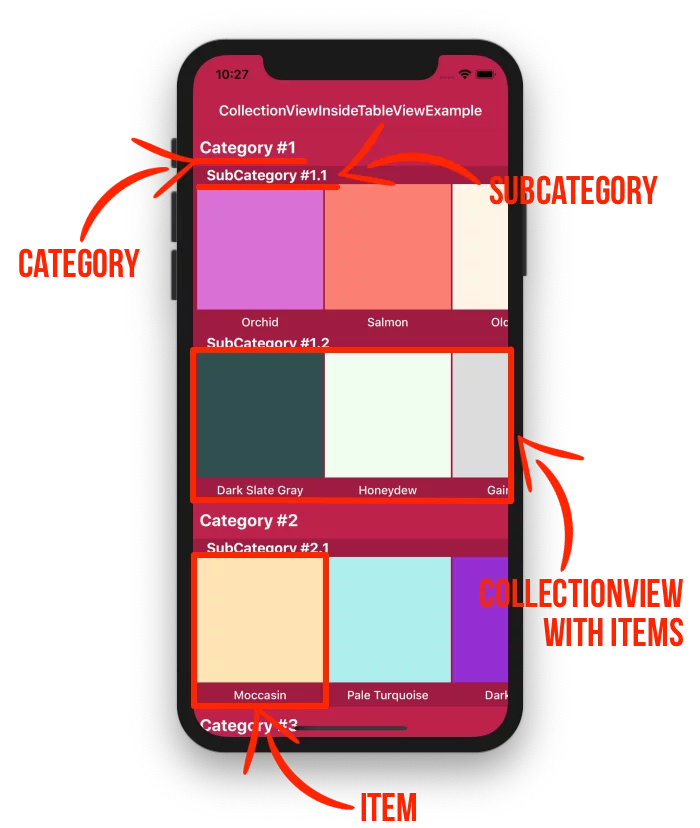
In this example, we have categories, and inside the categories we have a different number of subcategories.
Each subcategory has a UICollectionView and shows the items horizontally.
Every item(UICollectionViewCell) has a UIView to show the color and a UILabel for the name of the color.
Contents
Prepare the data
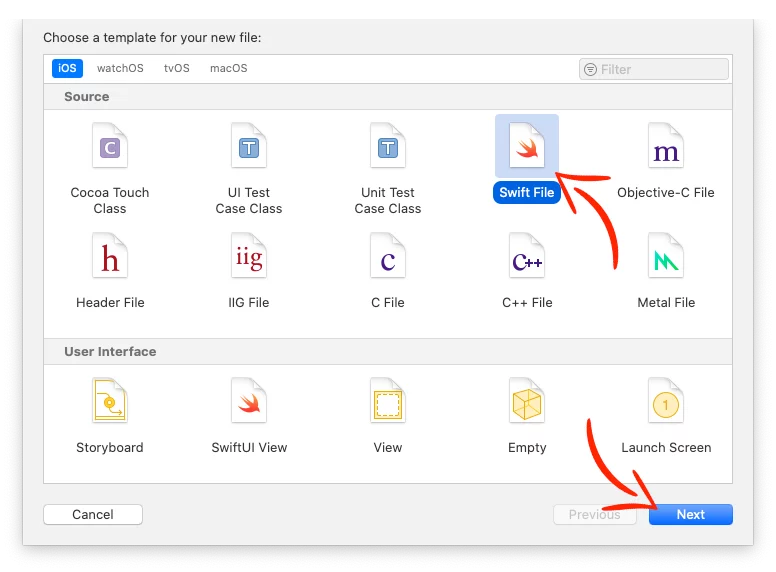
Before we start, create a swift file with a name Colors and paste the following data we’re going to use in this example.
import Foundation
import UIKit
struct Colors {
    var objectsArray = [
        TableViewCellModel(
            category: "Category #1",
            subcategory: ["SubCategory #1.1", "SubCategory #1.2"],
            colors: [
                // SubCategory #1.1
                [CollectionViewCellModel(color: UIColor.colorFromHex("#DA70D6"), name: "Orchid"),
                 CollectionViewCellModel(color: UIColor.colorFromHex("#FA8072"), name: "Salmon"),
                 CollectionViewCellModel(color: UIColor.colorFromHex("#FDF5E6"), name: "Old Lace"),
                 CollectionViewCellModel(color: UIColor.colorFromHex("#00FFFF"), name: "Aqua"),
                 CollectionViewCellModel(color: UIColor.colorFromHex("#2E8B57"), name: "Sea Green")],
                // SubCategory #1.2
                [CollectionViewCellModel(color: UIColor.colorFromHex("#2F4F4F"), name: "Dark Slate Gray"),
                 CollectionViewCellModel(color: UIColor.colorFromHex("#F0FFF0"), name: "Honeydew"),
                 CollectionViewCellModel(color: UIColor.colorFromHex("#DCDCDC"), name: "Gainsboro")]
            ]),
        TableViewCellModel(
            category: "Category #2",
            subcategory: ["SubCategory #2.1"],
            colors: [
                // SubCategory #2.1
                [CollectionViewCellModel(color: UIColor.colorFromHex("#FFE4B5"), name: "Moccasin"),
                 CollectionViewCellModel(color: UIColor.colorFromHex("#AFEEEE"), name: "Pale Turquoise"),
                 CollectionViewCellModel(color: UIColor.colorFromHex("#9400D3"), name: "Dark Violet"),
                 CollectionViewCellModel(color: UIColor.colorFromHex("#3CB371"), name: "Medium Sea Green")]
            ]),
        TableViewCellModel(
            category: "Category #3",
            subcategory: ["SubCategory #3.1", "SubCategory #3.2"],
            colors: [
                // SubCategory #3.1
                [CollectionViewCellModel(color: UIColor.colorFromHex("#FF6347"), name: "Tomato"),
                 CollectionViewCellModel(color: UIColor.colorFromHex("#4682B4"), name: "Steel Blue"),
                 CollectionViewCellModel(color: UIColor.colorFromHex("#778899"), name: "Light Slate Gray"),
                 CollectionViewCellModel(color: UIColor.colorFromHex("#191970"), name: "Midnight Blue"),
                 CollectionViewCellModel(color: UIColor.colorFromHex("#A52A2A"), name: "Brown")],
                // SubCategory #3.2
                [CollectionViewCellModel(color: UIColor.colorFromHex("#FFF8DC"), name: "Cornsilk"),
                 CollectionViewCellModel(color: UIColor.colorFromHex("#FF00FF"), name: "Magenta"),
                 CollectionViewCellModel(color: UIColor.colorFromHex("#7CFC00"), name: "Lawn Green"),
                 CollectionViewCellModel(color: UIColor.colorFromHex("#000000"), name: "Black"),
                 CollectionViewCellModel(color: UIColor.colorFromHex("#00BFFF"), name: "Deep Sky Blue"),
                 CollectionViewCellModel(color: UIColor.colorFromHex("#6495ED"), name: "Cornflower Blue"),
                 CollectionViewCellModel(color: UIColor.colorFromHex("#FF8C00"), name: "Dark Orange"),
                 CollectionViewCellModel(color: UIColor.colorFromHex("#20B2AA"), name: "Light Sea Green"),
                 CollectionViewCellModel(color: UIColor.colorFromHex("#FFC0CB"), name: "Pink")]
            ]),
        TableViewCellModel(
            category: "Category #4",
            subcategory: ["SubCategory #4.1", "SubCategory #4.2"],
            colors: [
                // SubCategory #4.1
                [CollectionViewCellModel(color: UIColor.colorFromHex("#DDA0DD"), name: "Plum"),
                 CollectionViewCellModel(color: UIColor.colorFromHex("#FFF5EE"), name: "Seashell"),
                 CollectionViewCellModel(color: UIColor.colorFromHex("#FFDEAD"), name: "Navajo White"),
                 CollectionViewCellModel(color: UIColor.colorFromHex("#00FF00"), name: "Lime"),
                 CollectionViewCellModel(color: UIColor.colorFromHex("#F0E68C"), name: "Khaki")],
                // SubCategory #4.2
                [CollectionViewCellModel(color: UIColor.colorFromHex("#FAEBD7"), name: "Antique White"),
                 CollectionViewCellModel(color: UIColor.colorFromHex("#C71585"), name: "Medium Violet Red"),
                 CollectionViewCellModel(color: UIColor.colorFromHex("#6B8E23"), name: "Olive Drab"),
                 CollectionViewCellModel(color: UIColor.colorFromHex("#FF4500"), name: "Orange Red"),
                 CollectionViewCellModel(color: UIColor.colorFromHex("#FFF0F5"), name: "Lavender Blush")]
            ]),
        TableViewCellModel(
            category: "Category #5",
            subcategory: ["SubCategory #5.1", "SubCategory #5.2"],
            colors: [
                // SubCategory #5.1
                [CollectionViewCellModel(color: UIColor.colorFromHex("#9966CC"), name: "Amethyst")],
                // SubCategory #5.2
                [CollectionViewCellModel(color: UIColor.colorFromHex("#7B68EE"), name: "Medium Slate Blue"),
                 CollectionViewCellModel(color: UIColor.colorFromHex("#800000"), name: "Maroon"),
                 CollectionViewCellModel(color: UIColor.colorFromHex("#FFA07A"), name: "Light Salmon"),
                 CollectionViewCellModel(color: UIColor.colorFromHex("#E6E6FA"), name: "Lavender"),
                 CollectionViewCellModel(color: UIColor.colorFromHex("#FFE4C4"), name: "Bisque")]
            ])
    ]
}
extension UIColor {
    static func rgbColor(red: CGFloat, green: CGFloat, blue: CGFloat) -> UIColor {
        return UIColor(red: red / 255, green: green / 255, blue: blue / 255, alpha: 1.0)
    }

    static func colorFromHex(_ hex: String) -> UIColor {
        var hexString = hex.trimmingCharacters(in: .whitespacesAndNewlines).uppercased()
        if hexString.hasPrefix("#") {
            hexString.remove(at: hexString.startIndex)
        }
        if hexString.count != 6 {
            return UIColor.magenta
        }

        var rgb: UInt64 = 0
        Scanner(string: hexString).scanHexInt64(&rgb)

        return UIColor(red: CGFloat((rgb & 0xFF0000) >> 16) / 255,
                       green: CGFloat((rgb & 0x00FF00) >> 8) / 255,
                       blue: CGFloat(rgb & 0x0000FF) / 255,
                       alpha: 1.0)
    }
}Code language: Swift (swift)
Creating the TableView
Add an UITableView in your ViewController. In this example, the name of this ViewController is called TableView.
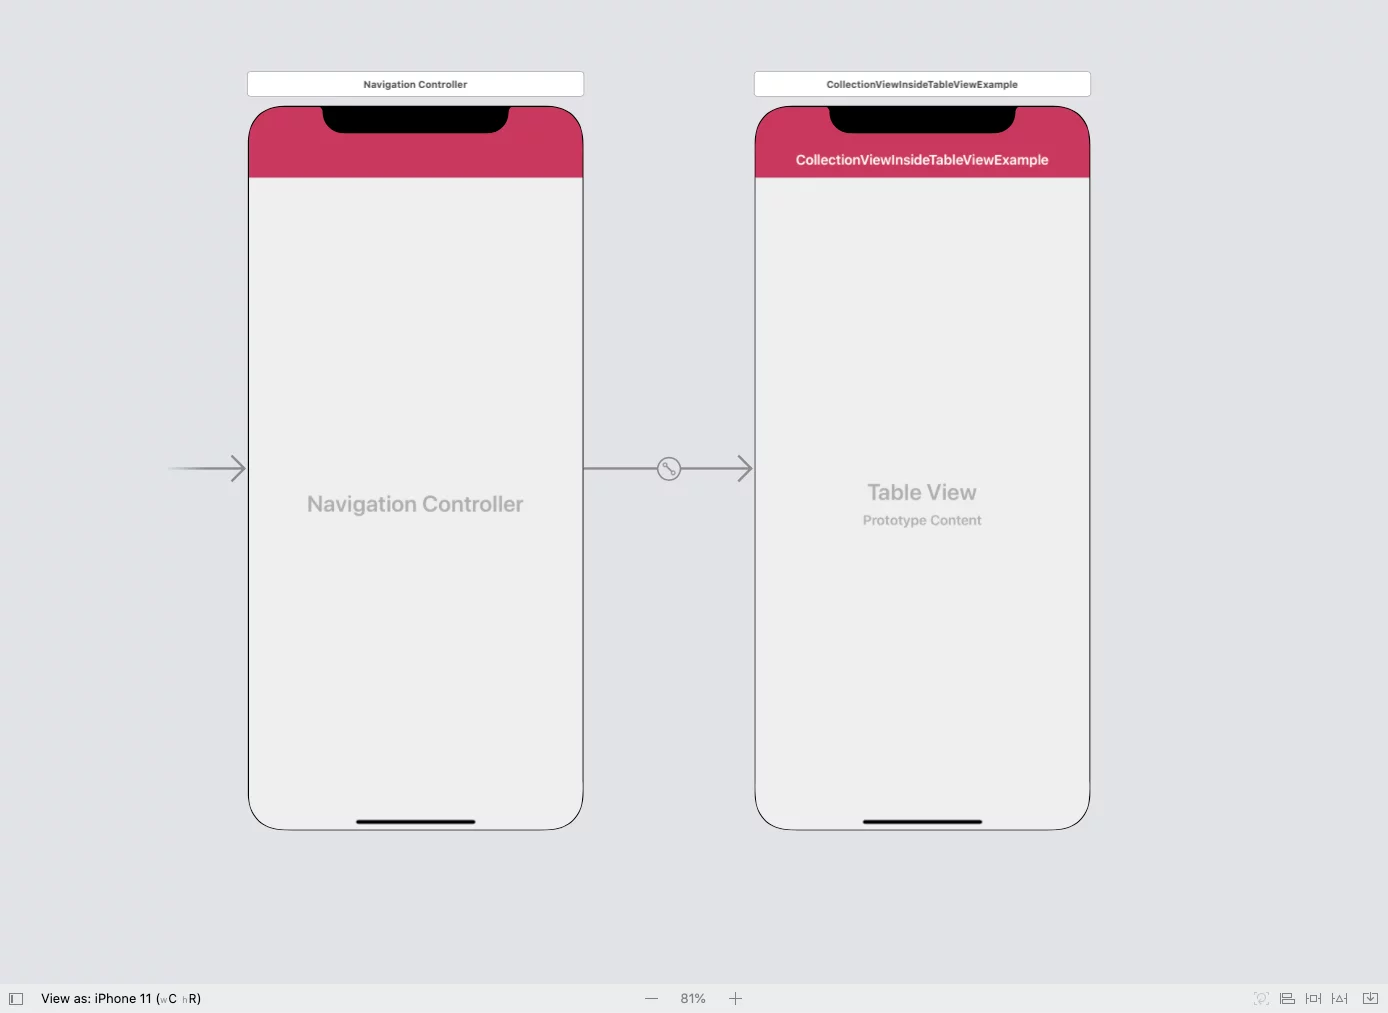
…and give the name tableView

Creating the TableView Cell
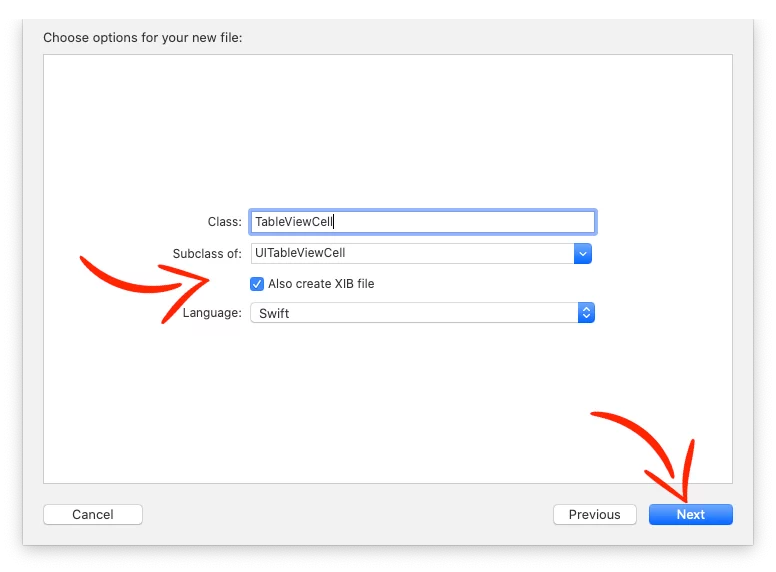
Create an UITableViewCell with XIB file.
Inside the UITableViewCell add an UILabel, which will be the title for the Subcategories and an UICollectionView for the items.

Add tableviewcellid as identifier

Creating the CollectionView Cell
Create an UICollectionViewCell with XIB file.

Add an UIView for the color and an UILabel for the color name.
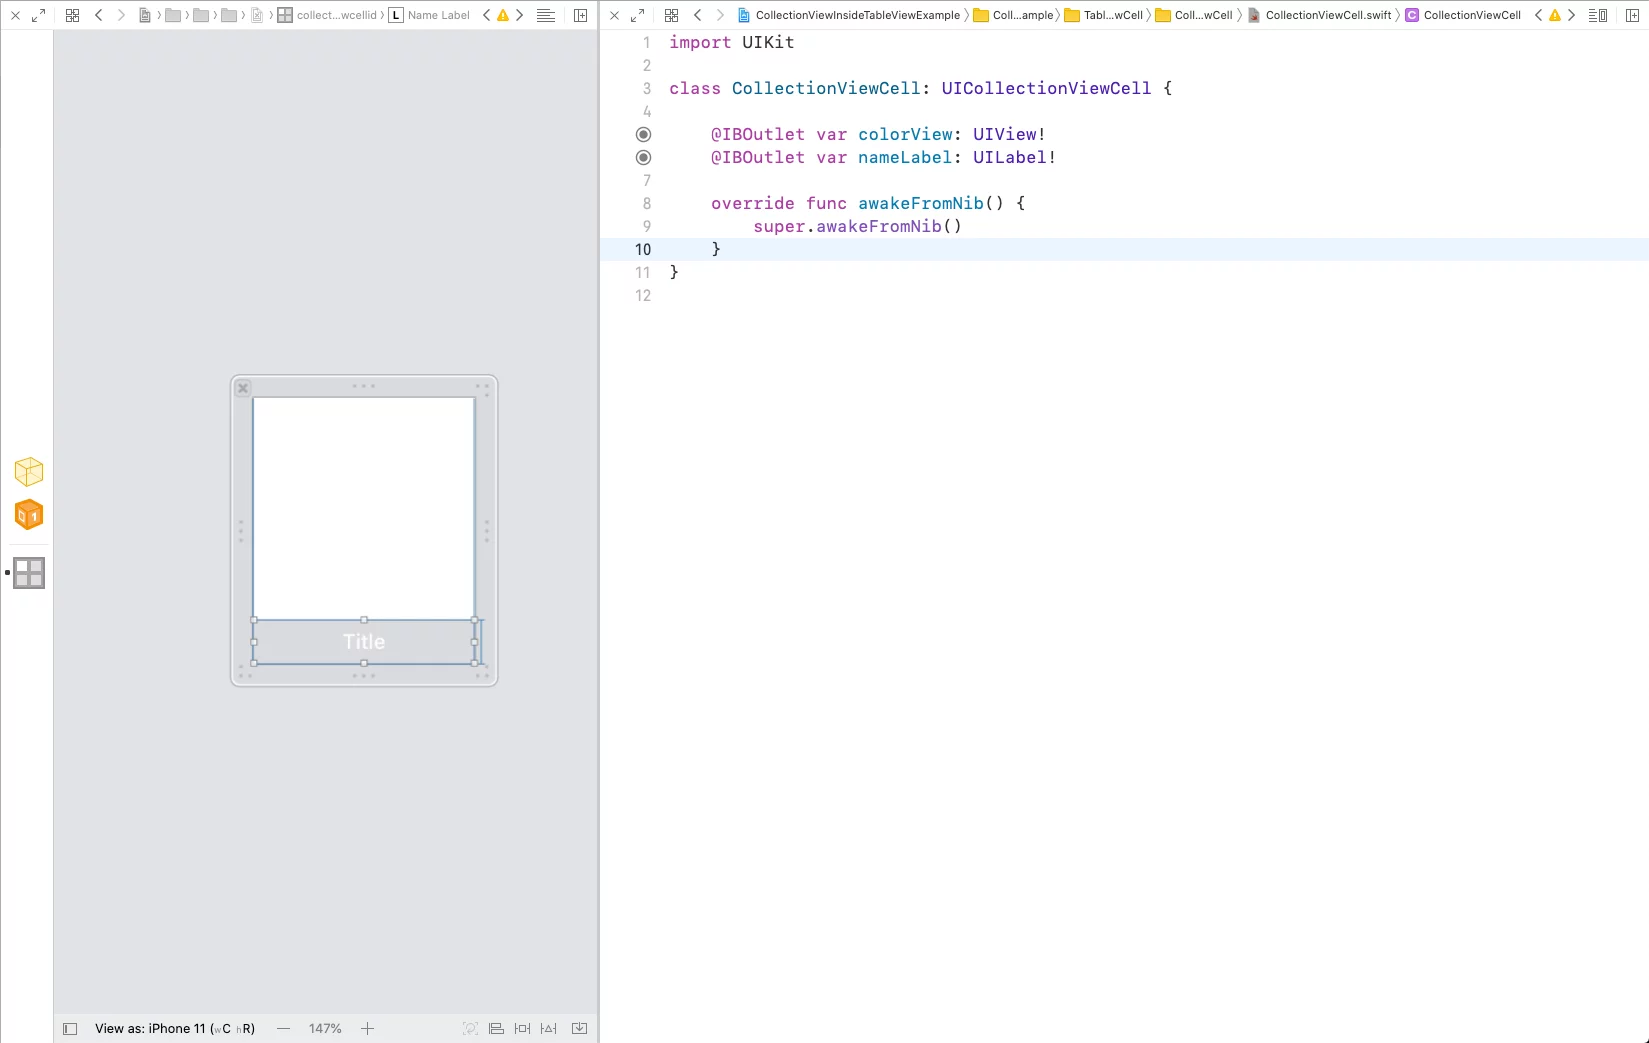
Add collectionviewcellid as identifier

Creating the Models
Create a new swift file and give the name TableViewCellModel. This will be the model for the TableViewCell.

…and paste the following code inside.
struct TableViewCellModel {
    var category: String
    var subcategory: [String]
    var colors: [[CollectionViewCellModel]]
}Code language: Swift (swift)
Do the same for the CollectionViewCell, giving the name CollectionViewCellModel
import Foundation
import UIKit
struct CollectionViewCellModel {
    var color: UIColor
    var name: String
}Code language: Swift (swift)
Setting up the TableView
Go back to the TableView and create an extension for UITableViewDelegate and UITableViewDataSource.
In this example, row’s height is 200, and header’s 44.
import UIKit
class TableView: UIViewController {

    @IBOutlet var tableView: UITableView!

    var colorsArray = Colors()

    override func viewDidLoad() {
        super.viewDidLoad()

        // Register the xib for tableview cell
        let cellNib = UINib(nibName: "TableViewCell", bundle: nil)
        self.tableView.register(cellNib, forCellReuseIdentifier: "tableviewcellid")
    }
}
extension TableView: UITableViewDelegate, UITableViewDataSource {


    func tableView(_ tableView: UITableView, numberOfRowsInSection section: Int) -> Int {
        return colorsArray.objectsArray[section].subcategory.count
    }

    func tableView(_ tableView: UITableView, heightForRowAt indexPath: IndexPath) -> CGFloat {
        return 200
    }

    // Category Title
    func tableView(_ tableView: UITableView, viewForHeaderInSection section: Int) -> UIView? {
        let headerView = UIView()
        headerView.backgroundColor = UIColor.green
        let titleLabel = UILabel(frame: CGRect(x: 8, y: 0, width: 200, height: 44))
        headerView.addSubview(titleLabel)
        titleLabel.textColor = UIColor.white
        titleLabel.font = UIFont.systemFont(ofSize: 20, weight: .bold)
        titleLabel.text = colorsArray.objectsArray[section].category
        return headerView
    }

    func tableView(_ tableView: UITableView, heightForHeaderInSection section: Int) -> CGFloat {
        return 44
    }

    func tableView(_ tableView: UITableView, cellForRowAt indexPath: IndexPath) -> UITableViewCell {
        if let cell = tableView.dequeueReusableCell(withIdentifier: "tableviewcellid") as? TableViewCell {
            // Show SubCategory Title
            let subCategoryTitle = colorsArray.objectsArray[indexPath.section].subcategory
            cell.subCategoryLabel.text = subCategoryTitle[indexPath.row]

            // Pass the data to colletionview inside the tableviewcell
            let rowArray = colorsArray.objectsArray[indexPath.section].colors[indexPath.row]
            cell.updateCellWith(row: rowArray)

            return cell
        }
        return UITableViewCell()
    }
}Code language: Swift (swift)
Setting up the TableView Cell
On the TableViewCell, declare a variable with a name row and a type [CollectionViewCellModel], which’ll be used to pass the data from the TableViewCell to the collectionView inside the cell.
Also create the flow layout of the collectionView programmatically.
class TableViewCell: UITableViewCell {

    var row: [CollectionViewCellModel]?

    override func awakeFromNib() {
        super.awakeFromNib()

        let flowLayout = UICollectionViewFlowLayout()
        flowLayout.scrollDirection = .horizontal
        flowLayout.itemSize = CGSize(width: 150, height: 180)
        flowLayout.minimumLineSpacing = 2.0
        flowLayout.minimumInteritemSpacing = 5.0
        self.collectionView.collectionViewLayout = flowLayout
        self.collectionView.showsHorizontalScrollIndicator = false

        // ...
    }
}Code language: Swift (swift)
In this example, the cell is 150 width and 180 height (150×150 is the box(UIView) for the color and 150×30 the size of the UILabel for the color name)
Set the dataSource and delegate for the collectionView and register the XIB for the CollectionViewCell
class TableViewCell: UITableViewCell {

    override func awakeFromNib() {
        super.awakeFromNib()

        // ...

        // Comment if you set Datasource and delegate in .xib
        self.collectionView.dataSource = self
        self.collectionView.delegate = self

        // Register the xib for collection view cell
        let cellNib = UINib(nibName: "CollectionViewCell", bundle: nil)
        self.collectionView.register(cellNib, forCellWithReuseIdentifier: "collectionviewcellid")
    }
}Code language: Swift (swift)
Create an extension of the TableViewCell for UICollectionViewDelegate, UICollectionViewDataSource and UICollectionViewDelegateFlowLayout
class TableViewCell: UITableViewCell {
    var rowWithColors: [CollectionViewCellModel]?
    // ...
}
extension TableViewCell: UICollectionViewDelegate, UICollectionViewDataSource, UICollectionViewDelegateFlowLayout {

    // The data we passed from the TableView send them to the CollectionView Model
    func updateCellWith(row: [CollectionViewCellModel]) {
        self.rowWithColors = row
        self.collectionView.reloadData()
    }

    func collectionView(_ collectionView: UICollectionView, numberOfItemsInSection section: Int) -> Int {
        return self.rowWithColors?.count ?? 0
    }

    func numberOfSections(in collectionView: UICollectionView) -> Int {
        return 1
    }

    // Set the data for each cell (color and color name)
    func collectionView(_ collectionView: UICollectionView, cellForItemAt indexPath: IndexPath) -> UICollectionViewCell {
        if let cell = collectionView.dequeueReusableCell(withReuseIdentifier: "collectionviewcellid", for: indexPath) as? CollectionViewCell {
            cell.colorView.backgroundColor = self.rowWithColors?[indexPath.item].color ?? UIColor.black
            cell.nameLabel.text = self.rowWithColors?[indexPath.item].name ?? ""
            return cell
        }
        return UICollectionViewCell()
    }

    // Add spaces at the beginning and the end of the collection view
    func collectionView(_ collectionView: UICollectionView, layout collectionViewLayout: UICollectionViewLayout, insetForSectionAt section: Int) -> UIEdgeInsets {
        return UIEdgeInsets(top: 0, left: 5, bottom: 0, right: 5)
    }
}Code language: Swift (swift)
Detecting which cell is tapped and passing the data
To detect which cell is tapped, go to TableViewCell and create a protocol with a name CollectionViewCellDelegate and inside there add a method that returns the cell (CollectionViewCell), the position(index) of this cell, and which TableViewCell is tapped.
Also declare the protocol CollectionViewCellDelegate as cellDelegate in your TableViewCell class
protocol CollectionViewCellDelegate: class {
    func collectionView(collectionviewcell: CollectionViewCell?, index: Int, didTappedInTableViewCell: TableViewCell)
    // other delegate methods that you can define to perform action in viewcontroller
}
class TableViewCell: UITableViewCell {

    weak var cellDelegate: CollectionViewCellDelegate?

    // ...
}Code language: Swift (swift)
In the extension of the TableViewCell you created earlier, add the method didSelectItemAt
extension TableViewCell: UICollectionViewDelegate, UICollectionViewDataSource, UICollectionViewDelegateFlowLayout {

    // ...

    func collectionView(_ collectionView: UICollectionView, didSelectItemAt indexPath: IndexPath) {
        let cell = collectionView.cellForItem(at: indexPath) as? CollectionViewCell
        self.cellDelegate?.collectionView(collectionviewcell: cell, index: indexPath.item, didTappedInTableViewCell: self)
    }

    // ...

}Code language: Swift (swift)
Every time the user presses a cell, it sends the data through the protocol.
To receive that data in the TableView (the ViewController with the UITableView), go back to the TableView and set the delegate of the cell (cellDelegate) inside the cellForRowAt method.
func tableView(_ tableView: UITableView, cellForRowAt indexPath: IndexPath) -> UITableViewCell {
        if let cell = tableView.dequeueReusableCell(withIdentifier: "tableviewcellid") as? TableViewCell {
            // ...

            // Set cell's delegate
            cell.cellDelegate = self

            // ...
            return cell
        }
        return UITableViewCell()
    }Code language: Swift (swift)
Lastly, create an extension for this delegate to receive the data.
extension TableView: CollectionViewCellDelegate {
    func collectionView(collectionviewcell: CollectionViewCell?, index: Int, didTappedInTableViewCell: TableViewCell) {
        if let colorsRow = didTappedInTableViewCell.rowWithColors {
            print("You tapped the cell \(index) in the row of colors \(colorsRow)")
            // You can also do changes to the cell you tapped using the 'collectionviewcell'
        }
    }
}Code language: Swift (swift)
That’s it!
You can find the final project here
If you have any questions, please feel free to leave a comment below