Last updated on: May 27, 2023
Passing data from a Fragment to another Fragment it’s not the same as passing data from one Activity to another. You need first to pass the data to Activity and then to the second Fragment.
If you have created your fragments and you just want to know how to pass data from one Fragment to another, skip the following step.
Contents
Creating Fragments
In this example, we have a fragment that contains an EditText, where we type a text and a Button that sends the text to the 2nd fragment and shows it in a TextView.
First, let’s go and create the layout of the fragment with the EditText and the Button (fragment_1.xml)
<?xml version="1.0" encoding="utf-8"?>
<RelativeLayout xmlns:android="http://schemas.android.com/apk/res/android"
        xmlns:app="http://schemas.android.com/apk/res-auto"
        android:layout_width="match_parent"
        android:layout_height="match_parent"
        android:background="@color/colorPrimary"
        android:gravity="center"
        android:orientation="vertical">


    <LinearLayout
            android:layout_width="wrap_content"
            android:layout_height="wrap_content"
            android:gravity="center"
            android:orientation="vertical">

        <EditText
                android:id="@+id/input_edit_text"
                android:layout_width="200dp"
                android:layout_height="wrap_content"
                android:layout_marginBottom="20dp"
                android:textColor="@android:color/white"
                android:textStyle="bold"
                app:backgroundTint="@android:color/white"
                android:autofillHints=""
                android:inputType="text" />

        <Button
                android:id="@+id/enter_btn"
                android:layout_width="wrap_content"
                android:layout_height="wrap_content"
                android:background="@color/colorPrimaryDark"
                android:padding="10dp"
                android:text="Enter"
                android:textAllCaps="false"
                android:textColor="@android:color/white"
                android:textStyle="bold" />
    </LinearLayout>


</RelativeLayout>Code language: HTML, XML (xml)
Next, let’s do the same for the fragment with the TextView (fragment_2.xml)
<?xml version="1.0" encoding="utf-8"?>
<RelativeLayout xmlns:android="http://schemas.android.com/apk/res/android"
android:layout_width="match_parent"
android:layout_height="match_parent"
android:background="@color/colorPrimary"
android:gravity="center"
android:orientation="vertical">
<TextView
android:id="@+id/output_textview"
android:layout_width="wrap_content"
android:layout_height="wrap_content"
android:textColor="@android:color/white"
android:textSize="22sp"
android:textStyle="bold" />
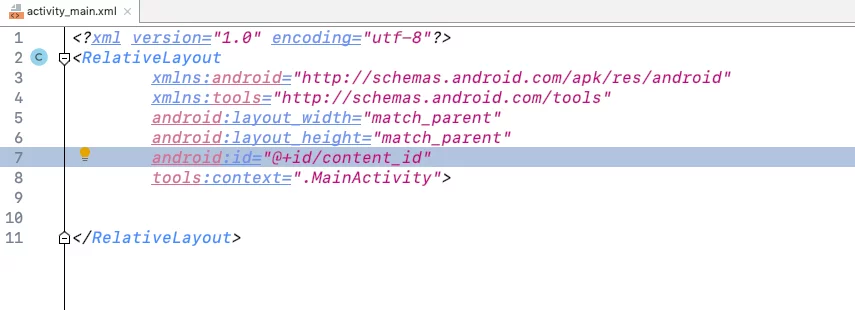
</RelativeLayout>Code language: HTML, XML (xml)Go and add an id with the name ‘content_id’ on the parent layout in the activity_main.xml file like the image below:
Now, let’s create the Kotlin class for our first fragment (Fragment1.kt) and second fragment (Fragment2.kt) like that:
class Fragment1 : Fragment() {

    override fun onCreateView(inflater: LayoutInflater, container: ViewGroup?, savedInstanceState: Bundle?): View {
        val rootView = layoutInflater.inflate(R.layout.fragment_1, container, false)

        val enterBtn = rootView.findViewById<Button>(R.id.enter_btn)
        val inputEditText = rootView.findViewById<EditText>(R.id.input_edit_text)

        return rootView
    }

}
Code language: Kotlin (kotlin)
class Fragment2 : Fragment() {
override fun onCreateView(inflater: LayoutInflater, container: ViewGroup?, savedInstanceState: Bundle?): View {
val rootView = layoutInflater.inflate(R.layout.fragment_2, container, false)
val outputTextView = rootView.findViewById<TextView>(R.id.output_textview)
return rootView
}
}Code language: Kotlin (kotlin)Passing Data Between Fragments
When we want to pass data between fragments, we are doing it with the help of the Activity which contains these fragments.
In our example, the Activity is the MainActivity.kt.
So we are going to use the MainActivity to pass the data from the first to the second fragment using an interface.
In our example we call it Communicator:
interface Communicator {
    fun passDataCom(editTextInput: String)
}Code language: Kotlin (kotlin)
Inside the interface there’s a method passDataCom where we pass the input text from the EditText from our first fragment.
Now, add Communicator at the top of the MainActivity and implement the methods by pressing Alt+Enter(Windows) or Command+Enter(MacOS), then Enter and OK on the new window.

Next, let’s go to Fragment1.kt and initialize our Communicator and call the method with the text from the EditText as a parameter:
class Fragment1 : Fragment() {

    private lateinit var comm: Communicator

    override fun onCreateView(inflater: LayoutInflater, container: ViewGroup?, savedInstanceState: Bundle?): View {
        val rootView = <em>layoutInflater</em>.inflate(R.layout.<em>fragment_1</em>, container, false)

        comm = requireActivity() as Communicator

        val enterBtn = rootView.findViewById<Button>(R.id.<em>enter_btn</em>)
        val inputEditText = rootView.findViewById<EditText>(R.id.<em>input_edit_text</em>)
        enterBtn.setOnClickListener <strong>{
</strong><strong>            </strong>comm.passDataCom(inputEditText.<em>text</em>.toString())
        <strong>}
</strong><strong>
</strong><strong>        </strong>return rootView
    }
}Code language: Kotlin (kotlin)
Now it’s time to go back to our MainActivity and pass the value from Fragment1 to Fragment2.
To do that, we’re taking the value and we’re adding it to a Bundle.
Then we pass the bundle data as arguments to the Fragment2
And at the end we display the new fragment by replacing the Fragment1 with Fragment2 in the MainActivity like that:
class MainActivity : AppCompatActivity(), Communicator {

    override fun onCreate(savedInstanceState: Bundle?) {
        super.onCreate(savedInstanceState)
        setContentView(R.layout.activity_main)

        // Replace Main Activity content with the Fragment1 content
        val fragment1 = Fragment1()
        supportFragmentManager.beginTransaction().replace(R.id.content_id, fragment1).commit()

    }

    override fun passDataCom(editTextInput: String) {
        val bundle = Bundle()
        bundle.putString("input_txt", editTextInput)

        val transaction = this.supportFragmentManager.beginTransaction()
        val frag2 = Fragment2()
        frag2.arguments = bundle

        transaction.replace(R.id.content_id, frag2)
        transaction.addToBackStack(null)
        transaction.setTransition(FragmentTransaction.TRANSIT_FRAGMENT_FADE)
        transaction.commit()
    }
}Code language: Kotlin (kotlin)
In the code above, we gave a key name “input_txt” for our text. This will help us to retrieve the value from our 2nd fragment.
After we have sent the value from the 1st fragment, it’s time to retrieve it from our 2nd fragment and display it on the screen.
Go to our Fragment2 and paste the following code:
class Fragment2 : Fragment() {

    private var inputText: String? = ""

    override fun onCreateView(inflater: LayoutInflater, container: ViewGroup?, savedInstanceState: Bundle?): View {
        val rootView = layoutInflater.inflate(R.layout.fragment_2, container, false)

        inputText = arguments?.getString("input_txt")

        val outputTextView = rootView.findViewById<TextView>(R.id.output_textview)
        outputTextView.text = inputText

        return rootView
    }
}Code language: Kotlin (kotlin)
Here we’re getting the value with the key name, we put earlier, and we display it on a TextView.
You can find the final project here
If you have any questions, please feel free to leave a comment below