
Last updated on: May 27, 2023
In this tutorial, I’ll show you step by step how to add a stretchy header to the following views:
Also, if you want to hide the navigation bar, and look like my demo app, I’ll show you how to do that too, at the end of the tutorial
Contents
Creating Stretchy Header for the UITableView
I’m not going to show you how to create a UITableView with cells, you suppose to have it already, and you just want to add a stretchy header.
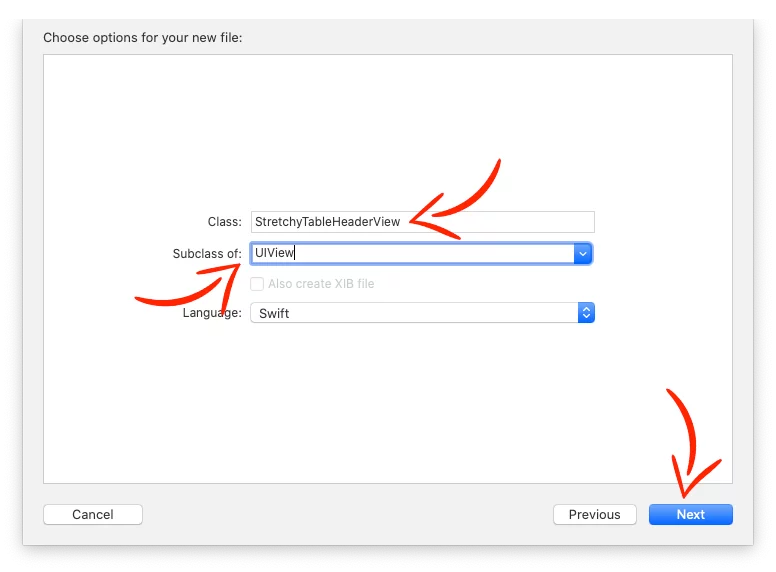
First, create a new UIView class, give the name StretchyTableHeaderView and paste the following code inside:
import Foundation
import UIKit

class StretchyTableHeaderView: UIView {
    var imageViewHeight = NSLayoutConstraint()
    var imageViewBottom = NSLayoutConstraint()

    var containerView: UIView!
    var imageView: UIImageView!

    var containerViewHeight = NSLayoutConstraint()

    override init(frame: CGRect) {
        super.init(frame: frame)

        createViews()

        setViewConstraints()

    }

    required init?(coder aDecoder: NSCoder) {
        super.init(coder: aDecoder)
    }

    func createViews() {
        // Container View
        containerView = UIView()
        self.addSubview(containerView)

        // ImageView for background
        imageView = UIImageView()
        imageView.clipsToBounds = true
        imageView.backgroundColor = .yellow
        imageView.contentMode = .scaleAspectFill
        containerView.addSubview(imageView)
    }

    func setViewConstraints() {
        // UIView Constraints
        NSLayoutConstraint.activate([
            self.widthAnchor.constraint(equalTo: containerView.widthAnchor),
            self.centerXAnchor.constraint(equalTo: containerView.centerXAnchor),
            self.heightAnchor.constraint(equalTo: containerView.heightAnchor)
        ])

        // Container View Constraints
        containerView.translatesAutoresizingMaskIntoConstraints = false

        containerView.widthAnchor.constraint(equalTo: imageView.widthAnchor).isActive = true
        containerViewHeight = containerView.heightAnchor.constraint(equalTo: self.heightAnchor)
        containerViewHeight.isActive = true

        // ImageView Constraints
        imageView.translatesAutoresizingMaskIntoConstraints = false
        imageViewBottom = imageView.bottomAnchor.constraint(equalTo: containerView.bottomAnchor)
        imageViewBottom.isActive = true
        imageViewHeight = imageView.heightAnchor.constraint(equalTo: containerView.heightAnchor)
        imageViewHeight.isActive = true
    }

    func scrollViewDidScroll(scrollView: UIScrollView) {
        containerViewHeight.constant = scrollView.contentInset.top
        let offsetY = -(scrollView.contentOffset.y + scrollView.contentInset.top)
        containerView.clipsToBounds = offsetY <= 0
        imageViewBottom.constant = offsetY >= 0 ? 0 : -offsetY / 2
        imageViewHeight.constant = max(offsetY + scrollView.contentInset.top, scrollView.contentInset.top)
    }
}Code language: Swift (swift)
Adding Stretchy Header in UITableView
Now, go to the ViewController that has the UITableView, and in viewviewDidLoad method, create the header view by giving the width, same as the width of the screen, and the height you want (e.g, 250), set the image, and add it as tableViewHeaderView
class TableView: UIViewController {
    @IBOutlet var tableView: UITableView!

    override func viewDidLoad() {
        super.viewDidLoad()

        // ...

        let headerView = StretchyTableHeaderView(frame: CGRect(x: 0, y: 0, width: self.view.bounds.width, height: 250))
        // Image from unsplash: https://unsplash.com/photos/iVPWGCbFwd8
        headerView.imageView.image = UIImage(named: "headerbg")
        self.tableView.tableHeaderView = headerView
    }
}Code language: Swift (swift)
To make the header follows the scrolling of the tableView, extend your class and add the UIScrollViewDelegate:
class TableView: UIViewController {
    @IBOutlet var tableView: UITableView!

    override func viewDidLoad() {
        super.viewDidLoad()

        // ...

    }
}

extension TableView: UIScrollViewDelegate {
    func scrollViewDidScroll(_ scrollView: UIScrollView) {
        let headerView = self.tableView.tableHeaderView as! StretchyTableHeaderView
        headerView.scrollViewDidScroll(scrollView: scrollView)
    }
}Code language: Swift (swift)
Creating Stretchy Header for UICollectionView
I’m not going to show you how to create a CollectionView with cells, you suppose to have it already, and you just want to add a stretchy header.
Create a new UICollectionReusableView class, give the name StretchyCollectionHeaderView and paste the following code inside:

class StretchyCollectionHeaderView: UICollectionReusableView {
    var imageView: UIImageView!

    override init(frame: CGRect) {
        super.init(frame: frame)

        createViews()

        setViewConstraints()
    }

    required init?(coder aDecoder: NSCoder) {
        super.init(coder: aDecoder)
    }

    func createViews() {
        // ImageView
        imageView = UIImageView()
        imageView.clipsToBounds = true
        imageView.contentMode = .scaleAspectFill
        self.addSubview(imageView)
    }

    func setViewConstraints() {
        // ImageView Constraints
        imageView.translatesAutoresizingMaskIntoConstraints = false
        NSLayoutConstraint.activate([
            self.imageView.topAnchor.constraint(equalTo: self.topAnchor),
            self.imageView.leadingAnchor.constraint(equalTo: self.leadingAnchor),
            self.imageView.trailingAnchor.constraint(equalTo: self.trailingAnchor),
            self.imageView.bottomAnchor.constraint(equalTo: self.bottomAnchor)
        ])
    }
}Code language: Swift (swift)
Creating CollectionView Flow Layout for Stretchy Header
Now, we have to create a UICollectionViewFlowLayout, this will make the header to be stretchy.
Create a new UICollectionViewFlowLayout class, and name it CollectionViewFlowLayout and paste the following code inside:

class CollectionViewFlowLayout: UICollectionViewFlowLayout {
    override func layoutAttributesForElements(in rect: CGRect) -> [UICollectionViewLayoutAttributes]? {
        let layoutAttributes = super.layoutAttributesForElements(in: rect)

        layoutAttributes?.forEach { attribute in
            if attribute.representedElementKind == UICollectionView.elementKindSectionHeader {
                guard let collectionView = collectionView else { return }
                let contentOffsetY = collectionView.contentOffset.y

                if contentOffsetY < 0 {
                    let width = collectionView.frame.width
                    let height = attribute.frame.height - contentOffsetY
                    attribute.frame = CGRect(x: 0, y: contentOffsetY, width: width, height: height)
                }
            }
        }

        return layoutAttributes
    }

    override func shouldInvalidateLayout(forBoundsChange newBounds: CGRect) -> Bool {
        return true
    }

    // ...

}
Code language: Swift (swift)
Adding Stretchy Header in UICollectionView
In the ViewController with the collectionView, add the CollectionViewFlowLayout to the collectionView and register the stretchy header we created before:
class CollectionView: UIViewController {
    @IBOutlet var collectionView: UICollectionView!

    override func viewDidLoad() {
        super.viewDidLoad()
        // ...

        // Set CollectionView Flow Layout for Header and Items
        let flowLayout = CollectionViewFlowLayout()
        flowLayout.scrollDirection = .vertical
        flowLayout.itemSize = CGSize(width: 100, height: 100)
        flowLayout.minimumLineSpacing = 1.0
        flowLayout.minimumInteritemSpacing = 1.0
        collectionView.collectionViewLayout = flowLayout


        // Register Header
        collectionView.register(StretchyCollectionHeaderView.self, forSupplementaryViewOfKind: UICollectionView.elementKindSectionHeader, withReuseIdentifier: "headerView")
    }
}Code language: Swift (swift)
Add the viewForSupplementaryElementOfKind method in the collectionView, and set stretchy header and the image you want:
func collectionView(_ collectionView: UICollectionView, viewForSupplementaryElementOfKind kind: String, at indexPath: IndexPath) -> UICollectionReusableView {
        if let headerView = collectionView.dequeueReusableSupplementaryView(ofKind: UICollectionView.elementKindSectionHeader, withReuseIdentifier: "headerView", for: indexPath) as? StretchyCollectionHeaderView {
            // Add Image to the Header
            headerView.imageView.image = UIImage(named: "headerbg")

            return headerView
        }
        return UICollectionReusableView()
}Code language: Swift (swift)
Last, extend your class and add the delegate UICollectionViewDelegateFlowLayout and set the size for the header.
class CollectionView: UIViewController {
    @IBOutlet var collectionView: UICollectionView!

    override func viewDidLoad() {
        super.viewDidLoad()
        //  ...
}

extension CollectionView: UICollectionViewDataSource {
    // ...
}

extension CollectionView: UICollectionViewDelegateFlowLayout {
    func collectionView(_ collectionView: UICollectionView, layout collectionViewLayout: UICollectionViewLayout, referenceSizeForHeaderInSection section: Int) -> CGSize {
        return CGSize(width: self.collectionView.frame.size.width, height: 250)
    }
}
Code language: Swift (swift)
Making a UIScrollView with Stretchy Header
To have a stretchy header in a UIScrollView is a little complicated with all these AutoLayout Constraints that we have to add.
So I made the whole viewController programmatically, just paste the code in your viewController, and you’re good to go!
class ScrollView: UIViewController, UIScrollViewDelegate {
    var scrollView: UIScrollView!

    var label: UILabel!

    var headerContainerView: UIView!

    var imageView: UIImageView!

    override func viewDidLoad() {
        super.viewDidLoad()

        createViews()

        setViewConstraints()

        // ScrollView
        scrollView.backgroundColor = UIColor.black

        // Label Customization
        label.backgroundColor = .clear
        label.font = UIFont.systemFont(ofSize: 16, weight: .semibold)
        label.textColor = .white
        label.text = "YOUR TEXT HERE"

        // Set Image on the Header
        imageView.image = UIImage(named: "headerbg")
    }

    func createViews() {
        // ScrollView
        scrollView = UIScrollView()
        scrollView.delegate = self
        self.view.addSubview(scrollView)

        // Label
        label = UILabel()
        label.backgroundColor = .white
        label.numberOfLines = 0
        self.scrollView.addSubview(label)

        // Header Container
        headerContainerView = UIView()
        headerContainerView.backgroundColor = .gray
        self.scrollView.addSubview(headerContainerView)

        // ImageView for background
        imageView = UIImageView()
        imageView.clipsToBounds = true
        imageView.backgroundColor = .green
        imageView.contentMode = .scaleAspectFill
        self.headerContainerView.addSubview(imageView)
    }

    func setViewConstraints() {
        // ScrollView Constraints
        self.scrollView.translatesAutoresizingMaskIntoConstraints = false
        NSLayoutConstraint.activate([
            self.scrollView.topAnchor.constraint(equalTo: self.view.topAnchor),
            self.scrollView.leadingAnchor.constraint(equalTo: self.view.leadingAnchor),
            self.scrollView.trailingAnchor.constraint(equalTo: self.view.trailingAnchor),
            self.scrollView.bottomAnchor.constraint(equalTo: self.view.bottomAnchor)
        ])

        // Label Constraints
        self.label.translatesAutoresizingMaskIntoConstraints = false
        NSLayoutConstraint.activate([
            self.label.leadingAnchor.constraint(equalTo: self.view.leadingAnchor, constant: 10),
            self.label.trailingAnchor.constraint(equalTo: self.view.trailingAnchor, constant: -10),
            self.label.bottomAnchor.constraint(equalTo: self.scrollView.bottomAnchor, constant: -10),
            self.label.topAnchor.constraint(equalTo: self.scrollView.topAnchor, constant: 280)
        ])

        // Header Container Constraints
        let headerContainerViewBottom : NSLayoutConstraint!

        self.headerContainerView.translatesAutoresizingMaskIntoConstraints = false
        NSLayoutConstraint.activate([
            self.headerContainerView.topAnchor.constraint(equalTo: self.view.topAnchor),
            self.headerContainerView.leadingAnchor.constraint(equalTo: self.view.leadingAnchor),
            self.headerContainerView.trailingAnchor.constraint(equalTo: self.view.trailingAnchor)
        ])
        headerContainerViewBottom = self.headerContainerView.bottomAnchor.constraint(equalTo: self.label.topAnchor, constant: -10)
        headerContainerViewBottom.priority = UILayoutPriority(rawValue: 900)
        headerContainerViewBottom.isActive = true

        // ImageView Constraints
        let imageViewTopConstraint: NSLayoutConstraint!
        imageView.translatesAutoresizingMaskIntoConstraints = false
        NSLayoutConstraint.activate([
            self.imageView.leadingAnchor.constraint(equalTo: self.headerContainerView.leadingAnchor),
            self.imageView.trailingAnchor.constraint(equalTo: self.headerContainerView.trailingAnchor),
            self.imageView.bottomAnchor.constraint(equalTo: self.headerContainerView.bottomAnchor)
        ])

        imageViewTopConstraint = self.imageView.topAnchor.constraint(equalTo: self.view.topAnchor)
        imageViewTopConstraint.priority = UILayoutPriority(rawValue: 900)
        imageViewTopConstraint.isActive = true
    }
}Code language: Swift (swift)
Making transparent the Navigation Bar
In the demo app, you’ll see that the UINavigationBar is transparent, and the only thing that appears is the back button icon.

To do that, and make the stretchy header looks cooler, add the following code in the viewWillAppear method of the view (UITableView, UICollectionView, UIScrollView):
override func viewWillAppear(_ animated: Bool) {
        super.viewWillAppear(animated)
        // Make sure the top constraint of the TableView/CollectionView/ScrollView is equal to Superview and not Safe Area

        // Make the Navigation Bar background transparent
        self.navigationController?.navigationBar.setBackgroundImage(UIImage(), for: .default)
        self.navigationController?.navigationBar.shadowImage = UIImage()
        self.navigationController?.navigationBar.isTranslucent = true
        self.navigationController?.navigationBar.tintColor = .white

        // Remove 'Back' text and Title from Navigation Bar
        self.navigationItem.backBarButtonItem = UIBarButtonItem(title: "", style: .plain, target: nil, action: nil)
        self.title = ""
}Code language: Swift (swift)
Also, in the previous ViewController (The ViewController before you press the button to go into the ViewController with the stretchy header), add this:
class MainViewController: UIViewController {

    override func viewDidLoad() {
        super.viewDidLoad()
    }

    override func viewWillAppear(_ animated: Bool) {
        // Navigation Customization
        self.navigationController?.navigationBar.isTranslucent = true
        self.navigationController?.navigationBar.shadowImage = nil
        self.navigationController?.navigationBar.setBackgroundImage(UIImage(), for: .default)

        // Remove 'Back' text and Title from Navigation Bar
        self.navigationItem.backBarButtonItem = UIBarButtonItem(title: "", style: .plain, target: nil, action: nil)
    }
}Code language: Swift (swift)
Hiding the Navigation Bar
To hide the UINavigationBar completely, add the following line of code in the viewWillAppear method
override func viewWillAppear(_ animated: Bool) {
        super.viewWillAppear(animated)
        // Make sure the top constraint of the TableView is equal to Superview and not Safe Area

        // Hide the navigation bar completely
        self.navigationController?.setNavigationBarHidden(true, animated: false)

}Code language: Swift (swift)
You can find the final project here
If you have any questions, please feel free to leave a comment below