Last updated on: May 27, 2023
Biometric authentication allows users to access their apps using their unique characteristics like fingerprint, face, or iris recognition. The Biometric library provides a unified API for both strong and weak biometrics. We will use the BiometricPrompt API to achieve this.
The Android documentation describes three different authentication types for biometric authentication.
In simple words, these authentication types are:
- Strong: This type of authentication requires the user to provide a strong biometric, like a fingerprint or iris scan, which is harder to fake or bypass. It offers a high level of security and is suitable for apps handling sensitive data or transactions.
- Weak: Weak biometric authentication includes less secure methods like face recognition, which might be easier to bypass or trick compared to strong authentication methods. This type of authentication is suitable for apps with lower security requirements.
- Device credential: This authentication type doesn’t involve biometrics but instead relies on the device’s security, like a PIN, password, or pattern. It can be used as a fallback option when biometric authentication isn’t available or suitable for the user or device.
Contents
Adding library
First, add the biometric library to your project. Open the build.gradle (Module: app) file and add the following dependency:
dependencies {

    // ...

    implementation 'androidx.biometric:biometric:1.2.0-alpha05'

    // ...
}Code language: Kotlin (kotlin)
Sync the project to download the required library.
Updating AndroidManifest.xml
Add the following permission to your AndroidManifest.xml file:
<uses-permission android:name="android.permission.USE_BIOMETRIC" />Code language: HTML, XML (xml)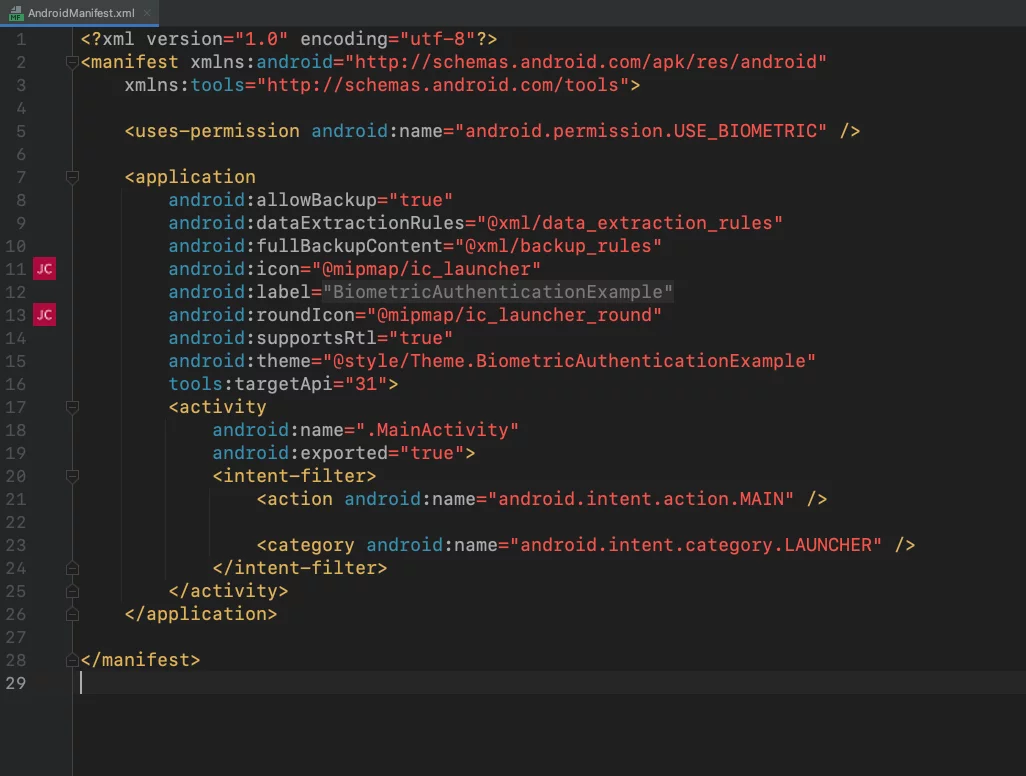
Creating a BiometricPrompt instance
BiometricPrompt is an Android component that helps developers add biometric authentication, like fingerprint or face recognition, to their apps in a simple and secure way.
In your MainActivity.kt, add the following code to create a BiometricPrompt instance:
private fun showBiometricPrompt() {
    val promptInfo = BiometricPrompt.PromptInfo.Builder()
        .setTitle("Biometric Authentication")
        .setSubtitle("Log in using your biometric credential")
        .setNegativeButtonText("Cancel")
        .build()

    val biometricPrompt = BiometricPrompt(this, ContextCompat.getMainExecutor(this),
        object : BiometricPrompt.AuthenticationCallback() {
            override fun onAuthenticationError(errorCode: Int, errString: CharSequence) {
                super.onAuthenticationError(errorCode, errString)
                // Handle authentication error
                showMessage("Authentication error: $errString")
            }

            override fun onAuthenticationSucceeded(result: BiometricPrompt.AuthenticationResult) {
                super.onAuthenticationSucceeded(result)
                // Handle authentication success
                showMessage("Authentication succeeded!")
            }

            override fun onAuthenticationFailed() {
                super.onAuthenticationFailed()
                // Handle authentication failure
                showMessage("Authentication failed.")
            }
        })

    biometricPrompt.authenticate(promptInfo)
}


private fun showMessage(message: String) {
    Toast.makeText(this, message, Toast.LENGTH_SHORT).show()
}Code language: Kotlin (kotlin)
The showBiometricPrompt() method is responsible for displaying the biometric prompt to the user.
- The
BiometricPrompt.PromptInfo.Builder()is used to create aPromptInfoobject with specified configurations such as title, subtitle, and negative button text. Thebuild()method is called at the end to create thePromptInfoinstance with the provided configuration. - The
BiometricPromptinstance is created by passing the activity context, a main executor, and an instance ofBiometricPrompt.AuthenticationCallback. The main executor is obtained usingContextCompat.getMainExecutor(this)and is responsible for handling the callback on the main thread. - The
BiometricPrompt.AuthenticationCallbackis an abstract class that contains three callback methods to handle different authentication outcomes:onAuthenticationError(errorCode: Int, errString: CharSequence): This method is called when an error occurs during the authentication process. TheerrorCodeanderrStringparameters provide information about the error.onAuthenticationSucceeded(result: BiometricPrompt.AuthenticationResult): This method is called when the authentication is successful. Theresultparameter contains information about the successful authentication.onAuthenticationFailed(): This method is called when the authentication fails. UnlikeonAuthenticationError, this method is called when the biometric sensor recognizes a failed attempt (e.g., incorrect fingerprint or face).
- The
biometricPrompt.authenticate(promptInfo)method is called to display the biometric prompt dialog to the user, using the configuredPromptInfoinstance. The user is then prompted to authenticate using their biometric credential.
Checking Biometric Compatibility
Now, we need to verify if the device is compatible with biometrics before displaying the prompt.
In the same file, add the following code:
private fun isBiometricSupported(): Boolean {
    val biometricManager = BiometricManager.from(this)
    val canAuthenticate = biometricManager.canAuthenticate(BiometricManager.Authenticators.BIOMETRIC_WEAK)
    when (canAuthenticate) {
        BiometricManager.BIOMETRIC_SUCCESS -> {
            // The user can authenticate with biometrics, continue with the authentication process
            return true
        }

        BiometricManager.BIOMETRIC_ERROR_NO_HARDWARE, BiometricManager.BIOMETRIC_ERROR_HW_UNAVAILABLE, BiometricManager.BIOMETRIC_ERROR_NONE_ENROLLED -> {
            // Handle the error cases as needed in your app
            return false
        }

        else -> {
            // Biometric status unknown or another error occurred
            return false
        }
    }
}Code language: Kotlin (kotlin)- We create a
BiometricManagerinstance usingBiometricManager.from(this). - We call
canAuthenticate()on thebiometricManagerinstance, passingBiometricManager.Authenticators.BIOMETRIC_WEAKas the parameter to check for weak biometric authentication support. The result is stored in thecanAuthenticatevariable. - We use a
whenstatement to handle different cases based on thecanAuthenticatevalue:- a. If
canAuthenticateisBiometricManager.BIOMETRIC_SUCCESS, it means the device supports biometric authentication. In this case, the function returnstrueto indicate that biometric authentication can proceed. - b. If
canAuthenticateisBiometricManager.BIOMETRIC_ERROR_NO_HARDWARE,BiometricManager.BIOMETRIC_ERROR_HW_UNAVAILABLE, orBiometricManager.BIOMETRIC_ERROR_NONE_ENROLLED, it means the device either doesn’t have biometric hardware, the hardware is unavailable, or the user hasn’t enrolled any biometric data. In these cases, the function returnsfalse. You should handle these error cases as needed in your app. - c. For any other value of
canAuthenticate, the function returnsfalseas the biometric status is unknown or another error occurred.
- a. If
By calling this isBiometricSupported() method in our app, you can determine whether to proceed with biometric authentication or provide an alternative authentication method.
After that, we can use it like that:
class MainActivity : AppCompatActivity() {


    override fun onCreate(savedInstanceState: Bundle?) {
        super.onCreate(savedInstanceState)
        setContentView(R.layout.activity_main)
        val button = findViewById<Button>(R.id.btn_authenticate)

        button.setOnClickListener {
            if (isBiometricSupported()) {
                showBiometricPrompt()
            } else {
                // Handle the case when biometric authentication is not supported
            }
        }
    }

    // ...

}Code language: Kotlin (kotlin)
Testing Biometrics on Emulator
If you already have an Android Emulator running with a virtual device that has biometric capabilities, follow these steps to test biometric authentication:
- Enable biometrics on the virtual device:
- Unlock the emulator’s screen if it’s locked.
- Open the “Settings” app in the emulator.
- Scroll down and tap “Security” or “Security & location.”
- Under “Device security,” tap “Fingerprint” or “Pixel Imprint.”
- Follow the on-screen instructions to add a fingerprint. You may need to set up a PIN, pattern, or password if you haven’t already.
- Trigger biometric authentication in your app:
- Run your app with biometric authentication implemented on the Android Emulator.
- Trigger the biometric prompt in your app, which should display the biometric authentication dialog.
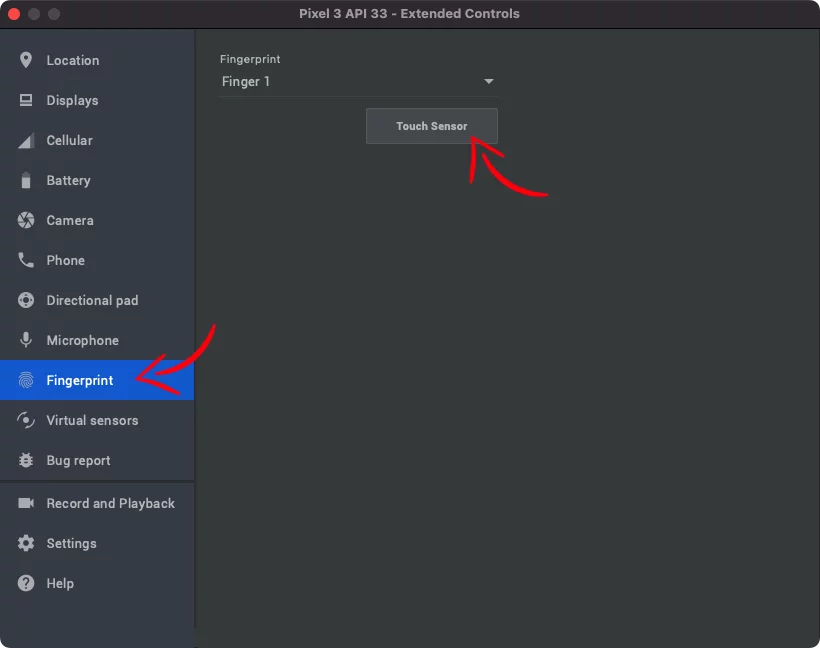
- Simulate biometric input:
- In the Android Emulator, click on the “More” button (three vertical dots) in the right-hand toolbar.
- In the “Extended controls” window, go to the “Finger” tab under the “Virtual Sensors” section.
- Choose “Finger 1” or any other finger you want to simulate.
- Click on the “Touch the sensor” button to simulate a fingerprint touch. This should result in successful biometric authentication in your app.

You can now test different scenarios, such as failed authentication or error cases, by using the options provided in the “Finger” tab of the emulator’s extended controls.
You can find the final project here
If you have any questions, please feel free to leave a comment below