
Last updated on: May 27, 2023
Contents
Add a Map
Storyboard
Go to your Main.storyboard file, search for the Map Kit View and drag it into your UIViewController

Set the AutoLayout constraints:

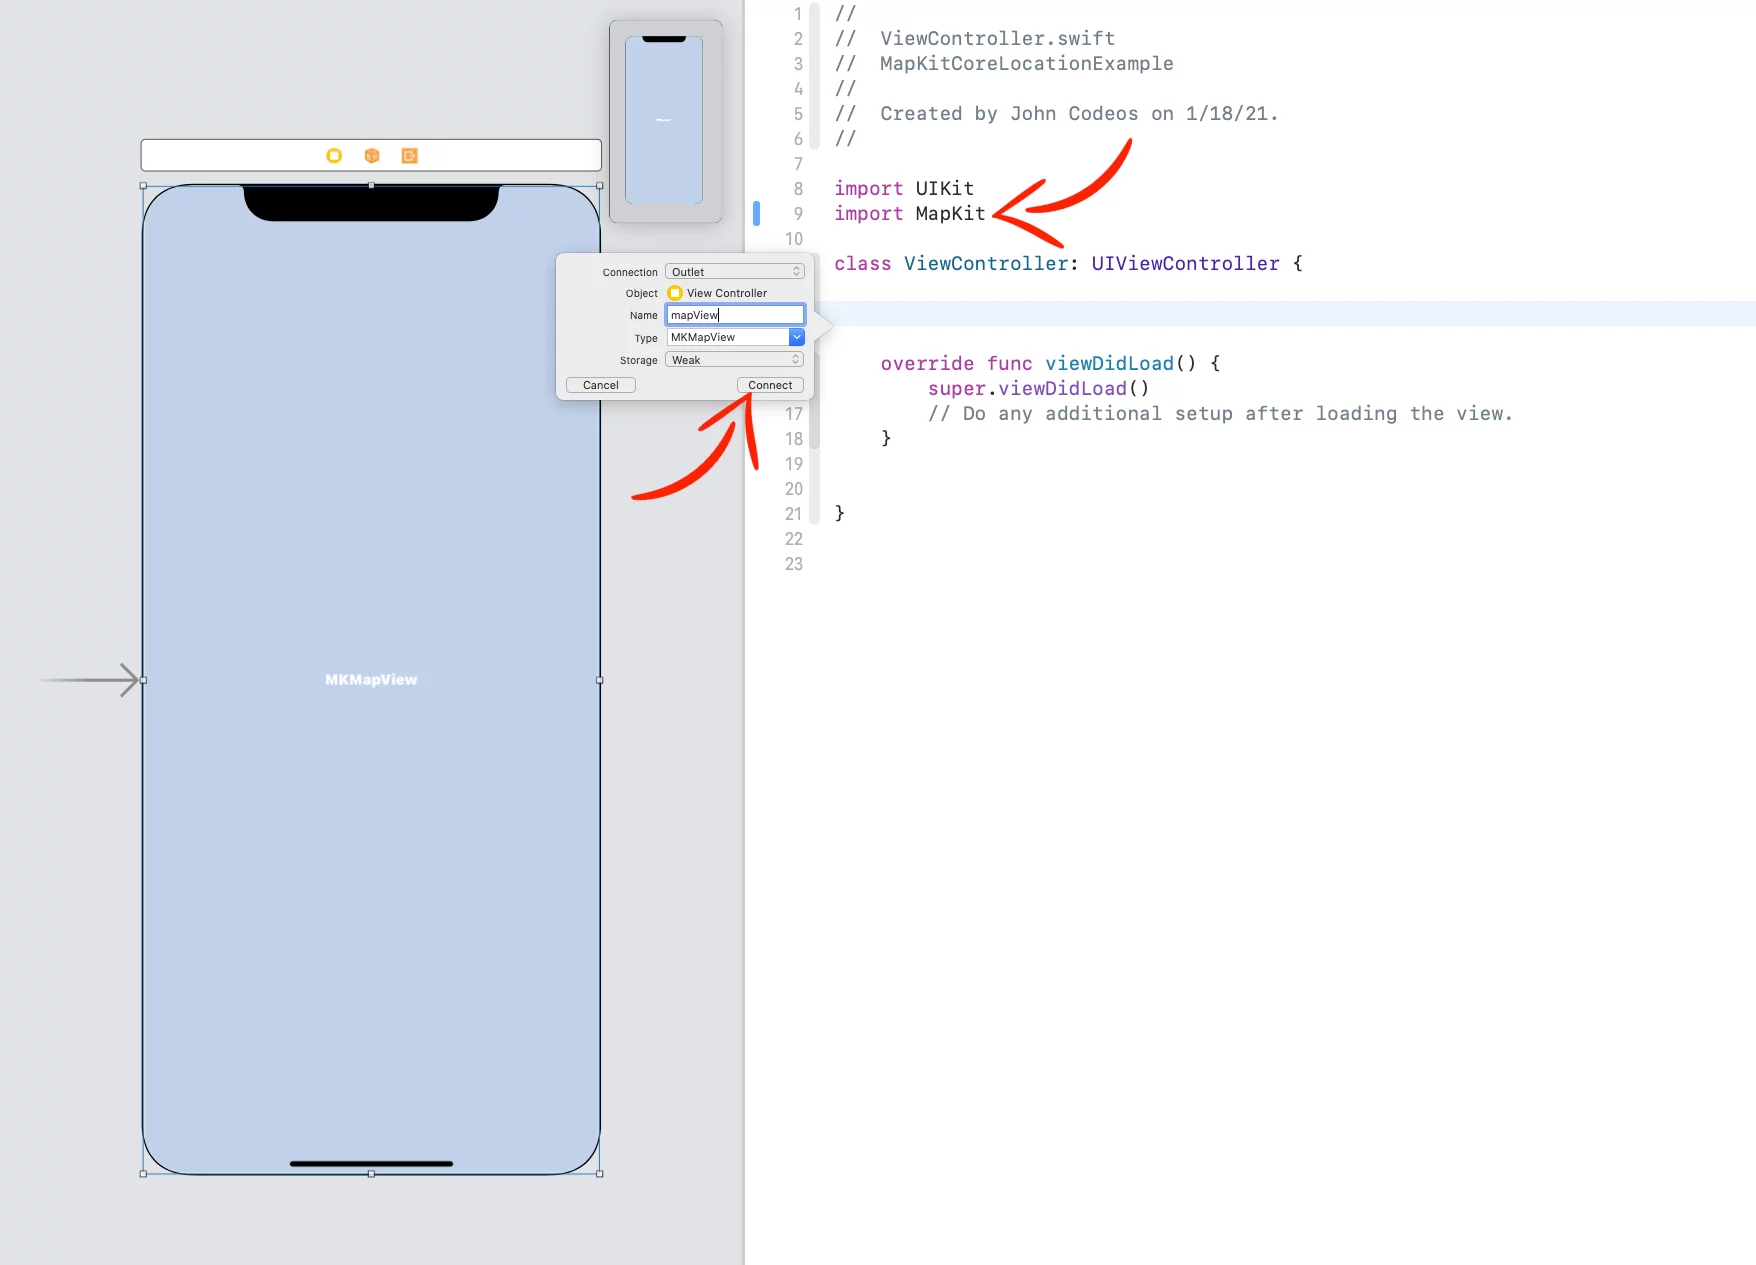
In your ViewController swift file, add import MapKit, create an IBOutlet of the MKMapView and name it mapView
Programmatically
To add a MKMapView in your ViewController, paste the following code:
import UIKit
import MapKit

class ViewController: UIViewController {

    var mapView: MKMapView!

    override func viewDidLoad() {
        super.viewDidLoad()

        mapView = MKMapView()
        self.view.addSubview(mapView)

        mapView.translatesAutoresizingMaskIntoConstraints = false
        NSLayoutConstraint.activate([
            mapView.topAnchor.constraint(equalTo: self.view.topAnchor),
            mapView.leadingAnchor.constraint(equalTo: self.view.leadingAnchor),
            mapView.bottomAnchor.constraint(equalTo: self.view.bottomAnchor),
            mapView.trailingAnchor.constraint(equalTo: self.view.trailingAnchor)
        ])
    }
}Code language: Swift (swift)
User’s Location
Asking for Permission
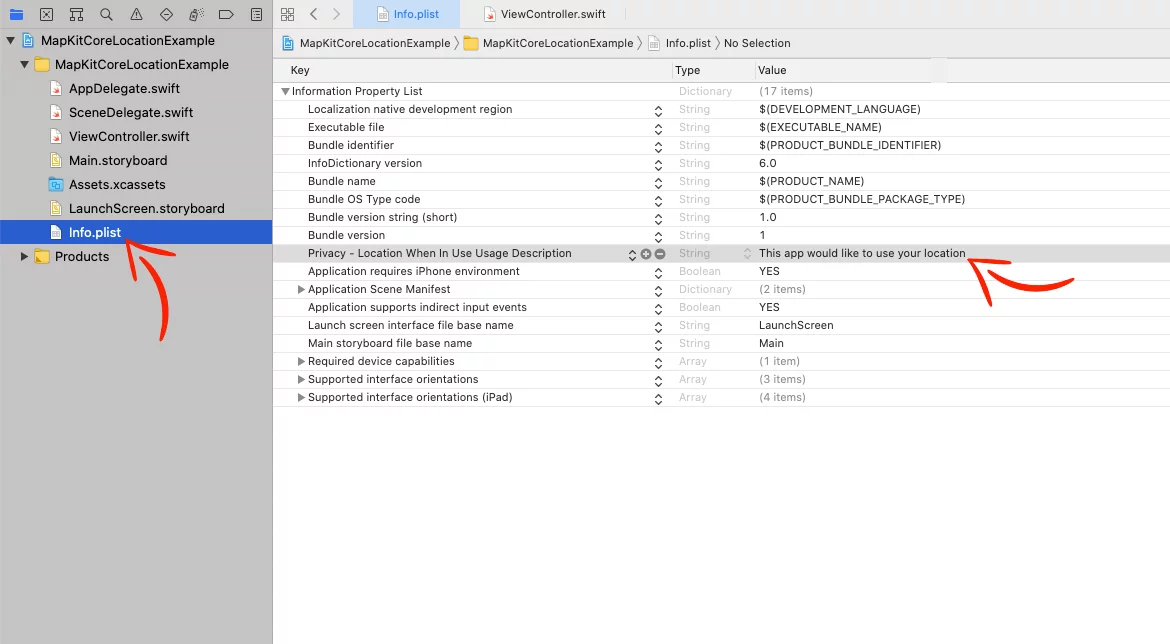
Go to Info.plist file of your project, press the + button and add the following permission:
- Set the key to “Privacy – Location When In Use Description” and the value to “This app would like to use your location”
Next, go to your ViewController, add import CoreLocation, create a CLLocationManager object, and make the request:
import UIKit
import MapKit
import CoreLocation

class ViewController: UIViewController {

    @IBOutlet weak var mapView: MKMapView!

    var locationManager: CLLocationManager!

    override func viewDidLoad() {
        super.viewDidLoad()

        locationManager = CLLocationManager()
        locationManager.requestWhenInUseAuthorization()

    }
}
Code language: Swift (swift)
Note: To see the permission dialog again, you need to delete the app and re-install it.
If you want to know the status of the authorization, extend your ViewController and add the CLLocationManagerDelegate.
Then use the locationManagerDidChangeAuthorization(_:) method:
import UIKit
import MapKit
import CoreLocation

class ViewController: UIViewController {

    @IBOutlet weak var mapView: MKMapView!

    var locationManager: CLLocationManager!

    override func viewDidLoad() {
        super.viewDidLoad()

        //…
        locationManager.delegate = self
        //…

    }
}

extension ViewController: CLLocationManagerDelegate {

    // iOS 14
    func locationManagerDidChangeAuthorization(_ manager: CLLocationManager) {
        if #available(iOS 14.0, *) {
            switch manager.authorizationStatus {
            case .notDetermined:
                print("Not determined")
            case .restricted:
                print("Restricted")
            case .denied:
                print("Denied")
            case .authorizedAlways:
                print("Authorized Always")
            case .authorizedWhenInUse:
                print("Authorized When in Use")
            @unknown default:
                print("Unknown status")
            }
        }
    }

    // iOS 13 and below
    func locationManager(_ manager: CLLocationManager, didChangeAuthorization status: CLAuthorizationStatus) {
        switch status {
        case .notDetermined:
            print("Not determined")
        case .restricted:
            print("Restricted")
        case .denied:
            print("Denied")
        case .authorizedAlways:
            print("Authorized Always")
        case .authorizedWhenInUse:
            print("Authorized When in Use")
        @unknown default:
            print("Unknown status")
        }
    }
}Code language: Swift (swift)
Displaying User’s Location on the Map
After you asked the user for permission and they agreed, you can display their location on the map in two ways:
Storyboard
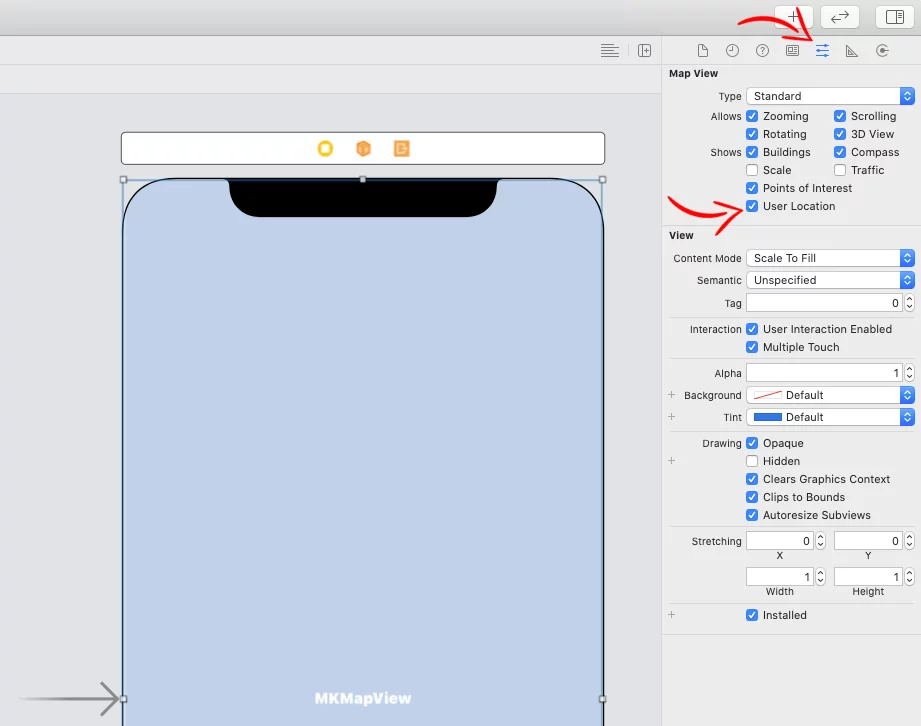
In your Main.storyboard, select the MKMapView, choose the Attribute Inspector (the fifth tab), and check the User Location checkbox
Programmatically
Inside the viewDidLoad() method, add the following line
import UIKit
import MapKit
import CoreLocation

class ViewController: UIViewController {

    @IBOutlet weak var mapView: MKMapView!

    //…

    override func viewDidLoad() {
        super.viewDidLoad()


        //…
        mapView.showsUserLocation = true

    }
}Code language: Swift (swift)
Annotations
Creating Annotations
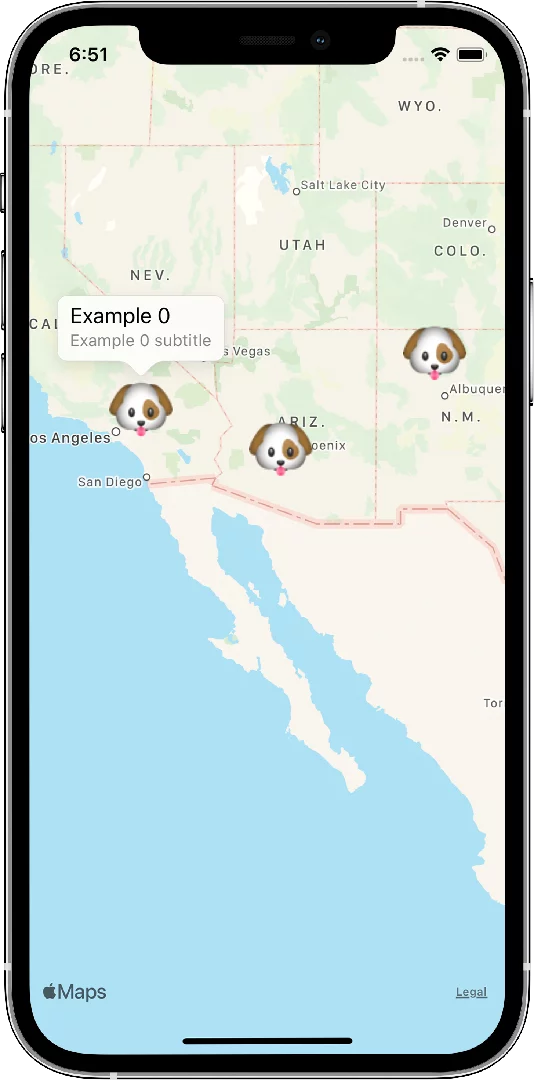
To display a simple annotation (with no customization), add import CoreLocation, create an annotation point (MKPointAnnotation), set coordinates, and add it on the map.
import CoreLocation
import MapKit
import UIKit

class AnnotationsViewController: UIViewController {
    @IBOutlet var mapView: MKMapView!

    override func viewDidLoad() {
        super.viewDidLoad()

        let annotation1 = MKPointAnnotation()
        annotation1.coordinate = CLLocationCoordinate2D(latitude: 33.95, longitude: -117.34)
        annotation1.title = "Example 0" // Optional
        annotation1.subtitle = "Example 0 subtitle" // Optional
        self.mapView.addAnnotation(annotation1)

    }
}
Code language: Swift (swift)
As you see, the only thing you can change is the title and the subtitle.

Customizing Annotations
To customize an annotation, extend your ViewController and add the MKMapViewDelegate.
Then, use the method mapView(_:viewFor:) to set a view for the annotation point
import UIKit
import MapKit
import CoreLocation
class ViewController: UIViewController {
@IBOutlet var mapView: MKMapView!
override func viewDidLoad() {
super.viewDidLoad()
// Simple Annotations
let annotation1 = MKPointAnnotation()
annotation1.coordinate = CLLocationCoordinate2D(latitude: 33.95, longitude: -117.34)
annotation1.title = "Example 0" // Optional
annotation1.subtitle = "Example 0 subtitle" // Optional
self.mapView.addAnnotation(annotation1)
let annotation2 = MKPointAnnotation()
annotation2.coordinate = CLLocationCoordinate2D(latitude: 32.78, longitude: -112.43)
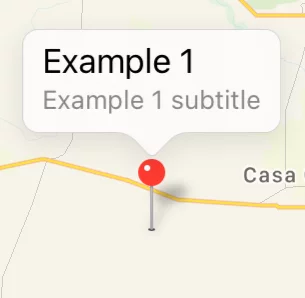
annotation2.title = "Example 1" // Optional
annotation2.subtitle = "Example 1 subtitle" // Optional
self.mapView.addAnnotation(annotation2)
let annotation3 = MKPointAnnotation()
annotation3.coordinate = CLLocationCoordinate2D(latitude: 35.58, longitude: -107.00)
annotation3.title = "Example 2" // Optional
annotation3.subtitle = "Example 2 subtitle" // Optional
self.mapView.addAnnotation(annotation3)
self.mapView.delegate = self
}
}
extension ViewController: MKMapViewDelegate {
func mapView(_ mapView: MKMapView, viewFor annotation: MKAnnotation) -> MKAnnotationView? {
return nil
}
}
Code language: Swift (swift)There’re two annotation views that you can use:
• MKMarkerAnnotationView: This view shows a balloon shape with a pin icon inside, and when you tap on it, it shows the title and the subtitle. It’s the default annotation view for devices with iOS 11.0 and above.

• MKPinAnnotationView: This view shows the classic old pin. When you tap on it, it shows a view in bubble shape with the title and the subtitle. This is the default annotation view for devices with iOS 10.0 and below
Now, let’s say that we want to customize only one of these three annotations, and our app supports iOS 10 and above.
So the mapView(_:viewFor:) will look like this:
func mapView(_ mapView: MKMapView, viewFor annotation: MKAnnotation) -> MKAnnotationView? {
    // If you're showing the user's location on the map, don't set any view
    if annotation is MKUserLocation { return nil }

    let id = MKMapViewDefaultAnnotationViewReuseIdentifier

    // Balloon Shape Pin (iOS 11 and above)
    if let view = mapView.dequeueReusableAnnotationView(withIdentifier: id) as? MKMarkerAnnotationView {
        // Customize only the 'Example 0' Pin
        if annotation.title == "Example 0" {
            view.titleVisibility = .visible // Set Title to be always visible
            view.subtitleVisibility = .visible // Set Subtitle to be always visible
            view.markerTintColor = .yellow // Background color of the balloon shape pin
            view.glyphImage = UIImage(systemName: "plus.viewfinder") // Change the image displayed on the pin (40x40 that will be sized down to 20x20 when is not tapped)
            // view.glyphText = "!" // Text instead of image
            view.glyphTintColor = .black // The color of the image if this is a icon
            return view
        }
    }

    // Classic old Pin (iOS 10 and below)
    if let view = mapView.dequeueReusableAnnotationView(withIdentifier: id) as? MKPinAnnotationView {
        // Customize only the 'Example 0' Pin
        if annotation.title == "Example 0" {
            view.animatesDrop = true // Animates the pin when shows up
            view.pinTintColor = .yellow // The color of the head of the pin
            view.canShowCallout = true // When you tap, it shows a bubble with the title and the subtitle
            return view
        }
    }

    return nil
}Code language: Swift (swift)
As I said, these are the default annotation views, but you can also choose which annotation you want to use. For example, you can use the old classic pin in all iOS versions by adding the following line in the viewDidLoad() method:
class ViewController: UIViewController {

    @IBOutlet var mapView: MKMapView!

    override func viewDidLoad() {
        super.viewDidLoad()

        // …
        mapView.register(MKPinAnnotationView.self, forAnnotationViewWithReuseIdentifier: MKMapViewDefaultAnnotationViewReuseIdentifier)
    }
}Code language: Swift (swift)
You can also create your own annotation view and have a custom image as a pin:

Download the image above, add it to your Assets.xcassets folder, create a new swift file, name it DogAnnotationView, and paste the following code inside.
class DogAnnotationView: MKAnnotationView {
    override var annotation: MKAnnotation? {
        willSet {
            // Resize image
            let pinImage = UIImage(named: "dog")
            let size = CGSize(width: 50, height: 50)
            UIGraphicsBeginImageContext(size)
            pinImage!.draw(in: CGRect(x: 0, y: 0, width: size.width, height: size.height))
            let resizedImage = UIGraphicsGetImageFromCurrentImageContext()

            // Add Image
            self.image = resizedImage
        }
    }

    override func didMoveToSuperview() {
        super.didMoveToSuperview()

        // Enable callout
        canShowCallout = true

        // Move the image a little bit above the point.
        centerOffset = CGPoint(x: 0, y: -20)
    }
}Code language: Swift (swift)
In the ViewController, as we set the classic old pin before, set the DogAnnotationView.
self.mapView.register(DogAnnotationView.self, forAnnotationViewWithReuseIdentifier: MKMapViewDefaultAnnotationViewReuseIdentifier)Code language: Swift (swift)After that, we don’t need to use the mapView(_:viewFor:), because everything we did in there, we’re doing it inside the DogAnnotationView file.
Points of Interest
To search for points of interest (coffee shops, banks, airports, etc.) and display them on the map, we’re doing it by using MapKit’s MKLocalSearch
When you create a request to search for POI, you can filter the results in two ways:
- naturalLanguageQuery: Search POI with text, for example, “tesla chargers” to find all the Tesla superchargers in your area.
- pointsOfInterestFilter: MapKit has a list with common POI, like airports, museums, banks, etc., and you create an array with all the POI you want to find. For example, if you want to find banks and ATMs, you can set
searchRequest.pointOfInterestFilter = MKPointOfInterestFilter(including: [.bank, .atm])
You can also filter the results by excluding POI.
After filtering, you can set the region you want to show the POI. If you don’t set any region, then it will use the device’s location. (You don’t need to ask for any permissions)
Lastly, you can set the type of results you want to get from the search request. You can choose to get POI, addresses, or both.
The results are an array of map items (MKMapItem), and you can create an annotation for each map item and display it on the map.
import MapKit
import UIKit

class ViewController: UIViewController {
    @IBOutlet var mapView: MKMapView!

    override func viewDidLoad() {
        super.viewDidLoad()
        showPointsOfInterest()
    }

    func showPointsOfInterest() {
        let searchRequest = MKLocalSearch.Request()
        // searchRequest.naturalLanguageQuery = "tesla chargers"
        searchRequest.pointOfInterestFilter = MKPointOfInterestFilter(including: [.bank, .atm]) // or you can use excluding
        searchRequest.region = mapView.region
        searchRequest.resultTypes = [.pointOfInterest, .address]

        let search = MKLocalSearch(request: searchRequest)
        search.start { response, error in
            guard let response = response else {
                print("Error: \(error?.localizedDescription ?? "No error specified").")
                return
            }
            // Create annotation for every map item
            for mapItem in response.mapItems {
                let annotation = MKPointAnnotation()
                annotation.coordinate = mapItem.placemark.coordinate

                annotation.title = mapItem.name
                annotation.subtitle = mapItem.phoneNumber

                self.mapView.addAnnotation(annotation)
            }
            self.mapView.setRegion(response.boundingRegion, animated: true)
        }
    }
}Code language: Swift (swift)
Directions
Displaying Directions on the Map
To get directions on your map, you create a request using MapKit’s MKDirections class and set the source, the destination, and the transport types (car, bike, walking, etc.).
As a result you’ll get a route to display it on the map.
import MapKit
import UIKit

class ViewController: UIViewController {
    @IBOutlet var mapView: MKMapView!

    override func viewDidLoad() {
        super.viewDidLoad()
        getDirections()
    }

    func getDirections() {
        let request = MKDirections.Request()
        // Source
        let sourcePlaceMark = MKPlacemark(coordinate: CLLocationCoordinate2D(latitude: 39.058, longitude: -100.21))
        request.source = MKMapItem(placemark: sourcePlaceMark)
        // Destination
        let destPlaceMark = MKPlacemark(coordinate: CLLocationCoordinate2D(latitude: 36.79, longitude: -98.64))
        request.destination = MKMapItem(placemark: destPlaceMark)
        // Transport Types
        request.transportType = [.automobile, .walking]

        let directions = MKDirections(request: request)
        directions.calculate { response, error in
            guard let response = response else {
                print("Error: \(error?.localizedDescription ?? "No error specified").")
                return
            }

            let route = response.routes[0]
            self.mapView.addOverlay(route.polyline)

            // …
        }
    }
}Code language: Swift (swift)
You can also customize the route, like change the line color by extending your ViewController and adding the MKMapViewDelegate, and then using the mapView(_:rendererFor:) method
import MapKit
import UIKit

class ViewController: UIViewController {
    @IBOutlet var mapView: MKMapView!

    override func viewDidLoad() {
        super.viewDidLoad()
        mapView.delegate = self
        // ...
    }
    // ...
}

extension ViewController: MKMapViewDelegate {
    func mapView(_ mapView: MKMapView, rendererFor overlay: MKOverlay) -> MKOverlayRenderer {
        let renderer = MKPolylineRenderer(overlay: overlay)
        // Set the color for the line
        renderer.strokeColor = .red
        return renderer
    }
}Code language: Swift (swift)
Showing Route Steps
With MapKit, you also show each step of the route and navigate with instructions. To see how it works, we’re going to build a simple navigation app.
At the top of the screen, add two UILabels inside a UIStackView, one for the instructions and one for the notices.

And at the bottom, add two UIButtons to change the displayed step and a UILabel to show the distance.

After you create all the IBOutlets and IBActions for the buttons, your ViewController will look like this:
import MapKit
import UIKit

class ViewController: UIViewController {
    @IBOutlet var mapView: MKMapView!

    @IBOutlet var instructionsLabel: UILabel!
    @IBOutlet var noticeLabel: UILabel!
    @IBOutlet var distanceLabel: UILabel!
    @IBOutlet var previousStepBtn: UIButton!
    @IBOutlet var nextStepBtn: UIButton!

    override func viewDidLoad() {
        super.viewDidLoad()
        // ...

        // Customizing UI
        previousStepBtn.clipsToBounds = true
        previousStepBtn.layer.cornerRadius = 15

        nextStepBtn.clipsToBounds = true
        nextStepBtn.layer.cornerRadius = 15

        distanceLabel.clipsToBounds = true
        distanceLabel.layer.cornerRadius = 25
        distanceLabel.layer.borderWidth = 2
        distanceLabel.layer.borderColor = UIColor.black.cgColor
    }

    // ...

    @IBAction func previousStepBtnAction(_ sender: UIButton) {

     }

    @IBAction func nextStepBtnAction(_ sender: UIButton) {

    }

}

// ...Code language: Swift (swift)
Now, create a new method displayCurrentStep(), and paste the following code
func displayCurrentStep() {
    guard let currentRoute = currentRoute else { return }
    if currentStepIndex >= currentRoute.steps.count { return }
    let step = currentRoute.steps[currentStepIndex]

    instructionsLabel.text = step.instructions
    distanceLabel.text = "\(distanceConverter(distance: step.distance))"

    // Hide the noticeLabel if notice doesn't exist
    if step.notice != nil {
        noticeLabel.isHidden = false
        noticeLabel.text = step.notice
    } else {
        noticeLabel.isHidden = true
    }

    // Enable/Disable buttons according to the step they are
    previousStepBtn.isEnabled = currentStepIndex > 0
    nextStepBtn.isEnabled = currentStepIndex < (currentRoute.steps.count - 1)

    // Add padding around the route
    let padding = UIEdgeInsets(top: 40, left: 40, bottom: 100, right: 40)
    mapView.setVisibleMapRect(step.polyline.boundingMapRect, edgePadding: padding, animated: true)
}

func distanceConverter(distance: CLLocationDistance) -> String {
    let lengthFormatter = LengthFormatter()
    lengthFormatter.numberFormatter.maximumFractionDigits = 2
    if NSLocale.current.usesMetricSystem {
        return lengthFormatter.string(fromValue: distance / 1000, unit: .kilometer)
    } else {
        return lengthFormatter.string(fromValue: distance / 1609.34, unit: .mile)
    }
}Code language: Swift (swift)
As you see, we’re getting the instructions, notice, and distance for each step of the current route, and we display them on the screen.
The method distanceConverter() converts the meters to miles (or kilometers) according to the current locale. For example, if the route is in the US, the method will return the distance in miles.
Now, call the displayCurrentStep() from inside the directions request block
class ViewController: UIViewController {

    // ...

    var currentRoute: MKRoute?
    var currentStepIndex = 0

    func getDirections() {

        // ...

        directions.calculate { response, error in
            guard let response = response else {
                print("Error: \(error?.localizedDescription ?? "No error specified").")
                return
            }

            let route = response.routes[0]

            self.currentRoute = route
            self.displayCurrentStep()

            self.mapView.addOverlay(route.polyline)
        }
    }

    func displayCurrentStep() {

        // ...

    }

    // ...

}Code language: Swift (swift)
And lastly, change the current step when you pressing the previous/next buttons:
@IBAction func previousStepBtnAction(_ sender: UIButton) {
    if currentRoute == nil { return }
    if currentStepIndex <= 0 { return }
    currentStepIndex -= 1
    displayCurrentStep()
}

@IBAction func nextStepBtnAction(_ sender: UIButton) {
    guard let currentRoute = currentRoute else { return }
    if currentStepIndex >= (currentRoute.steps.count - 1) { return }
    currentStepIndex += 1
    displayCurrentStep()
}Code language: Swift (swift)
Geofences
Geofences are areas (called regions in CoreLocation) that you set and monitor (up to 20 geofences), and you can detect when the user enters or exits this area.
iOS has a built-in region monitoring, and you don’t need to have your app running all the time in the foreground to detect changes.
The downside is that the system will not notify the user right away after crossing the region’s borders. This is happening because iOS has a 20 seconds delay between notifications to avoid spamming.
So, if you set a region and the user rides a bike, car, or running and past that region, they’ll get the notification later.
Setting up User’s Location Permissions for Geofences
The only permission you need to be able to use geofences, is user’s location.
Go to your Info.plist file, press the + button, and add the following permissions:
- Set the key to “Privacy – Location When In Use Description” and the value to “This app would like to use your location for geofences”
- Set the key to “Privacy – Location Always and When In Use Usage Description“ and the value to “This app would like to use your location for geofences” – Because we need to track the user’s location even when the app is not running.

In your ViewController, add the following code to create a request for authorization:
import UIKit
import CoreLocation

class ViewController: UIViewController {

    var locationManager: CLLocationManager!

    override func viewDidLoad() {
        super.viewDidLoad()
        locationManager = CLLocationManager()
        locationManager.requestAlwaysAuthorization()
    }

}Code language: Swift (swift)
When the user opens the app, they will see the popup to give access to their location.
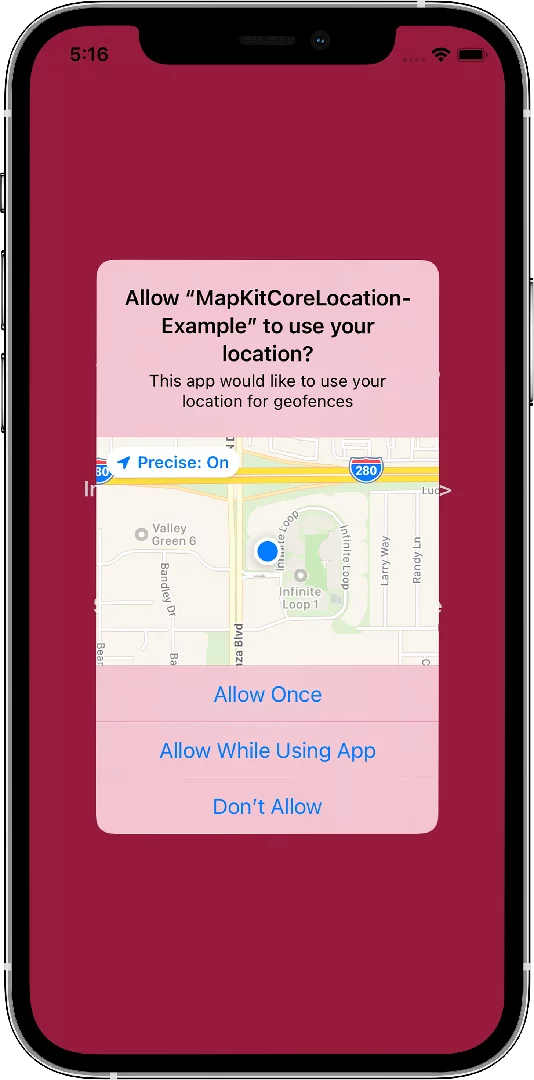
The problem with that is there’s no “Always Allow” option from the beginning to be able to track the user’s location when the app is closed.
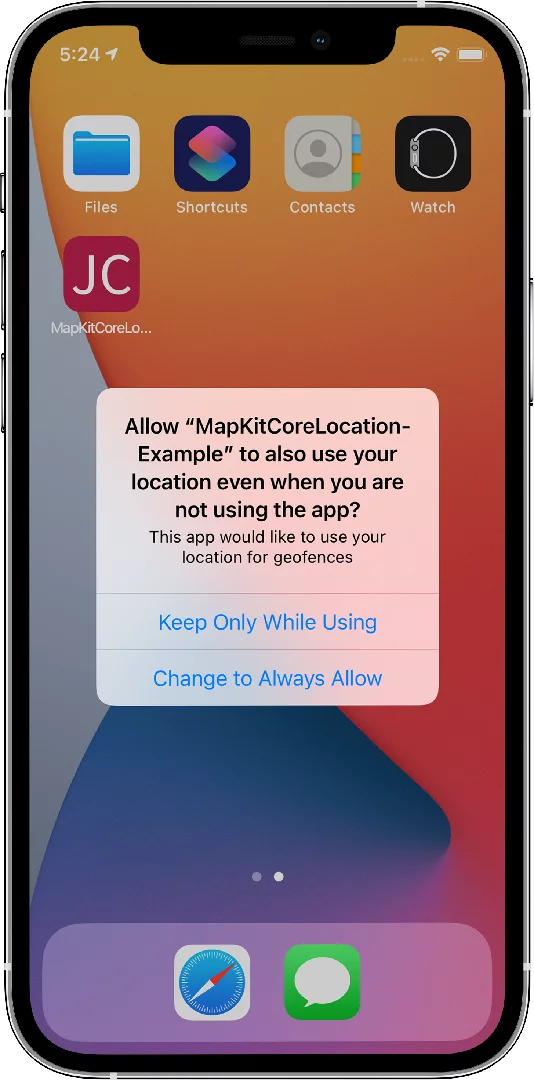
To enable this option, the user needs to enter or exit one of the geofences to see the following popup and choose the “Change to Always Allow” option.
This is causing the geofence not to work the first time correctly.
Starting monitoring region
To start monitoring a region, we check if monitoring is available, add the region, and set if we want the user to be notified when they enter or exit that region.
import CoreLocation
import UIKit

class ViewController: UIViewController {
    var locationManager: CLLocationManager!

    override func viewDidLoad() {
        super.viewDidLoad()
        locationManager = CLLocationManager()
        locationManager.requestAlwaysAuthorization()
        monitorGeofences()
    }

    func monitorGeofences() {
        if CLLocationManager.isMonitoringAvailable(for: CLCircularRegion.self) {
            let coord = CLLocationCoordinate2D(latitude: 35.58, longitude: 107.00)
            let region = CLCircularRegion(center: coord, radius: 100, identifier: "Geofence1")
            region.notifyOnEntry = true
            region.notifyOnExit = true

            locationManager.startMonitoring(for: region)
        }
    }
}Code language: Swift (swift)
Stopping monitoring region
To stop a region from monitoring, you need to get the list of all monitored regions and remove the region you don’t want.
func stopMonitorRegions() {
    for region in locationManager.monitoredRegions {
        locationManager.stopMonitoring(for: region)
    }
}Code language: Swift (swift)
Detecting when the user enters and exits a region
To detect when the user enters or exits a region, extend your ViewController and add the CLLocationManagerDelegate.
Then add the didEnterRegion and didExitRegion methods to detect the changes
import CoreLocation
import UIKit

class ViewController: UIViewController {
    var locationManager: CLLocationManager!

    override func viewDidLoad() {
        super.viewDidLoad()
        // …
        locationManager.delegate = self
    }

    // …
}

extension ViewController: CLLocationManagerDelegate {
    func locationManager(_ manager: CLLocationManager, didEnterRegion region: CLRegion) {
        print("User has entered \(region.identifier)")
    }

    func locationManager(_ manager: CLLocationManager, didExitRegion region: CLRegion) {
        print("User has exited \(region.identifier)")
    }
}Code language: Swift (swift)
Now, to test if it’s working, run the app in the iOS Simulator and then go to Features > Location > Custom Location… and set the latitude to 35.58 and longitude to -107.00.
Then, change the longitude from -107.00 to 107.00, and you’ll see the following message in your Xcode console

You can find the final project here
If you have any questions, please feel free to leave a comment below