
Last updated on: May 22, 2020
In this tutorial, I’m going to show you how to create Tabs without using any 3rd party library.
The view for the tabs (TabsView) will be a UICollectionView, and each cell (TabCell) has an UIImageView for the icon (optional) and an UILabel for the title.
Contents
Creating the View for the Tabs
First, add a UIView in the View Controller you want to have the tabs.
Set the height to 55, and make the leading, top, and trailing of the UIView equals to the ViewController
Select the UIView, and add TabsView as a Class

Create a new swift file, give it the name TabsView, and paste the following code inside:
import UIKit
protocol TabsDelegate {
    func tabsViewDidSelectItemAt(position: Int)
}
enum TabMode {
    case fixed
    case scrollable
}
struct Tab {
    var icon: UIImage?
    var title: String
}
class TabsView: UIView {
    var tabMode: TabMode = .scrollable {
        didSet {
            self.collectionView.reloadData()
        }
    }

    var tabs: [Tab] = [] {
        didSet {
            self.collectionView.reloadData()
        }
    }

    var titleColor: UIColor = .black {
        didSet {
            self.collectionView.reloadData()
        }
    }

    var titleFont: UIFont = UIFont.systemFont(ofSize: 20, weight: .regular) {
        didSet {
            self.collectionView.reloadData()
        }
    }

    var iconColor: UIColor = .black {
        didSet {
            self.collectionView.reloadData()
        }
    }

    var indicatorColor: UIColor = .black {
        didSet {
            self.collectionView.reloadData()
        }
    }

    var collectionView: UICollectionView!

    var delegate: TabsDelegate?

    override init(frame: CGRect) {
        super.init(frame: frame)
        createView()
    }

    required init?(coder aDecoder: NSCoder) {
        super.init(coder: aDecoder)
        createView()
    }

    private func createView() {
        // Create Flow Layout
        let layout = UICollectionViewFlowLayout()
        layout.scrollDirection = .horizontal

        // Create CollectionView
        collectionView = UICollectionView(frame: CGRect.zero, collectionViewLayout: layout)
        collectionView.showsHorizontalScrollIndicator = false
        collectionView.backgroundColor = .clear
        collectionView.delegate = self
        collectionView.dataSource = self
        collectionView.register(TabCell.self, forCellWithReuseIdentifier: "TabCell")
        addSubview(collectionView)

        // ColletionView Constraints
        collectionView.translatesAutoresizingMaskIntoConstraints = false
        NSLayoutConstraint.activate([
            collectionView.topAnchor.constraint(equalTo: self.topAnchor),
            collectionView.leadingAnchor.constraint(equalTo: self.leadingAnchor),
            collectionView.bottomAnchor.constraint(equalTo: self.bottomAnchor),
            collectionView.trailingAnchor.constraint(equalTo: self.trailingAnchor)
        ])
    }
}
extension TabsView: UICollectionViewDelegate, UICollectionViewDataSource {
    func collectionView(_ collectionView: UICollectionView, numberOfItemsInSection section: Int) -> Int {
        return tabs.count
    }

    func collectionView(_ collectionView: UICollectionView, cellForItemAt indexPath: IndexPath) -> UICollectionViewCell {
        guard let cell = collectionView.dequeueReusableCell(withReuseIdentifier: "TabCell", for: indexPath) as? TabCell else {
            return UICollectionViewCell()
        }
        cell.tabViewModel = Tab(icon: tabs[indexPath.item].icon, title: tabs[indexPath.item].title)

        // Change Icon Color
        cell.tabIcon.image = cell.tabIcon.image?.withRenderingMode(.alwaysTemplate)
        cell.tabIcon.tintColor = iconColor

        // Change Title Color
        cell.tabTitle.font = titleFont
        cell.tabTitle.textColor = titleColor
        cell.indicatorColor = indicatorColor
        return cell
    }

    func collectionView(_ collectionView: UICollectionView, didSelectItemAt indexPath: IndexPath) {
        delegate?.tabsViewDidSelectItemAt(position: indexPath.item)
    }
}
extension TabsView: UICollectionViewDelegateFlowLayout {
    func collectionView(_ collectionView: UICollectionView, layout collectionViewLayout: UICollectionViewLayout, sizeForItemAt indexPath: IndexPath) -> CGSize {
        switch tabMode {
        case .scrollable:
            let tabSize = CGSize(width: 500, height: self.frame.height)
            let tabTitle = tabs[indexPath.item].title

            // Add more space left and right the tab
            var addSpace: CGFloat = 20
            if tabs[indexPath.item].icon != nil {
                // Icon exist, add space for the icon width
                addSpace += 40
            }
            // Calculate the width of the Tab Title string
            let titleWidth = NSString(string: tabTitle).boundingRect(with: tabSize, options: .usesLineFragmentOrigin, attributes: [.font: titleFont], context: nil).size.width

            let tabWidth = titleWidth + addSpace

            return CGSize(width: tabWidth, height: self.frame.height)
        case .fixed:
            return CGSize(width: self.frame.width / CGFloat(tabs.count), height: self.frame.height)
        }
    }

    func collectionView(_ collectionView: UICollectionView, layout collectionViewLayout: UICollectionViewLayout, minimumLineSpacingForSectionAt section: Int) -> CGFloat {
        return 0
    }

    func collectionView(_ collectionView: UICollectionView, layout collectionViewLayout: UICollectionViewLayout, minimumInteritemSpacingForSectionAt section: Int) -> CGFloat {
        return 0
    }

    func collectionView(_ collectionView: UICollectionView, layout collectionViewLayout: UICollectionViewLayout, insetForSectionAt section: Int) -> UIEdgeInsets {
        return UIEdgeInsets(top: 0, left: 0, bottom: 0, right: 0)
    }
}Code language: Swift (swift)
Creating the Tab
The next step is to create the cell (tab) for the UICollectionView.
Create a new swift file, name it TabCell, and paste the following code:
import UIKit
class TabCell: UICollectionViewCell {
private var tabSV: UIStackView!
var tabTitle: UILabel!
var tabIcon: UIImageView!
var indicatorView: UIView!
var indicatorColor: UIColor = .black
override var isSelected: Bool {
didSet {
DispatchQueue.main.async {
UIView.animate(withDuration: 0.3) {
self.indicatorView.backgroundColor = self.isSelected ? self.indicatorColor : UIColor.clear
self.layoutIfNeeded()
}
}
}
}
var tabViewModel: Tab? {
didSet {
tabTitle.text = tabViewModel?.title
tabIcon.image = tabViewModel?.icon
// Remove stackView spacing if icon is nil
(tabViewModel?.icon != nil) ? (tabSV.spacing = 10) : (tabSV.spacing = 0)
}
}
override init(frame: CGRect) {
super.init(frame: frame)
tabSV = UIStackView()
tabSV.axis = .horizontal
tabSV.distribution = .equalCentering
tabSV.alignment = .center
tabSV.spacing = 10.0
addSubview(tabSV)
// Tab Icon
tabIcon = UIImageView()
tabIcon.clipsToBounds = true
self.tabSV.addArrangedSubview(tabIcon)
// Tab Title
tabTitle = UILabel()
tabTitle.textAlignment = .center
self.tabSV.addArrangedSubview(tabTitle)
// TabIcon Constaints
tabIcon.translatesAutoresizingMaskIntoConstraints = false
NSLayoutConstraint.activate([
self.tabIcon.heightAnchor.constraint(equalToConstant: 18),
self.tabIcon.widthAnchor.constraint(lessThanOrEqualToConstant: 18)
])
// TabSv Constraints
tabSV.translatesAutoresizingMaskIntoConstraints = false
NSLayoutConstraint.activate([
tabSV.centerXAnchor.constraint(equalTo: self.centerXAnchor),
tabSV.centerYAnchor.constraint(equalTo: self.centerYAnchor)
])
setupIndicatorView()
}
required init?(coder aDecoder: NSCoder) {
fatalError("init(coder:) has not been implemented")
}
override func prepareForReuse() {
super.prepareForReuse()
tabTitle.text = ""
tabIcon.image = nil
}
func setupIndicatorView() {
indicatorView = UIView()
addSubview(indicatorView)
indicatorView.translatesAutoresizingMaskIntoConstraints = false
NSLayoutConstraint.activate([
indicatorView.heightAnchor.constraint(equalToConstant: 3),
indicatorView.widthAnchor.constraint(equalTo: self.widthAnchor),
indicatorView.bottomAnchor.constraint(equalTo: self.bottomAnchor)
])
}
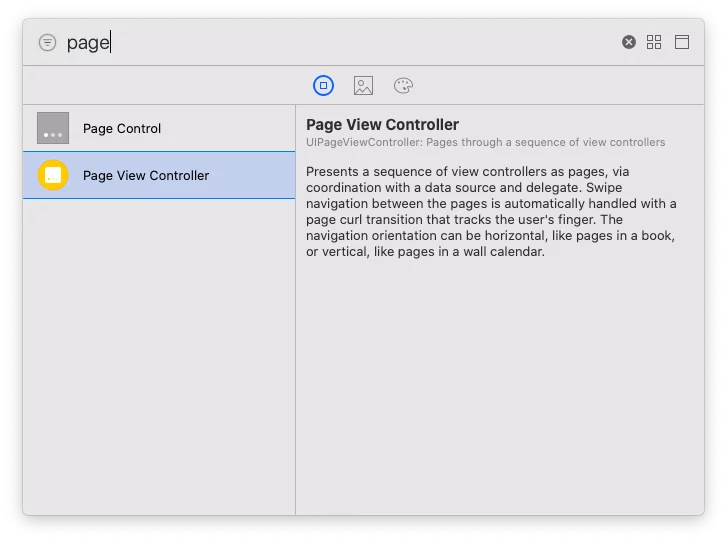
}Code language: Swift (swift)Creating the Page View Controller
In the Storyboard (e.g Main.storyboard), add a Page View Controller, add TabsPageViewController as a Class and type TabsPageViewController as a Storyboard ID

Next, change the Transition Style of the Page View Controller to Scroll

Create a new swift file, give the name TabsPageViewController, and paste the following code in:
import UIKit
class TabsPageViewController: UIPageViewController {

    override func viewDidLoad() {
        super.viewDidLoad()
    }
}Code language: Swift (swift)
Creating the View Controllers
Now it’s time to create the View Controllers that contain the content we want to display.
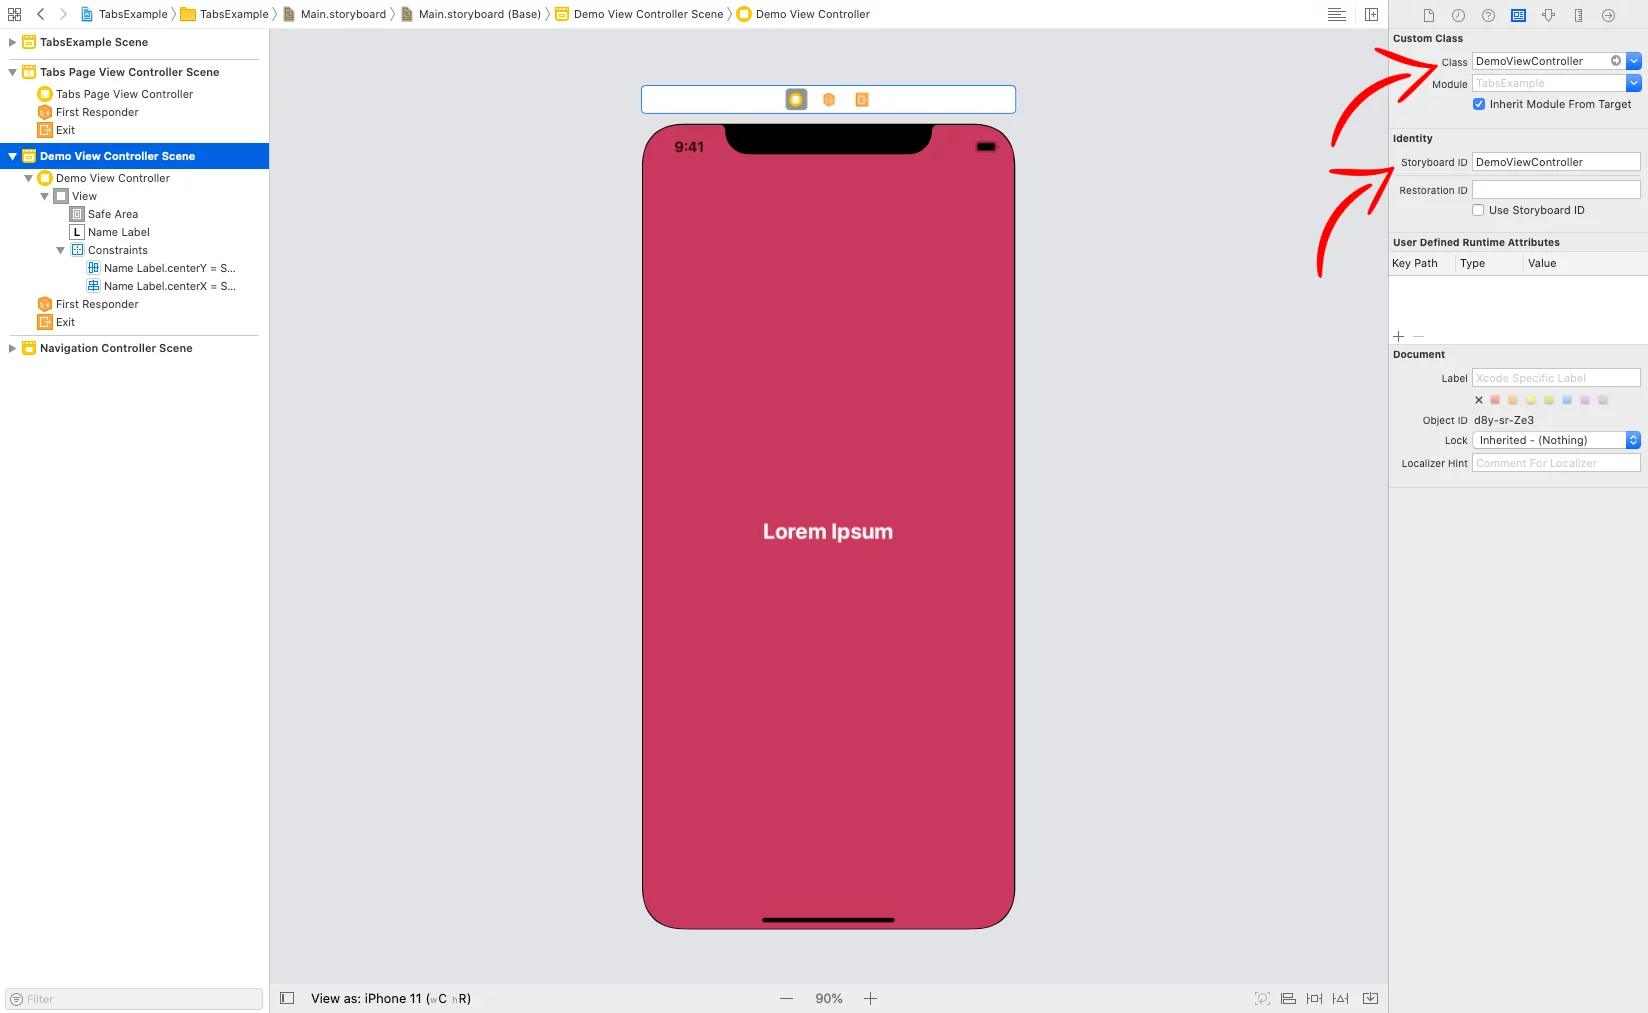
In this example, we create three different View Controllers (Demo1ViewController, Demo2ViewController, and Demo3ViewController)
Go to your Storyboard, add as many View Controllers you want, and type the same name of your UIViewController class to the Storyboard ID field
Create a new UIViewController swift file, give it a name (e.g. Demo1ViewController), and add the variable pageIndex.
Page View Controller doesn’t return the current page position, so we use this variable to keep track.
import UIKit
class Demo1ViewController: UIViewController {
    var pageIndex: Int!

    override func viewDidLoad() {
        super.viewDidLoad()
    }
}Code language: Swift (swift)
Setting up Tabs
Go back to your View Controller you added the TabsView at the beginning, and create an IBOutlet:

Now, create the list of tabs and customize them the way you like:
class ViewController: UIViewController {
    @IBOutlet var tabsView: TabsView!
    var currentIndex: Int = 0

    var pageController: UIPageViewController!

    override func viewDidLoad() {
        super.viewDidLoad()

        setupTabs()

    }

    func setupTabs() {
        // Add Tabs (Set 'icon'to nil if you don't want to have icons)
        tabsView.tabs = [
            Tab(icon: UIImage(named: "music"), title: "Music"),
            Tab(icon: UIImage(named: "movies"), title: "Movies"),
            Tab(icon: UIImage(named: "books"), title: "Books")
        ]

        // Set TabMode to '.fixed' for stretched tabs in full width of screen or '.scrollable' for scrolling to see all tabs
        tabsView.tabMode = .fixed

        // TabView Customization
        tabsView.titleColor = .white
        tabsView.iconColor = .white
        tabsView.indicatorColor = .white
        tabsView.titleFont = UIFont.systemFont(ofSize: 20, weight: .semibold)
        tabsView.collectionView.backgroundColor = .cyan

        // Set TabsView Delegate
        tabsView.delegate = self

        // Set the selected Tab when the app starts
        tabsView.collectionView.selectItem(at: IndexPath(item: 0, section: 0), animated: true, scrollPosition: .centeredVertically)
    }
}
Code language: Swift (swift)
If you have rotation enabled in your app, you need to update the UICollectionView Layout every time you rotate:
override func viewDidLayoutSubviews() {
    super.viewDidLayoutSubviews()
    // Refresh CollectionView Layout when you rotate the device
    tabsView.collectionView.collectionViewLayout.invalidateLayout()
}Code language: Swift (swift)
At the bottom of your swift file, extend your View Controller, and add the TabsDelegate.
The following method (tabsViewDidSelectItemAt) called every time you tap on a tab.
extension ViewController: TabsDelegate {
    func tabsViewDidSelectItemAt(position: Int) {
        // Check if the selected tab cell position is the same with the current position in pageController, if not, then go forward or backward
        if position != currentIndex {
            if position > currentIndex {
                self.pageController.setViewControllers([showViewController(position)!], direction: .forward, animated: true, completion: nil)
            } else {
                self.pageController.setViewControllers([showViewController(position)!], direction: .reverse, animated: true, completion: nil)
            }
            tabsView.collectionView.scrollToItem(at: IndexPath(item: position, section: 0), at: .centeredHorizontally, animated: true)
        }
    }
}Code language: Swift (swift)
Next, setup the UIPageViewController:
class ViewController: UIViewController {
    @IBOutlet var tabsView: TabsView!

    var currentIndex: Int = 0

    var pageController: UIPageViewController!

    override func viewDidLoad() {
        super.viewDidLoad()

        // ...

        setupPageViewController()
    }

    func setupPageViewController() {
        // PageViewController
        self.pageController = storyboard?.instantiateViewController(withIdentifier: "TabsPageViewController") as! TabsPageViewController
        self.addChild(self.pageController)
        self.view.addSubview(self.pageController.view)

        // Set PageViewController Delegate & DataSource
        pageController.delegate = self
        pageController.dataSource = self

        // Set the selected ViewController in the PageViewController when the app starts
        pageController.setViewControllers([showViewController(0)!], direction: .forward, animated: true, completion: nil)

        // PageViewController Constraints
        self.pageController.view.translatesAutoresizingMaskIntoConstraints = false
        NSLayoutConstraint.activate([
            self.pageController.view.topAnchor.constraint(equalTo: self.tabsView.bottomAnchor),
            self.pageController.view.leadingAnchor.constraint(equalTo: self.view.leadingAnchor),
            self.pageController.view.trailingAnchor.constraint(equalTo: self.view.trailingAnchor),
            self.pageController.view.bottomAnchor.constraint(equalTo: self.view.bottomAnchor)
        ])
        self.pageController.didMove(toParent: self)
    }
}Code language: Swift (swift)
Again, at the bottom of your swift file, extend your View Controller, and add the UIPageViewControllerDataSource & UIPageViewControllerDelegate.
extension ViewController: UIPageViewControllerDataSource, UIPageViewControllerDelegate {
    // return ViewController when go forward
    func pageViewController(_ pageViewController: UIPageViewController, viewControllerAfter viewController: UIViewController) -> UIViewController? {
        let vc = pageViewController.viewControllers?.first
        var index: Int
        index = getVCPageIndex(vc)
        // Don't do anything when viewpager reach the number of tabs
        if index == tabsView.tabs.count {
            return nil
        } else {
            index += 1
            return self.showViewController(index)
        }
    }

    // return ViewController when go backward
    func pageViewController(_ pageViewController: UIPageViewController, viewControllerBefore viewController: UIViewController) -> UIViewController? {
        let vc = pageViewController.viewControllers?.first
        var index: Int
        index = getVCPageIndex(vc)

        if index == 0 {
            return nil
        } else {
            index -= 1
            return self.showViewController(index)
        }
    }

    func pageViewController(_ pageViewController: UIPageViewController, didFinishAnimating finished: Bool, previousViewControllers: [UIViewController], transitionCompleted completed: Bool) {
        if finished {
            if completed {
                guard let vc = pageViewController.viewControllers?.first else { return }
                let index: Int

                index = getVCPageIndex(vc)

                tabsView.collectionView.selectItem(at: IndexPath(item: index, section: 0), animated: true, scrollPosition: .centeredVertically)
                // Animate the tab in the TabsView to be centered when you are scrolling using .scrollable
                tabsView.collectionView.scrollToItem(at: IndexPath(item: index, section: 0), at: .centeredHorizontally, animated: true)
            }
        }
    }

    // Return the current position that is saved in the UIViewControllers we have in the UIPageViewController
    func getVCPageIndex(_ viewController: UIViewController?) -> Int {
        switch viewController {
        case is Demo1ViewController:
            let vc = viewController as! Demo1ViewController
            return vc.pageIndex
        case is Demo2ViewController:
            let vc = viewController as! Demo2ViewController
            return vc.pageIndex
        case is Demo3ViewController:
            let vc = viewController as! Demo3ViewController
            return vc.pageIndex
        default:
            let vc = viewController as! Demo1ViewController
            return vc.pageIndex
        }
    }
}
Code language: Swift (swift)
The viewControllerAfter method returns the next viewController when you go forward on the Page View Controller, and the viewControllerBefore when you go backward.
The didFinishAnimating called after a user swipes to a new UIViewController, and the animation has completed.
Last, add the showViewController method. This method returns the right View Controller for the current position.
// Show ViewController for the current position
func showViewController(_ index: Int) -> UIViewController? {
    if (self.tabsView.tabs.count == 0) || (index >= self.tabsView.tabs.count) {
        return nil
    }

    currentIndex = index

    if index == 0 {
        let contentVC = storyboard?.instantiateViewController(withIdentifier: "Demo1ViewController") as! Demo1ViewController
        contentVC.pageIndex = index
        return contentVC
    } else if index == 1 {
        let contentVC = storyboard?.instantiateViewController(withIdentifier: "Demo2ViewController") as! Demo2ViewController
        contentVC.pageIndex = index
        return contentVC
    } else if index == 2 {
        let contentVC = storyboard?.instantiateViewController(withIdentifier: "Demo3ViewController") as! Demo3ViewController
        contentVC.pageIndex = index
        return contentVC
    } else {
        let contentVC = storyboard?.instantiateViewController(withIdentifier: "Demo1ViewController") as! Demo1ViewController
        contentVC.pageIndex = index
        return contentVC
    }
}Code language: Swift (swift)
Done!
You can find the final project here
If you have any questions, please feel free to leave a comment below