
Last updated on: May 27, 2023
In this tutorial, I’m going to show you how to implement Tabs in your Android app using Kotlin
We’re going to use the new ViewPager, ViewPager2.
This version of ViewPager has some new features, and the way to use it with Tabs is a little bit different.
Contents
Adding Dependencies
Go to your app-level build.gradle, and add the following dependencies:
dependencies {
    // ...

    implementation 'com.google.android.material:material:1.1.0'
    implementation 'androidx.viewpager2:viewpager2:1.0.0'

    // ...
}Code language: Kotlin (kotlin)
Creating the Tabs Layout
In your Activity’s layout file, add a TabLayout, for the tabs, and a ViewPager2
<?xml version="1.0" encoding="utf-8"?>
<LinearLayout xmlns:android="http://schemas.android.com/apk/res/android"
    xmlns:app="http://schemas.android.com/apk/res-auto"
    android:layout_width="match_parent"
    android:layout_height="match_parent"
    android:orientation="vertical">

    <com.google.android.material.tabs.TabLayout
        android:id="@+id/tab_layout"
        android:layout_width="match_parent"
        android:layout_height="wrap_content"
        android:background="@color/colorPrimaryDark"
        app:tabMaxWidth="0dp"
        app:tabTextAppearance="?android:attr/textAppearanceMedium"
        app:textAllCaps="false" />


    <androidx.viewpager2.widget.ViewPager2
        android:id="@+id/tabs_viewpager"
        android:layout_width="match_parent"
        android:layout_height="0dp"
        android:layout_weight="1"/>

</LinearLayout>Code language: HTML, XML (xml)
Creating Tabs ViewPager Adapter
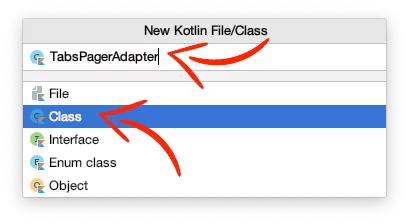
Create a new Kotlin class and name it TabsPagerAdapter
Next, paste the following code inside:
class TabsPagerAdapter(fm: FragmentManager, lifecycle: Lifecycle, private var numberOfTabs: Int) : FragmentStateAdapter(fm, lifecycle) {

    override fun createFragment(position: Int): Fragment {
        when (position) {
            0 -> {
                // # Music Fragment
                val bundle = Bundle()
                bundle.putString("fragmentName", "Music Fragment")
                val musicFragment = DemoFragment()
                musicFragment.arguments = bundle
                return musicFragment
            }
            1 -> {
                // # Movies Fragment
                val bundle = Bundle()
                bundle.putString("fragmentName", "Movies Fragment")
                val moviesFragment = DemoFragment()
                moviesFragment.arguments = bundle
                return moviesFragment
            }
            2 -> {
                // # Books Fragment
                val bundle = Bundle()
                bundle.putString("fragmentName", "Books Fragment")
                val booksFragment = DemoFragment()
                booksFragment.arguments = bundle
                return booksFragment
            }
            else -> return DemoFragment()
        }
    }

    override fun getItemCount(): Int {
        return numberOfTabs
    }
}Code language: Kotlin (kotlin)
In the createFragment method, we return a fragment for each position.
In the getItemCount method, we use the same number of fragments with the tabs.
Adding Tabs in Activity
In the Activity’s Kotlin file, customize and set the number of tabs.
class MainActivity : AppCompatActivity() {

    override fun onCreate(savedInstanceState: Bundle?) {
        super.onCreate(savedInstanceState)
        setContentView(R.layout.activity_main)

        // Tabs Customization
        tab_layout.setSelectedTabIndicatorColor(Color.WHITE)
        tab_layout.setBackgroundColor(ContextCompat.getColor(this, R.color.colorPrimaryDark))
        tab_layout.tabTextColors = ContextCompat.getColorStateList(this, android.R.color.white)

        // Set different Text Color for Tabs for when are selected or not
        //tab_layout.setTabTextColors(R.color.normalTabTextColor, R.color.selectedTabTextColor)

        // Number Of Tabs
        val numberOfTabs = 3

        // Set Tabs in the center
        //tab_layout.tabGravity = TabLayout.GRAVITY_CENTER

        // Show all Tabs in screen
        tab_layout.tabMode = TabLayout.MODE_FIXED

        // Scroll to see all Tabs
        //tab_layout.tabMode = TabLayout.MODE_SCROLLABLE

        // Set Tab icons next to the text, instead above the text
        tab_layout.isInlineLabel = true


        // ...
    }
}Code language: Kotlin (kotlin)
Then, create the adapter for the ViewPager2 and enable the left-n-right swipe.
class MainActivity : AppCompatActivity() {


    override fun onCreate(savedInstanceState: Bundle?) {
        super.onCreate(savedInstanceState)
        setContentView(R.layout.activity_main)

        // ...

        // Set the ViewPager Adapter
        val adapter = TabsPagerAdapter(supportFragmentManager, lifecycle, numberOfTabs)
        tabs_viewpager.adapter = adapter

        // Enable Swipe
        tabs_viewpager.isUserInputEnabled = true

        // ...

    }
}
Code language: Kotlin (kotlin)
Last, link the TabLayout and the ViewPager2 together, and set the tab titles and icons for each fragment.
class MainActivity : AppCompatActivity() {


    override fun onCreate(savedInstanceState: Bundle?) {
        super.onCreate(savedInstanceState)
        setContentView(R.layout.activity_main)

        // ...

        // Link the TabLayout and the ViewPager2 together and Set Text & Icons
        TabLayoutMediator(tab_layout, tabs_viewpager) { tab, position ->
            when (position) {
                0 -> {
                    tab.text = "Music"
                    tab.setIcon(R.drawable.ic_music)
                }
                1 -> {
                    tab.text = "Movies"
                    tab.setIcon(R.drawable.ic_movie)

                }
                2 -> {
                    tab.text = "Books"
                    tab.setIcon(R.drawable.ic_book)
                }

            }
            // Change color of the icons
            tab.icon?.colorFilter =
                BlendModeColorFilterCompat.createBlendModeColorFilterCompat(
                    Color.WHITE,
                    BlendModeCompat.SRC_ATOP
                )
        }.attach()

        // ...

    }
}
Code language: Kotlin (kotlin)
Extra: Customizing Tab’s TextView
You can change Tab’s TextView size and font by getting every child view of the TabLayout and editing the TextViews the way you want
private fun setCustomTabTitles() {
        val vg = tab_layout.getChildAt(0) as ViewGroup
        val tabsCount = vg.childCount

        for (j in 0 until tabsCount) {
            val vgTab = vg.getChildAt(j) as ViewGroup

            val tabChildCount = vgTab.childCount

            for (i in 0 until tabChildCount) {
                val tabViewChild = vgTab.getChildAt(i)
                if (tabViewChild is TextView) {

                    // Change Font and Size
                    tabViewChild.typeface = Typeface.DEFAULT_BOLD
//                    val font = ResourcesCompat.getFont(this, R.font.myFont)
//                    tabViewChild.typeface = font
//                    tabViewChild.setTextSize(TypedValue.COMPLEX_UNIT_SP, 25f)
                }
            }
        }
    }Code language: Kotlin (kotlin)
You can find the final project here
If you have any questions, please feel free to leave a comment below