
Last updated on: March 29, 2021
Contents
Creating an App on Twitter
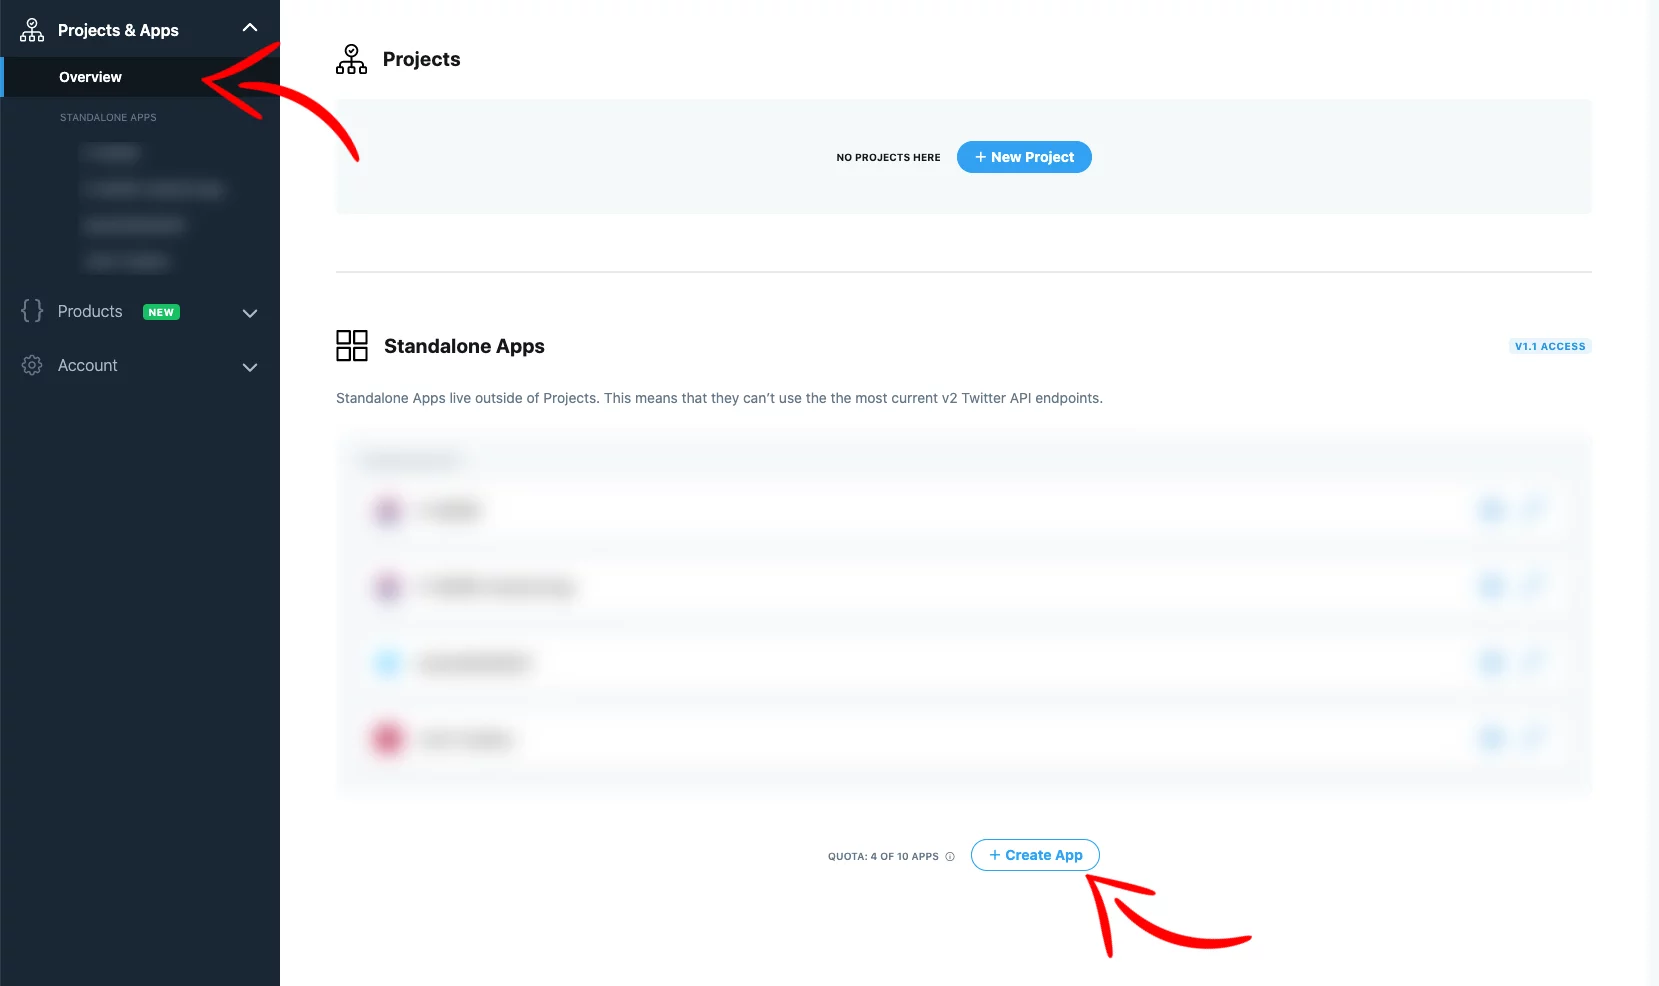
Go to https://developer.twitter.com/en/portal/projects-and-apps, log in with your Twitter account, and press Create an app
On the new page, add the name for your app and press Complete

Next, copy the API key and API secret key somewhere to use them later, and press App settings

Press the Edit button to edit the App Details

In the Edit App details page, add an App icon(optional), write a description for your app, and press Save

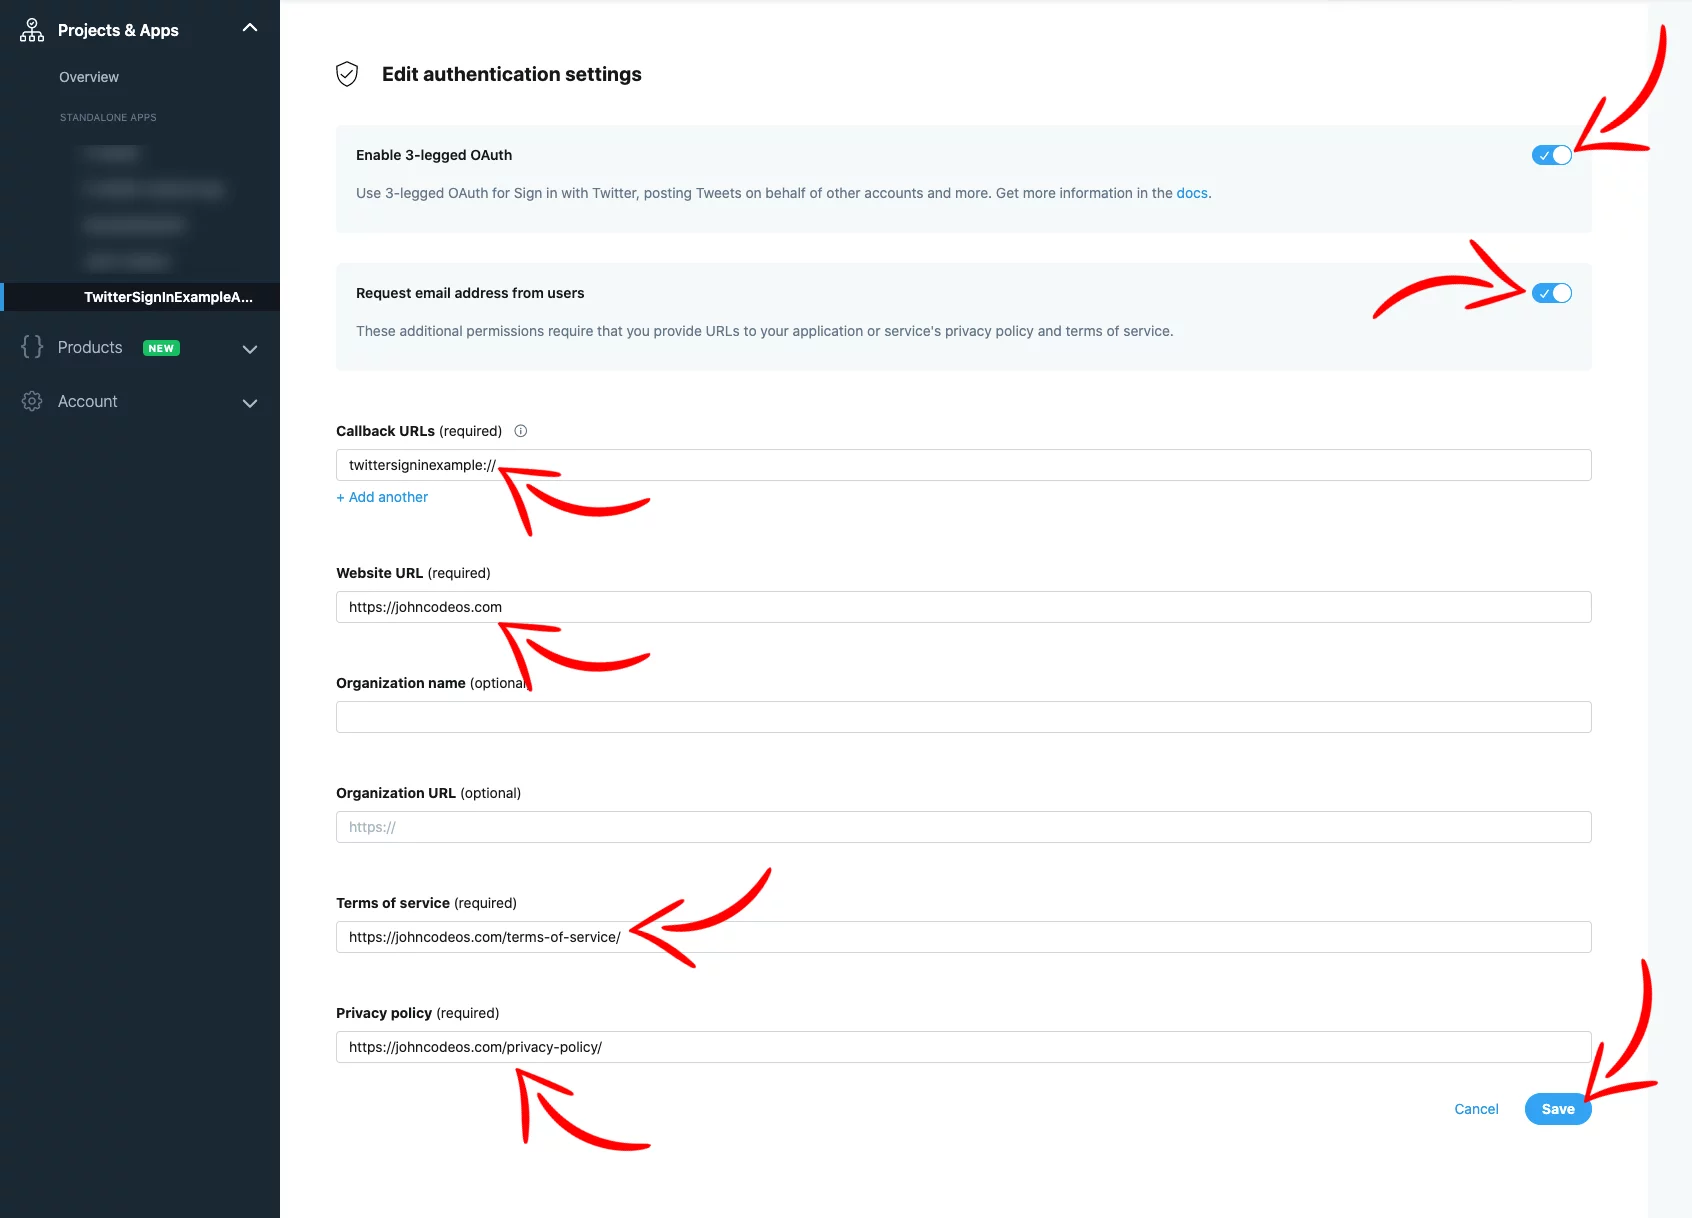
Now, press the Edit to edit the Authentication settings

On the next page, fill in all the required fields.
Turn on the switch for the Request email address from users if you want to get the user’s email.
As a Callback URL, add the name of your app (in lowercase) with :// , for example, twittersigninexample://
Also, add the Terms of Service and Privacy policy URLs of your app if you want to get the user’s email.
Then press Save
Adding the Swifter Library
First, we have to add the 3rd party library called Swifter that will make the entire process painless.
In this example, we do it using Cocoapods
Add the following pod to your Podfile and then from Terminal do pod update
pod 'Swifter', :git => "https://github.com/mattdonnelly/Swifter.git"Code language: Kotlin (kotlin)

Open your project from the .xcworkspace file, choose your app in TARGETS, go to the Info tab and press the little arrow next to URL Types.
In the URL Schemes field, add the name of your app (in lowercase). This needs to be the same with the callback URL (without the ://) you added before on the Twitter dashboard

Next, go to AppDelegate.swift and add the following code:
import Swifter
@UIApplicationMain
class AppDelegate: UIResponder, UIApplicationDelegate {

    // ...

    func application(_ app: UIApplication, open url: URL, options: [UIApplication.OpenURLOptionsKey : Any] = [:]) -> Bool {
        let callbackUrl = URL(string: TwitterConstants.CALLBACK_URL)!
        Swifter.handleOpenURL(url, callbackURL: callbackUrl)
        return true
    }
    // ...
}
Code language: Swift (swift)
If you have a SceneDelegate.swift file (created in Xcode 11 and iOS 13 and above) in your project, add the following code too:
import Swifter
class SceneDelegate: UIResponder, UIWindowSceneDelegate {
    // ...

    func scene(_ scene: UIScene, openURLContexts URLContexts: Set<UIOpenURLContext>) {
        guard let context = URLContexts.first else { return }
        let callbackUrl = URL(string: TwitterConstants.CALLBACK_URL)!
        Swifter.handleOpenURL(context.url, callbackURL: callbackUrl)
    }

    // ...
}
Code language: Swift (swift)
Now, create a new .swift file and name it TwitterConstants.swift
Then, paste the following code inside:
struct TwitterConstants {

    static let CONSUMER_KEY = "MY_CONSUMER_KEY"
    static let CONSUMER_SECRET_KEY = "MY_CONSUMER_SECRET_KEY"
    static let CALLBACK_URL = "MY_CALLBACK_URL"
}Code language: Swift (swift)
Replace the MY_CONSUMER_KEY with your API key, the MY_CONSUMER_SECRET with your API secret key, and the MY_CALLBACK_URL with your callback URL you added before on the Twitter dashboard.
Creating the Twitter Login Button
Create an UIButton in your ViewController and make an Outlet and an Action connection to your .swift file. In this example, we called it twitterLoginBtn and twitterLoginBtnAction.

Add import Swifter at the top of your file, and in the twitterLoginBtnAction add the following code:
var swifter: Swifter!
    var accToken: Credential.OAuthAccessToken?

    @IBAction func twitterLoginBtnAction(_ sender: UIButton) {
        self.swifter = Swifter(consumerKey: TwitterConstants.CONSUMER_KEY, consumerSecret: TwitterConstants.CONSUMER_SECRET_KEY)
        self.swifter.authorize(withCallback: URL(string: TwitterConstants.CALLBACK_URL)!, presentingFrom: self, success: { accessToken, _ in
            self.accToken = accessToken
            self.getUserProfile()
        }, failure: { _ in
            print("ERROR: Trying to authorize")
        })
    }Code language: Swift (swift)
If the authorization was successful, we get back an Access Token and we call the method getUserProfile() to get their data.
Note: If you want to show the Authorization Screen inside your app instead of opening the Safari browser, add import SafariServices at the top of your .swift file and extend your ViewController class with SFSafariViewControllerDelegate
// Show the Authorization screen inside the app instead of opening Safari
extension LoginViewController: SFSafariViewControllerDelegate {}Code language: Swift (swift)
Getting User’s Profile Info
Now, after the user gave us access to their data, we can get them using .verifyAccountCredentials() from the swifter library.
If you don’t want to get the user’s email, change the parameter includeEmail to false
func getUserProfile() {
        self.swifter.verifyAccountCredentials(includeEntities: false, skipStatus: false, includeEmail: true, success: { json in
            // Twitter Id
            if let twitterId = json["id_str"].string {
                print("Twitter Id: \(twitterId)")
            } else {
                self.twitterId = "Not exists"
            }
            // Twitter Handle
            if let twitterHandle = json["screen_name"].string {
                print("Twitter Handle: \(twitterHandle)")
            } else {
                self.twitterHandle = "Not exists"
            }
            // Twitter Name
            if let twitterName = json["name"].string {
                print("Twitter Name: \(twitterName)")
            } else {
                self.twitterName = "Not exists"
            }
            // Twitter Email
            if let twitterEmail = json["email"].string {
                print("Twitter Email: \(twitterEmail)")
            } else {
                self.twitterEmail = "Not exists"
            }
            // Twitter Profile Pic URL
            if let twitterProfilePic = json["profile_image_url_https"].string?.replacingOccurrences(of: "_normal", with: "", options: .literal, range: nil) {
                print("Twitter Profile URL: \(twitterProfilePic)")
            } else {
                self.twitterProfilePicURL = "Not exists"
            }
            print("Twitter Access Token: \(self.accToken?.key ?? "Not exists")")
        }) { error in
            print("ERROR: \(error.localizedDescription)")
        }
    }Code language: Swift (swift)
Checking User’s Logging state
To check the user’s logging state, we use the .verifyAccountCredentials().
Using the .verifyAccountCredentials(), we verify if the access token is valid or not.
Twitter’s access tokens never expire (only in some cases), they just become invalidate when the user revokes your app from their Twitter account (Settings and privacy > Account > Apps and sessions)

To do the .verifyAccountCredentials(), we need the oauth token and the oauth token secret.
These two can be saved on your app, using UserDefaults, when you are getting the user’s profile data.
func getUserProfile() {
        self.swifter.verifyAccountCredentials(includeEntities: false, skipStatus: false, includeEmail: true, success: { json in
            // ...Getting Profile Data
            // Save the Access Token (accToken.key) and Access Token Secret (accToken.secret) using UserDefaults
            // This will allow us to check user's logging state every time they open the app after cold start.
            let userDefaults = UserDefaults.standard
            userDefaults.set(self.accToken?.key, forKey: "oauth_token")
            userDefaults.set(self.accToken?.secret, forKey: "oauth_token_secret")
        }) { error in
            print("ERROR: \(error.localizedDescription)")
        }
    }Code language: Swift (swift)
So every time the user opens the app, we check if the access token is valid, and we send them to the right ViewController.
class LoginViewController: UIViewController {
    override func viewDidLoad() {
        super.viewDidLoad()

        self.isLoggedIn { loggedin in
            if loggedin {
                // Show the ViewController with the logged in user
                print("Logged In?: YES")
            } else {
                // Show the Home ViewController
                print("Logged In?: NO")
            }
        }
    }

    func isLoggedIn(completion: @escaping (Bool) -> ()) {
        let userDefaults = UserDefaults.standard
        let accessToken = userDefaults.string(forKey: "oauth_token") ?? ""
        let accessTokenSecret = userDefaults.string(forKey: "oauth_token_secret") ?? ""

        let swifter = Swifter(consumerKey: TwitterConstants.CONSUMER_KEY, consumerSecret: TwitterConstants.CONSUMER_SECRET_KEY, oauthToken: accessToken, oauthTokenSecret: accessTokenSecret)
        swifter.verifyAccountCredentials(includeEntities: false, skipStatus: false, includeEmail: true, success: { _ in
            // Verify Succeed - Access Token is valid
            completion(true)
        }) { _ in
            // Verify Failed - Access Token has expired
            completion(false)
        }
    }
}
Code language: Swift (swift)
You can find the final project here
If you have any questions, please feel free to leave a comment below