
Last updated on: March 29, 2021
Contents
Creating an App on Twitter
Go to https://developer.twitter.com/en/portal/projects-and-apps, log in with your Twitter account, and press Create an app.
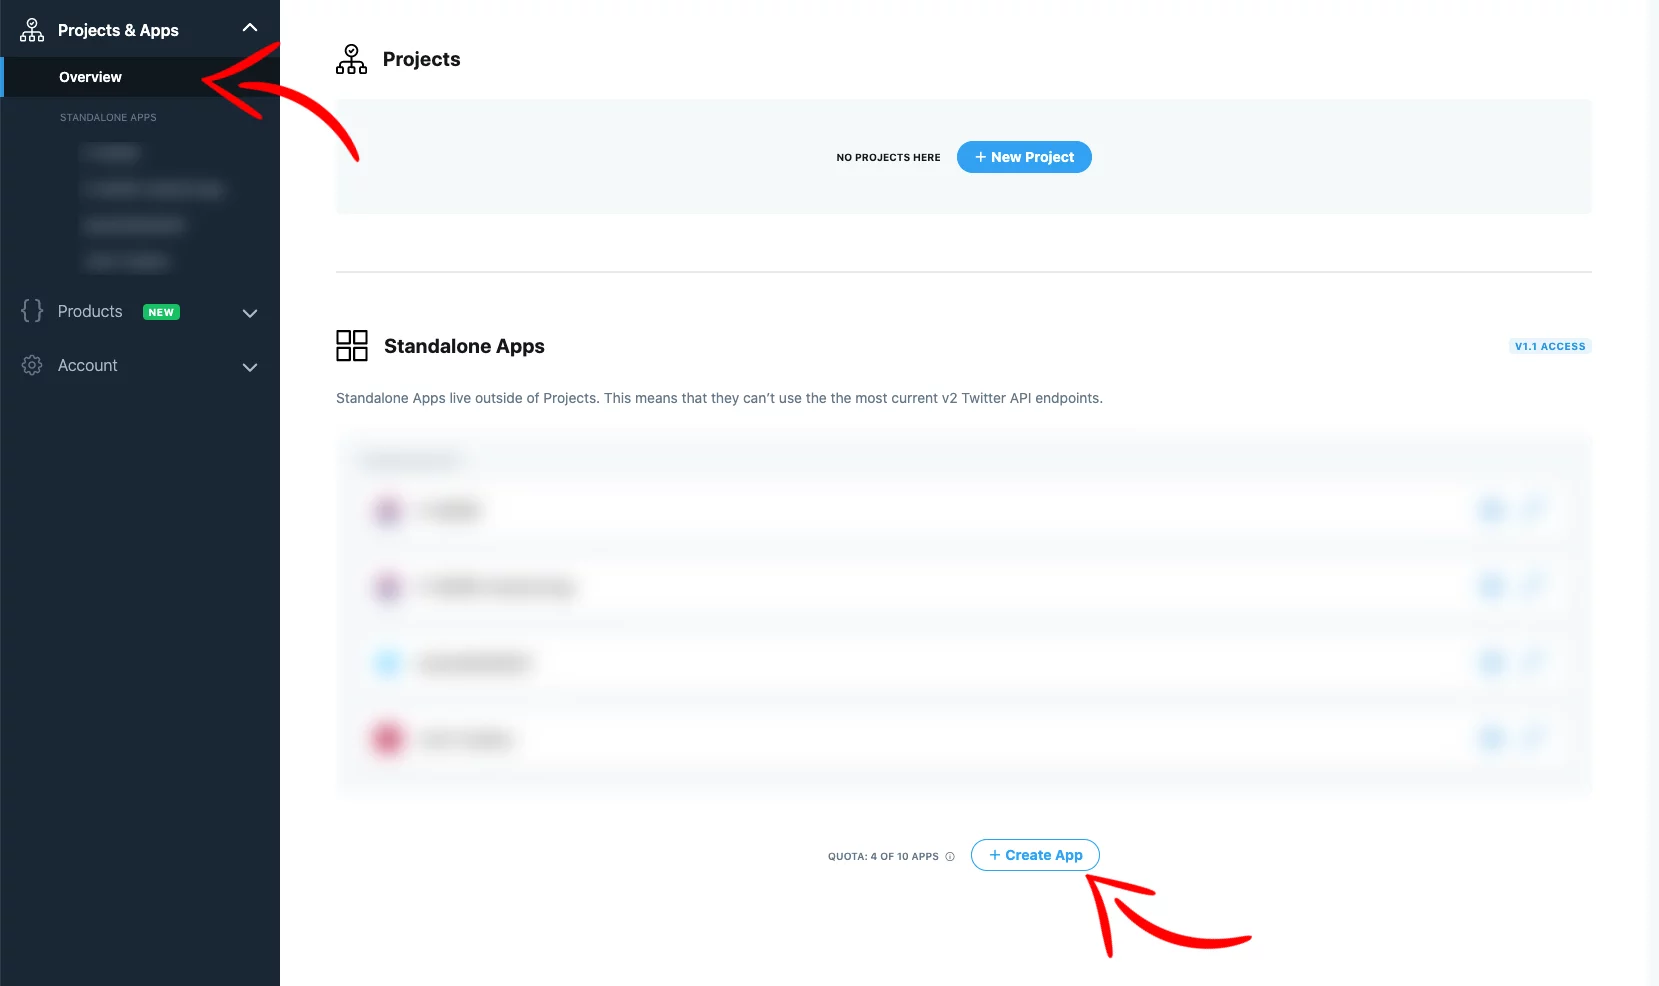
On the new page, add the name for your app and press Complete

Next, copy the API key and API secret key somewhere to use them later, and press App settings

Press the Edit button to edit the App Details

In the Edit App details page, add an App icon(optional), write a description for your app, and press Save.

Now, press Edit to edit the Authentication settings

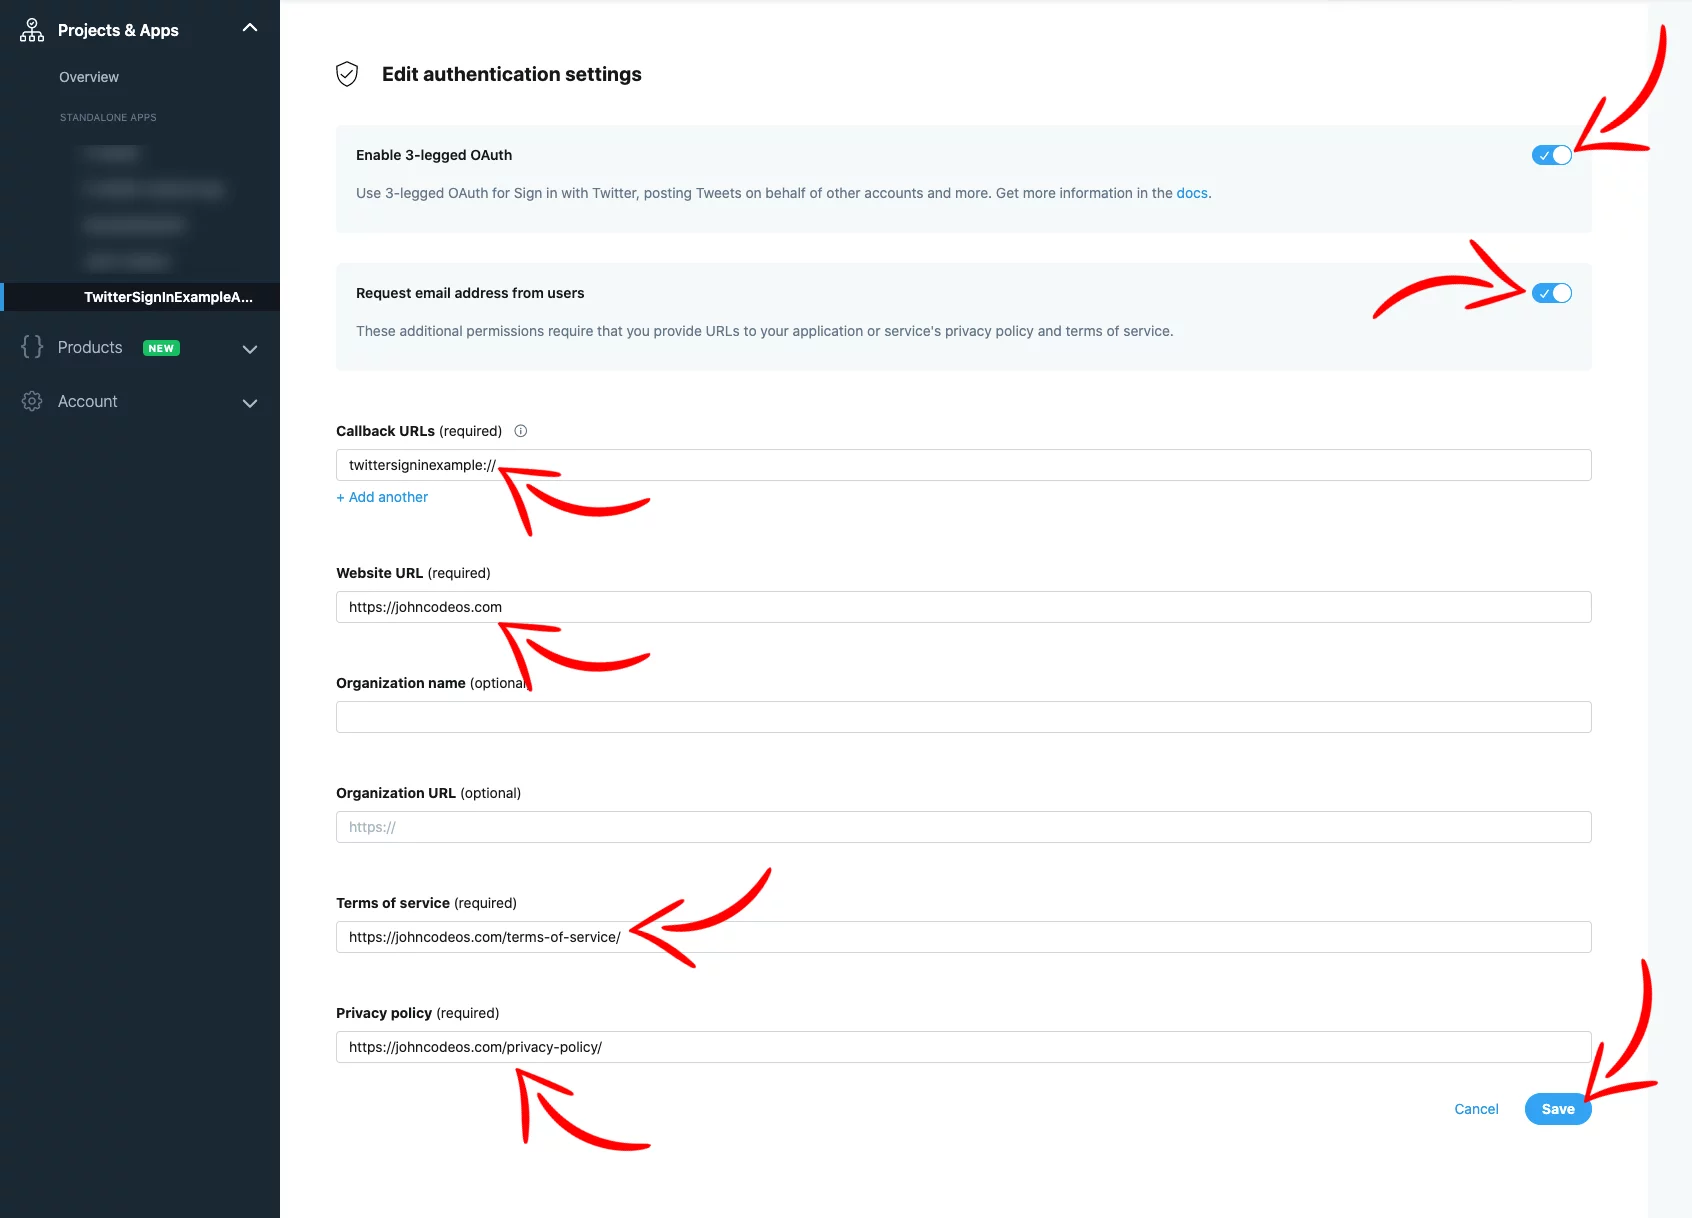
On the next page, fill in all the required fields.
Turn on the switch for the Request email address from users if you want to get the user’s email.
As a Callback URL, add the name of your app (in lowercase) and :// at the end, for example, twittersigninexample://
Also, add your app’s Terms of Service and Privacy policy URLs if you want to get the user’s email.
Then press Save
Creating the Twitter Login Button
Go to build.gradle of your app and add the following dependencies
We use Coroutines to do the asynchronous tasks and twitter4j for the Twitter API.
dependencies {
    // ...
    implementation 'org.twitter4j:twitter4j-core:4.0.7'
    implementation 'androidx.lifecycle:lifecycle-runtime-ktx:2.5.1'
    // ...
}Code language: Kotlin (kotlin)
In your AndroidManifest.xml (manifests > AndroidManifest.xml) add the following permission:
<uses-permission android:name="android.permission.INTERNET" />Code language: HTML, XML (xml)Go to your layout XML and add a button
<?xml version="1.0" encoding="utf-8"?>
<RelativeLayout xmlns:android="http://schemas.android.com/apk/res/android"
    xmlns:tools="http://schemas.android.com/tools"
    android:layout_width="match_parent"
    android:layout_height="match_parent"
    android:background="@color/colorPrimary"
    tools:context=".MainActivity">
    <Button
        android:id="@+id/twitter_login_btn"
        android:layout_width="wrap_content"
        android:layout_height="wrap_content"
        android:layout_centerInParent="true"
        android:background="@drawable/rounded_corners"
        android:drawableStart="@drawable/twitter_icon"
        android:drawablePadding="8dp"
        android:padding="8dp"
        android:text="Log in with Twitter"
        android:textAllCaps="false"
        android:textColor="@android:color/white" />
</RelativeLayout>Code language: HTML, XML (xml)
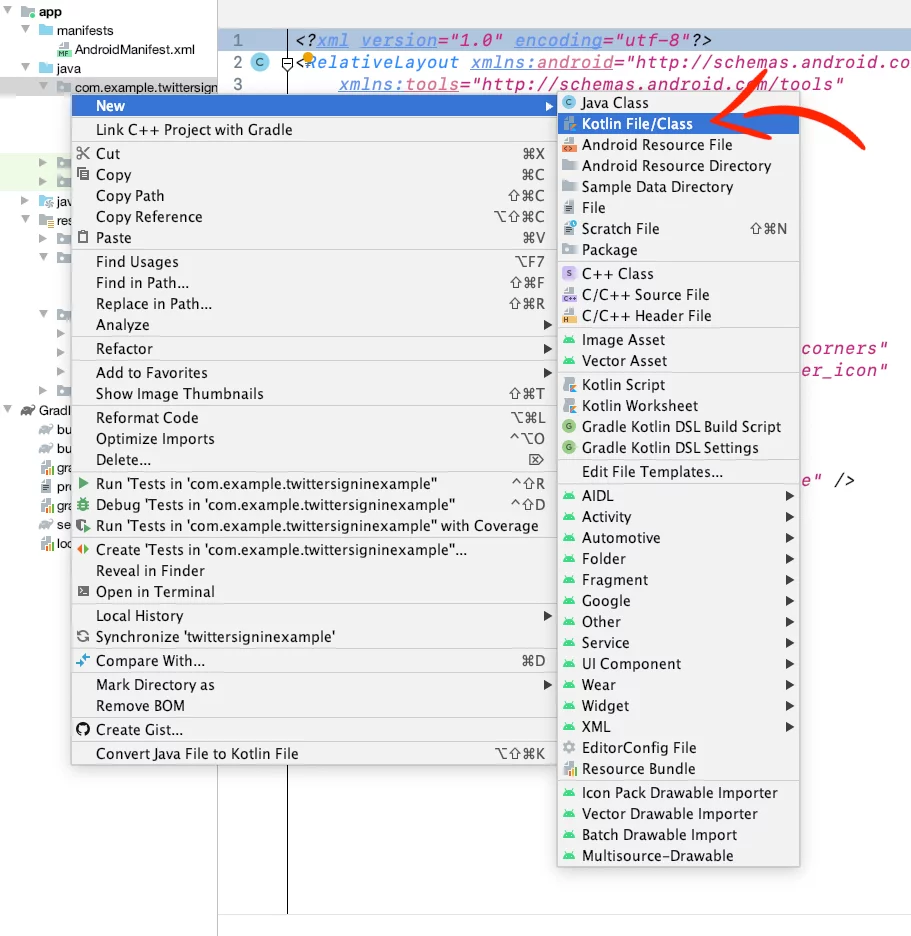
Create a new Kotlin Object in your project by right-clicking on your project’s package name and pressing New > Kotlin File/Class.
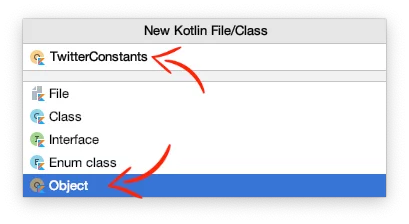
Give the name TwitterConstants and select the Object
Inside the file, paste the following code:
object TwitterConstants {
    var CONSUMER_KEY = "MY_CONSUMER_KEY"
    var CONSUMER_SECRET = "MY_CONSUMER_SECRET"
    var CALLBACK_URL = "MY_CALLBACK_URL"
}Code language: Kotlin (kotlin)
Replace MY_CONSUMER_KEY with your API Key and MY_CONSUMER_SECRET with your API Secret Key. Then enter the MY_CALLBACK_URL as the callback URL you added before on the Twitter dashboard.
Go to your Activity (or Fragment) file and create a click listener for your button that calls the getRequestToken() method.
class MainActivity : AppCompatActivity() {
    override fun onCreate(savedInstanceState: Bundle?) {
        super.onCreate(savedInstanceState)
        setContentView(R.layout.activity_main)

        val twitterLoginBtn = findViewById<Button>(R.id.twitter_login_btn)
        twitterLoginBtn.setOnClickListener {
            getRequestToken()
        }

    }
}Code language: Kotlin (kotlin)
Before we ask the user to permit us to use their data, we have to get a request token from Twitter that we’ll use later to do the authorization.
lateinit var twitter: Twitter

private fun getRequestToken() {
    lifecycleScope.launch(Dispatchers.Default) {
        val builder = ConfigurationBuilder()
            .setDebugEnabled(true)
            .setOAuthConsumerKey(TwitterConstants.CONSUMER_KEY)
            .setOAuthConsumerSecret(TwitterConstants.CONSUMER_SECRET)
            .setIncludeEmailEnabled(true)
        val config = builder.build()
        val factory = TwitterFactory(config)
        twitter = factory.instance
        try {
            val requestToken = twitter.oAuthRequestToken
            withContext(Dispatchers.Main) {
                setupTwitterWebViewDialog(requestToken.authorizationURL)
            }
        } catch (e: IllegalStateException) {
            Log.e("ERROR: ", e.toString())
        }
    }
}Code language: Kotlin (kotlin)
After you successfully get the Request Token, we have to open a Dialog with a WebView in it to ask them if they want our app to get their profile data (authorize).
If they accept it, we get back a URL of the form:
MY_CALLBACK_URL?oauth_token=XXXXXXXXXXXXXXX&oauth_verifier=XXXXXXXXXXXXXXXXXXXXXXXXXXXXCode language: Swift (swift)From that URL, we take the oauth_verifier, and use it to get the access token
lateinit var twitterDialog: Dialog
var accToken: AccessToken? = null

// Show twitter login page in a dialog
private fun setupTwitterWebViewDialog(url: String) {
    val webView = WebView(this).apply {
        isVerticalScrollBarEnabled = false
        isHorizontalScrollBarEnabled = false
        webViewClient = TwitterWebViewClient()
        loadUrl(url)
    }
    twitterDialog = Dialog(this).apply {
        setContentView(webView)
        show()
    }
}

// A client to know about WebView navigation
@Suppress("OverridingDeprecatedMember")
inner class TwitterWebViewClient : WebViewClient() {
    override fun shouldOverrideUrlLoading(view: WebView, request: WebResourceRequest): Boolean {
        if (request.url.toString().startsWith(TwitterConstants.CALLBACK_URL)) {
            handleUrl(request.url.toString())
            twitterDialog.dismiss()
            return true
        }
        return false
    }

    // Get the oauth_verifier
    private fun handleUrl(url: String) {
        val uri = Uri.parse(url)
        val oauthVerifier = uri.getQueryParameter("oauth_verifier") ?: ""
        lifecycleScope.launch(Dispatchers.Main) {
            accToken =
                withContext(Dispatchers.IO) { twitter.getOAuthAccessToken(oauthVerifier) }
            getUserProfile()
            twitterDialog.dismiss()
        }
    }
}Code language: Kotlin (kotlin)
Getting User’s Profile Info
To get the user’s data, we’re using the .verifyCredentials() from the twitter4j
suspend fun getUserProfile() {
        val usr = withContext(Dispatchers.IO) { twitter.verifyCredentials() }
        //Twitter Id
        val twitterId = usr.id.toString()
        Log.d("Twitter Id: ", twitterId)

        //Twitter Handle
        val twitterHandle = usr.screenName
        Log.d("Twitter Handle: ", twitterHandle)
        //Twitter Name
        val twitterName = usr.name
        Log.d("Twitter Name: ", twitterName)
        //Twitter Email
        val twitterEmail = usr.email
        Log.d("Twitter Email: ", twitterEmail ?: "'Request email address from users' on the Twitter dashboard is disabled")
        // Twitter Profile Pic URL
        val twitterProfilePic = usr.profileImageURLHttps.replace("_normal", "")
        Log.d("Twitter Profile URL: ", twitterProfilePic)
        // Twitter Access Token
        Log.d("Twitter Access Token", accToken?.token ?: "")

    }Code language: Kotlin (kotlin)
Checking the User’s Logging state
To check the user’s logging state, we use the .verifyCredentials().
Using the .verifyCredentials(), we verify if the access token is valid or not.
Twitter’s access tokens never expire (only in some cases). They just become invalidated when the user revokes your app from their Twitter account (Settings and privacy > Account > Apps and sessions)

To do the .verifyCredentials(), we need the OAuth Token and the OAuth Token Secret.
These two can be saved on your app, using SharedPreferences, when you are getting the user’s profile data.
suspend fun getUserProfile() {
        // ...Getting Profile Data
        // Save the Access Token (accToken.token) and Access Token Secret (accToken.tokenSecret) using SharedPreferences
        // This will allow us to check user's logging state every time they open the app after cold start.
        val sharedPref = this.getPreferences(Context.MODE_PRIVATE)
        sharedPref.edit().putString("oauth_token",accToken?.token ?: "").apply()
        sharedPref.edit().putString("oauth_token_secret",accToken?.tokenSecret ?: "").apply()
    }Code language: Kotlin (kotlin)
So every time the user opens the app, we check if the access token is valid and send them to the correct Activity (or Fragment).
class MainActivity : AppCompatActivity() {

    override fun onCreate(savedInstanceState: Bundle?) {
        super.onCreate(savedInstanceState)
        setContentView(R.layout.activity_main)

        lifecycleScope.launch {
            val result = isLoggedIn()
            if (result) {
                // Show the Activity with the logged in user
                Log.d("LoggedIn?: ", "YES")
            } else {
                // Show the Home Activity
                Log.d("LoggedIn?: ", "NO")
            }
        }

        // ...

    }

    private suspend fun isLoggedIn(): Boolean {
        val sharedPref = this.getPreferences(Context.MODE_PRIVATE)
        val accessToken = sharedPref.getString("oauth_token", "")
        val accessTokenSecret = sharedPref.getString("oauth_token_secret", "")

        val builder = ConfigurationBuilder()
            .setOAuthConsumerKey(TwitterConstants.CONSUMER_KEY)
            .setOAuthConsumerSecret(TwitterConstants.CONSUMER_SECRET)
            .setOAuthAccessToken(accessToken)
            .setOAuthAccessTokenSecret(accessTokenSecret)
        val config = builder.build()
        val factory = TwitterFactory(config)
        val twitter = factory.instance
        try {
            withContext(Dispatchers.IO) { twitter.verifyCredentials() }
            return true
        } catch (e: Exception) {
            return false
        }
    }

}Code language: Kotlin (kotlin)
You can find the final project here
If you have any questions, please feel free to leave a comment below