
Last updated on: May 27, 2023
Contents
Creating an App on Facebook
First, go to developers.facebook.com and log in with your Facebook account.
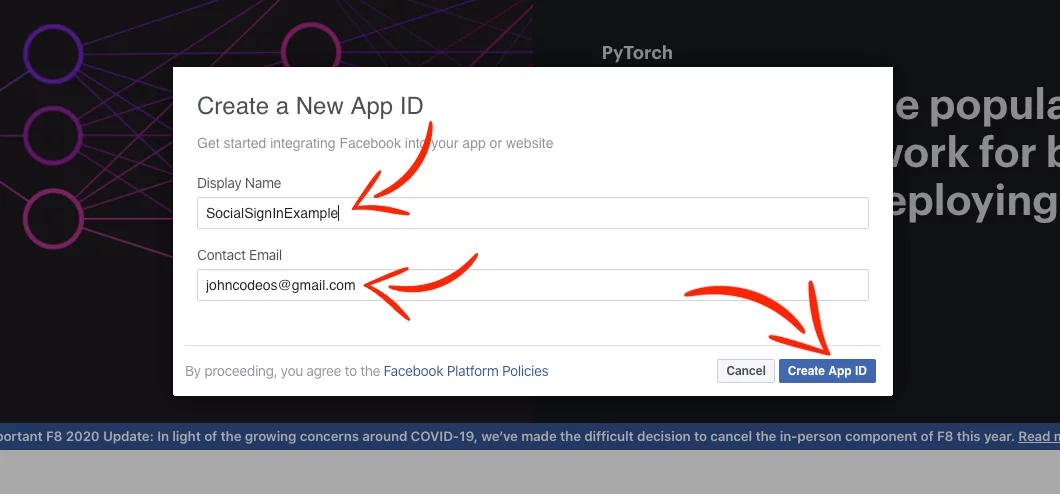
After you logged in, go to My Apps > Create App to create a new app.

Give your app a name and a contact email address, and then press Create App ID.
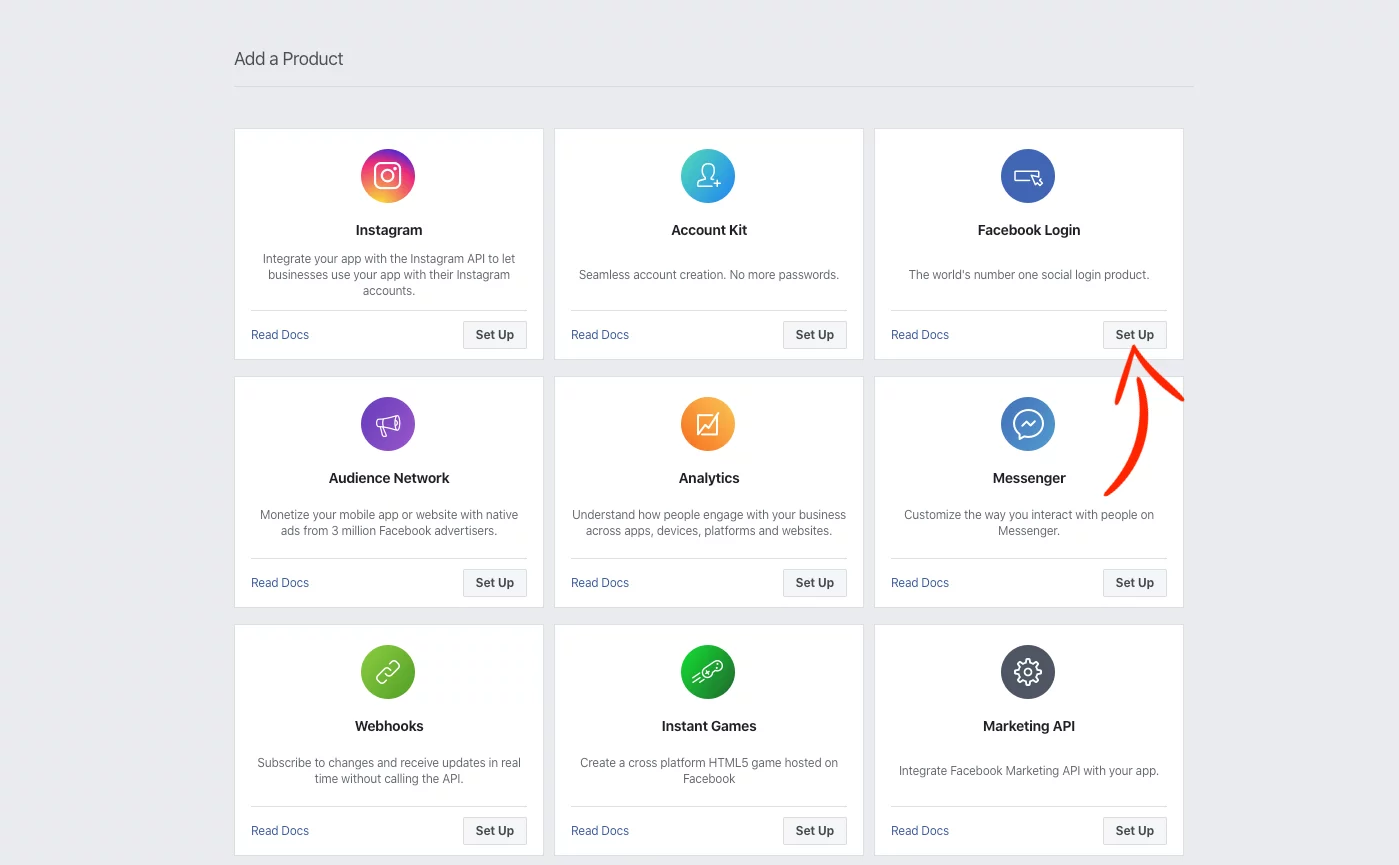
Press Set Up on Facebook Login.
Select iOS

Next, in Step 1, choose how you want to add the Facebook SDK to your project and follow the instructions. In this example, we’re using Cocoapods
Then press Next

On the next step, add your app’s Bundle ID, then press Save and Continue

Skip the third step (3. Enable Single Sign On for Your App) by pressing Next
In Step 4, go to your Xcode project, right-click on Info.plist > Open As > Source Code and copy and paste the XML snippet as the instructions say.
Then press Next

(Optional) To disable tracking add these two lines too:
<key>FacebookAdvertiserIDCollectionEnabled</key>
<false/>
<key>FacebookAutoLogAppEventsEnabled</key>
<false/>Code language: HTML, XML (xml)
On the fifth step (5. Connect App Delegate), go to the AppDelegate.swift of your project and paste the following code:
import FBSDKCoreKit

@UIApplicationMain
class AppDelegate: UIResponder, UIApplicationDelegate {

    func application(_ application: UIApplication, didFinishLaunchingWithOptions launchOptions: [UIApplication.LaunchOptionsKey: Any]?) -> Bool {
        ApplicationDelegate.shared.application(application, didFinishLaunchingWithOptions: launchOptions)
        return true
    }

    func application(_ app: UIApplication, open url: URL, options: [UIApplication.OpenURLOptionsKey : Any] = [:]) -> Bool {
        return ApplicationDelegate.shared.application(app, open: url, options: options)
    }

    // ...

}Code language: Swift (swift)
If you have the SceneDelegate.swift file on your project, add the following code too:
import FBSDKCoreKit

class SceneDelegate: UIResponder, UIWindowSceneDelegate {

    // ...

    func scene(_ scene: UIScene, openURLContexts URLContexts: Set<UIOpenURLContext>) {
        let openURLContext = Array(URLContexts).first
        if openURLContext != nil {
            if let URL = openURLContext?.url, let annotation = openURLContext?.options.annotation {
                ApplicationDelegate.shared.application(UIApplication.shared, open: URL, sourceApplication: openURLContext?.options.sourceApplication, annotation: annotation)
            }
        }
    }

    // If your app has support for iOS 8, add the following method too
    func application(_ application: UIApplication, open url: URL, sourceApplication: String?, annotation: Any) -> Bool {
        return ApplicationDelegate.shared.application(application, open: url, sourceApplication: sourceApplication, annotation: annotation)
    }

}Code language: Swift (swift)
We’re done with this part (skip the other steps). Let’s go to our app.
Creating the Facebook Login Button
In your app, you can add the Login button made by Facebook, or you can make your own Custom Login button.
Login Button made by Facebook
If you want to add the login button made by Facebook, you can add it programmatically to your .swift file like that:
import FBSDKCoreKit
import FBSDKLoginKit

class LoginViewController: UIViewController {

    override func viewDidLoad() {
        super.viewDidLoad()

        // Login Button made by Facebook
        let loginButton = FBLoginButton()
        // Optional: Place the button in the center of your view.
        loginButton.permissions = ["public_profile", "email"]
        loginButton.center = view.center
        loginButton.delegate = self
        view.addSubview(loginButton)
}Code language: Swift (swift)
Then, to get the login results, add at the bottom of your .swift file the LoginButtonDelegate:
extension LoginViewController: LoginButtonDelegate {
    func loginButton(_ loginButton: FBLoginButton, didCompleteWith result: LoginManagerLoginResult?, error: Error?) {
        if result?.isCancelled ?? false {
            print("Cancelled")
        } else if error != nil {
            print("ERROR: Trying to get login results")
        } else {
            print("Logged in")
            self.getUserProfile(token: result?.token, userId: result?.token?.userID)
        }
    }

    func loginButtonDidLogOut(_ loginButton: FBLoginButton) {
        // Do something after the user pressed the logout button
        print("You logged out!")
    }
}Code language: Swift (swift)
If the results are successful, we get the user’s data using the getUserProfile method
Custom Login Button
Create an UIButton in your ViewController and make an Outlet and an Action connection to your .swift file. In this example, we called it facebookLoginBtn and facebookLoginBtnAction.

Create a new method with the name loginButtonClicked().
func loginButtonClicked() {
        let loginManager = LoginManager()
        loginManager.logIn(permissions: ["public_profile", "email"], from: self, handler: { result, error in
            if error != nil {
                print("ERROR: Trying to get login results")
            } else if result?.isCancelled != nil {
                print("The token is \(result?.token?.tokenString ?? "")")
                if result?.token?.tokenString != nil {
                    print("Logged in")
                    self.getUserProfile(token: result?.token, userId: result?.token?.userID)
                } else {
                    print("Cancelled")
                }
            }
        })
    }Code language: Swift (swift)
Inside this method, we get the login results (Error, Successful, or Cancelled).
If the results are successful, we get the user’s data using the getUserProfile method
Last, don’t forget to call the method loginButtonClicked() when you press the button
@IBAction func facebookLoginBtnAction(_ sender: UIButton) {
        self.loginButtonClicked()
    }Code language: Swift (swift)
Getting User’s Profile Info
After a successful login, we use the Access Token and User ID to get the user’s data using GraphRequest
func getUserProfile(token: AccessToken?, userId: String?) {
        let graphRequest: GraphRequest = GraphRequest(graphPath: "me", parameters: ["fields": "id, first_name, middle_name, last_name, name, picture, email"])
        graphRequest.start { _, result, error in
            if error == nil {
                let data: [String: AnyObject] = result as! [String: AnyObject]

                // Facebook Id
                if let facebookId = data["id"] as? String {
                    print("Facebook Id: \(facebookId)")
                } else {
                    print("Facebook Id: Not exists")
                }

                // Facebook First Name
                if let facebookFirstName = data["first_name"] as? String {
                    print("Facebook First Name: \(facebookFirstName)")
                } else {
                    print("Facebook First Name: Not exists")
                }

                // Facebook Middle Name
                if let facebookMiddleName = data["middle_name"] as? String {
                    print("Facebook Middle Name: \(facebookMiddleName)")
                } else {
                    print("Facebook Middle Name: Not exists")
                }

                // Facebook Last Name
                if let facebookLastName = data["last_name"] as? String {
                    print("Facebook Last Name: \(facebookLastName)")
                } else {
                    print("Facebook Last Name: Not exists")
                }

                // Facebook Name
                if let facebookName = data["name"] as? String {
                    print("Facebook Name: \(facebookName)")
                } else {
                    print("Facebook Name: Not exists")
                }

                // Facebook Profile Pic URL
                let facebookProfilePicURL = "https://graph.facebook.com/\(userId ?? "")/picture?type=large"
                print("Facebook Profile Pic URL: \(facebookProfilePicURL)")

                // Facebook Email
                if let facebookEmail = data["email"] as? String {
                    print("Facebook Email: \(facebookEmail)")
                } else {
                    print("Facebook Email: Not exists")
                }

                print("Facebook Access Token: \(token?.tokenString ?? "")")
            } else {
                print("Error: Trying to get user's info")
            }
        }
    }Code language: Swift (swift)
In this method (getUserProfile) we check every JSON object to see if exists before we use it because if a user, for example, doesn’t have a middle name, then the results won’t return the middle_name.
The Facebook Login SDK returns a long-lived token that lasts for about 60 days.
If the user opens your app within the day, Facebook automatically refreshes this token. This happens only once every day.
If the user hasn’t used your app for over 60 days, the token will expire and you have to log out the user from your app and ask them to re-login again to get a new access token.
Checking the User’s Logging state
You can check the user’s logging state by checking the current access token to see if it has expired or not.
func isLoggedIn() -> Bool {
        let accessToken = AccessToken.current
        let isLoggedIn = accessToken != nil && !(accessToken?.isExpired ?? false)
        return isLoggedIn
    }Code language: Swift (swift)
Add this method (isLoggedin) in the viewDidLoad method of your .swift file to check in every cold start of your app.
class LoginViewController: UIViewController {

    override func viewDidLoad() {
        super.viewDidLoad()

        if isLoggedIn() {
            // Show the ViewController with the logged in user
        }else{
            // Show the Home ViewController
        }
    }
}Code language: Swift (swift)
Logging out the User
To log out the user from your app, use:
LoginManager().logOut()You can find the final project here
If you have any questions, please feel free to leave a comment below