Last updated on: May 27, 2023
Contents
Creating an App on Facebook
First, go to developers.facebook.com and log in with your Facebook account.
After you logged in, go My Apps > Create App to create a new app.

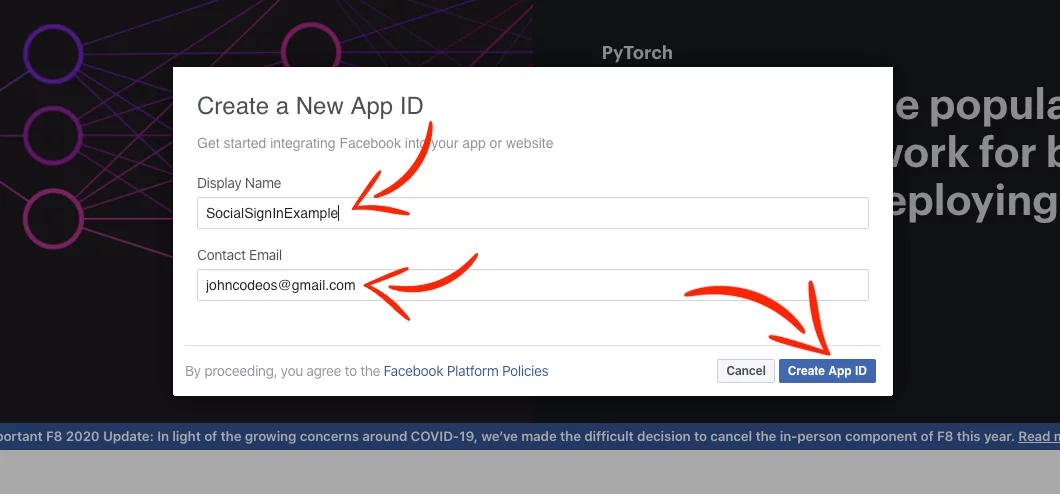
Give a name and a contact email for your app and press Create App ID.
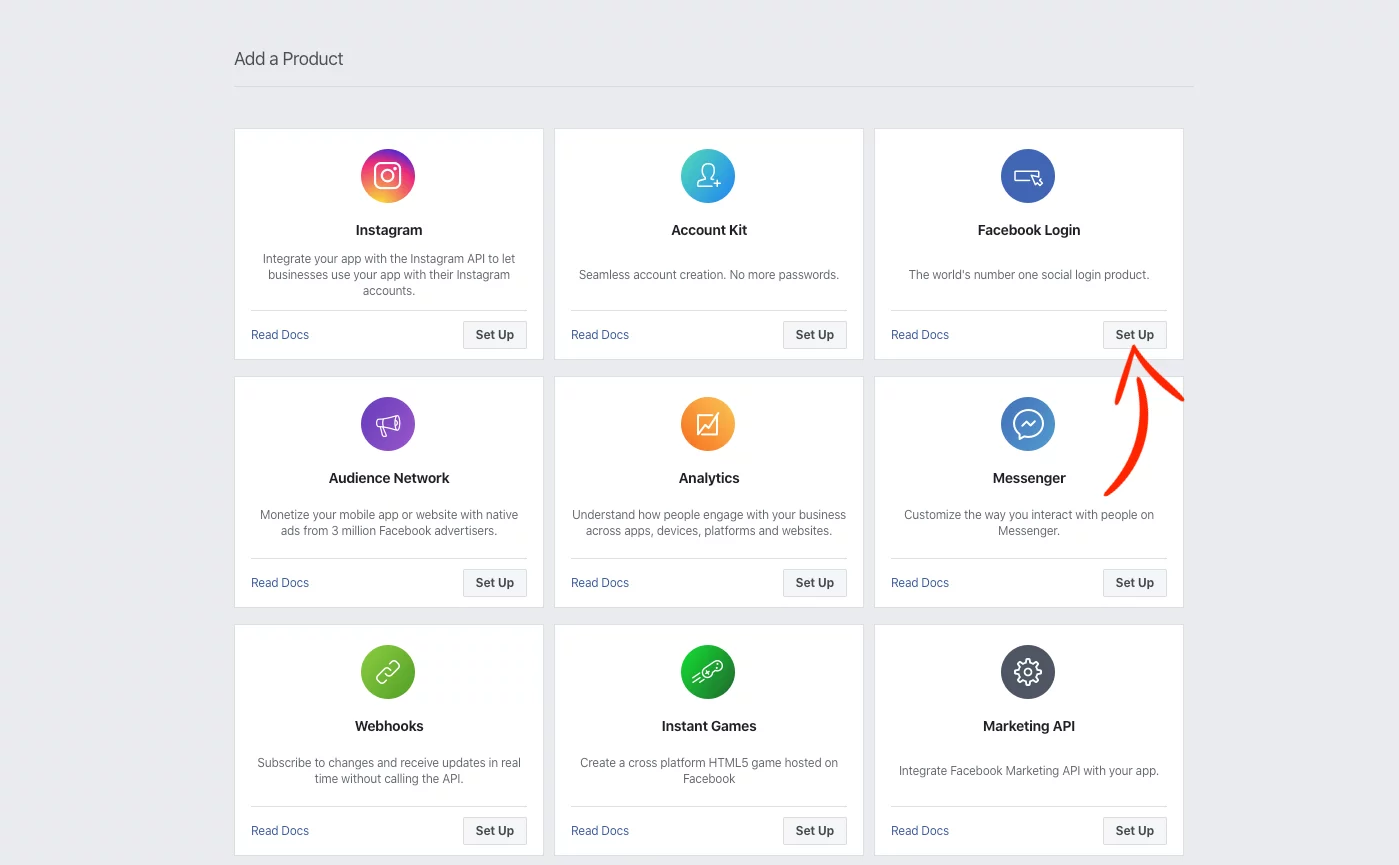
Press Set Up on Facebook Login.
Select Android

On the new page skip the Step 1 and 2 by pressing Next (we’re gonna add different dependency later)
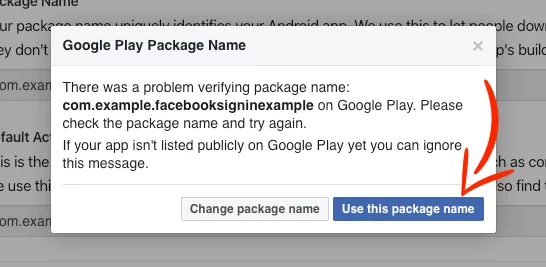
On Step 3. Tell Us about Your Android Project, add the package name of your app, in this example is com.example.facebooksigninexample, and the first activity that opens when the user starts your app.
Then press Save and Continue.

Note: If you haven’t released your app yet on Google Play store, you’ll see a popup window saying that the system didn’t find your app in the store.
Just press Use this package name and Continue
On the next step, 4. Add Your Development and Release Key Hashes, we have to generate hashes for the debug and release version of our app.
If you haven’t released your app yet, just do the Debug Key Hash only, and then after you release it, come back and do the Release Key Hash too.
Open your Terminal on Mac (Command Prompt for Windows), find your my_keystore.jks or .keystore you generated from Android Studio, in this example, I have it on my Desktop, and type:
For the Debug Key Hash:
keytool -exportcert -alias androiddebugkey -keystore my_keystore.jks | openssl sha1 -binary | openssl base64
For the Release Key Hash:
keytool -exportcert -alias facebooksigninexample -keystore my_keystore.jks | openssl sha1 -binary | openssl base64Change facebooksigninexample with your own alias.
Then copy and paste the keys inside the box and press Save and Continue

Skip Step 5 by pressing Next
In Step 6, follow the instructions and add the Facebook App ID, Client Token, and scheme to your strings.xml file.
On AndroidManifest.xml add the internet permission and only the following meta-data and activity
<meta-data android:name="com.facebook.sdk.ApplicationId"
        android:value="@string/facebook_app_id"/>
<meta-data android:name="com.facebook.sdk.ClientToken"
            android:value="@string/facebook_client_token"
            />

<activity android:name="com.facebook.FacebookActivity"
        android:configChanges= "keyboard|keyboardHidden|screenLayout|screenSize|orientation"
        android:label="@string/app_name" />Code language: HTML, XML (xml)
That’s it, we’re done with this part (just skip the other steps), now let’s go to our app.
Creating the Facebook Login Button
Go to the build.gradle of your app and add the following dependency:
dependencies {
    // ...

    implementation 'com.facebook.android:facebook-login:14.1.0'

    // ...
}Code language: Kotlin (kotlin)
In your app, you can add the Login button made by Facebook, or you can make your own Custom Login button.
Login Button made by Facebook
Add the following code to your XML layout:
<?xml version="1.0" encoding="utf-8"?>
<RelativeLayout
    xmlns:android="http://schemas.android.com/apk/res/android"
    xmlns:tools="http://schemas.android.com/tools"
    android:layout_width="match_parent"
    android:layout_height="match_parent"
    android:gravity="center"
    android:background="@color/colorPrimary"
    tools:context=".MainActivity">

    <com.facebook.login.widget.LoginButton
        android:id="@+id/login_button"
        android:layout_width="wrap_content"
        android:layout_height="wrap_content"
        android:layout_gravity="center_horizontal"
        android:layout_marginTop="30dp"
        android:layout_marginBottom="30dp" />


</RelativeLayout>Code language: HTML, XML (xml)
And in your Activity (or Fragment) add:
class MainActivity : AppCompatActivity() {

    lateinit var callbackManager: CallbackManager

    override fun onCreate(savedInstanceState: Bundle?) {
        super.onCreate(savedInstanceState)
        setContentView(R.layout.activity_main)

        callbackManager = CallbackManager.Factory.create()


        val loginButton = findViewById<LoginButton>(R.id.login_button)
        loginButton.setReadPermissions(listOf("public_profile", "email"))
        // If you are using in a fragment, call loginButton.setFragment(this)

        // Callback registration
        loginButton.registerCallback(callbackManager, object : FacebookCallback<LoginResult> {
            override fun onSuccess(loginResult: LoginResult) {
                Log.d("TAG", "Success Login")
                // Get User's Info
            }

            override fun onCancel() {
                Toast.makeText(this@MainActivity, "Login Cancelled", Toast.LENGTH_LONG).show()
            }

            override fun onError(exception: FacebookException) {
                Toast.makeText(this@MainActivity, exception.message, Toast.LENGTH_LONG).show()
            }
        })
    }
}Code language: Kotlin (kotlin)
In your onActivityResult method, pass the login results to LoginManager using the callbackManager:
override fun onActivityResult(requestCode: Int, resultCode: Int, data: Intent?) {
        callbackManager.onActivityResult(requestCode, resultCode, data)
        super.onActivityResult(requestCode, resultCode, data)
    }Code language: Kotlin (kotlin)
Custom Login Button
For a custom login button, add the following code to your XML layout:
<?xml version="1.0" encoding="utf-8"?>
<RelativeLayout xmlns:android="http://schemas.android.com/apk/res/android"
    xmlns:tools="http://schemas.android.com/tools"
    android:layout_width="match_parent"
    android:layout_height="match_parent"
    android:background="@color/colorPrimary"
    android:gravity="center"
    tools:context=".MainActivity">

    <Button
        android:id="@+id/facebook_login_btn"
        android:layout_width="wrap_content"
        android:layout_height="wrap_content"
        android:layout_centerInParent="true"
        android:background="@drawable/rounded_corners"
        android:drawableStart="@drawable/facebook_icon"
        android:drawablePadding="8dp"
        android:padding="8dp"
        android:text="Log in with Facebook"
        android:textAllCaps="false"
        android:textColor="@android:color/white" />

</RelativeLayout>Code language: HTML, XML (xml)
You can get the color and the Facebook logo from the final project at the end of the article.
And in your Activity (or Fragment) add:
class MainActivity : AppCompatActivity() {

    lateinit var callbackManager: CallbackManager

    override fun onCreate(savedInstanceState: Bundle?) {
        super.onCreate(savedInstanceState)
        setContentView(R.layout.activity_main)

        callbackManager = CallbackManager.Factory.create()

        facebook_login_btn.setOnClickListener {
            LoginManager.getInstance().logInWithReadPermissions(this, listOf("public_profile", "email"))
        }

        // Callback registration
        LoginManager.getInstance().registerCallback(callbackManager, object : FacebookCallback<LoginResult> {
                override fun onSuccess(loginResult: LoginResult) {
                    Log.d("TAG", "Success Login")
                    // Get User's Info
                }

                override fun onCancel() {
                    Toast.makeText(this@MainActivity, "Login Cancelled", Toast.LENGTH_LONG).show()
                }

                override fun onError(exception: FacebookException) {
                    Toast.makeText(this@MainActivity, exception.message, Toast.LENGTH_LONG).show()
                }
            })
    }
}Code language: Kotlin (kotlin)
In your onActivityResult method, pass the login results to LoginManager using the callbackManager:
override fun onActivityResult(requestCode: Int, resultCode: Int, data: Intent?) {
        callbackManager.onActivityResult(requestCode, resultCode, data)
        super.onActivityResult(requestCode, resultCode, data)
    }Code language: Kotlin (kotlin)
Getting User’s Profile Info
After the user gave permission to your app to access their data (first name, middle name, last name, profile picture, email address), Facebook returns an access token.
We use this access token alongside the user’s id to get these data by doing a GraphRequest.
@SuppressLint("LongLogTag")
fun getUserProfile(token: AccessToken?, userId: String?) {

        val parameters = Bundle()
        parameters.putString(
            "fields",
            "id, first_name, middle_name, last_name, name, picture, email"
        )
        GraphRequest(token,
            "/$userId/",
            parameters,
            HttpMethod.GET,
            GraphRequest.Callback { response ->
                val jsonObject = response.jsonObject ?: return@Callback

                // Facebook Access Token
                // You can see Access Token only in Debug mode.
                // You can't see it in Logcat using Log.d, Facebook did that to avoid leaking user's access token.
                if (BuildConfig.DEBUG) {
                    FacebookSdk.setIsDebugEnabled(true)
                    FacebookSdk.addLoggingBehavior(LoggingBehavior.INCLUDE_ACCESS_TOKENS)
                }

                // Facebook Id
                if (jsonObject.has("id")) {
                    val facebookId = jsonObject.getString("id")
                    Log.i("Facebook Id: ", facebookId.toString())
                } else {
                    Log.i("Facebook Id: ", "Not exists")
                }


                // Facebook First Name
                if (jsonObject.has("first_name")) {
                    val facebookFirstName = jsonObject.getString("first_name")
                    Log.i("Facebook First Name: ", facebookFirstName)
                } else {
                    Log.i("Facebook First Name: ", "Not exists")
                }


                // Facebook Middle Name
                if (jsonObject.has("middle_name")) {
                    val facebookMiddleName = jsonObject.getString("middle_name")
                    Log.i("Facebook Middle Name: ", facebookMiddleName)
                } else {
                    Log.i("Facebook Middle Name: ", "Not exists")
                }


                // Facebook Last Name
                if (jsonObject.has("last_name")) {
                    val facebookLastName = jsonObject.getString("last_name")
                    Log.i("Facebook Last Name: ", facebookLastName)
                } else {
                    Log.i("Facebook Last Name: ", "Not exists")
                }


                // Facebook Name
                if (jsonObject.has("name")) {
                    val facebookName = jsonObject.getString("name")
                    Log.i("Facebook Name: ", facebookName)
                } else {
                    Log.i("Facebook Name: ", "Not exists")
                }


                // Facebook Profile Pic URL
                if (jsonObject.has("picture")) {
                    val facebookPictureObject = jsonObject.getJSONObject("picture")
                    if (facebookPictureObject.has("data")) {
                        val facebookDataObject = facebookPictureObject.getJSONObject("data")
                        if (facebookDataObject.has("url")) {
                            val facebookProfilePicURL = facebookDataObject.getString("url")
                            Log.i("Facebook Profile Pic URL: ", facebookProfilePicURL)
                        }
                    }
                } else {
                    Log.i("Facebook Profile Pic URL: ", "Not exists")
                }

                // Facebook Email
                if (jsonObject.has("email")) {
                    val facebookEmail = jsonObject.getString("email")
                    Log.i("Facebook Email: ", facebookEmail)
                } else {
                    Log.i("Facebook Email: ", "Not exists")
                }
            }).executeAsync()
    }Code language: Kotlin (kotlin)
In this method (getUserProfile) we check every JSON object to see if exists before we use it because if a user, for example, doesn’t have a middle name, then the results won’t return the middle_name.
Last, call this method when the callback has succeeded, and pass the access token and the user id we got from the results:
// registerCallback...
    override fun onSuccess(loginResult: LoginResult) {
        Log.d("TAG", "Success Login")
        getUserProfile(loginResult.accessToken, loginResult.accessToken.userId)
    }

    override fun onCancel() {
        Toast.makeText(this@MainActivity, "Login Cancelled", Toast.LENGTH_LONG).show()
    }

    override fun onError(exception: FacebookException) {
        Toast.makeText(this@MainActivity, exception.message, Toast.LENGTH_LONG).show()
    }
    // ...Code language: Kotlin (kotlin)
The Facebook Login SDK returns a long-lived token that lasts for about 60 days.
If the user opens your app within the day, Facebook automatically refreshes this token. This happens only once every day.
If the user hasn’t used your app for over 60 days, the token will expire and you have to log out the user from your app and ask them to re-login again to get a new access token.
Checking the User’s Logging state
You can check the user’s logging state by checking the current access token to see if it has expired or not.
fun isLoggedIn(): Boolean {
        val accessToken = AccessToken.getCurrentAccessToken()
        val isLoggedIn = accessToken != null && !accessToken.isExpired
        return isLoggedIn
    }Code language: Kotlin (kotlin)
Add this method (isLoggedin) in the onCreate method of your MainActivity to check in every cold start of your app.
class MainActivity : AppCompatActivity() {

    override fun onCreate(savedInstanceState: Bundle?) {
        super.onCreate(savedInstanceState)
        setContentView(R.layout.activity_main)

        if (isLoggedIn()) {
            // Show the Activity with the logged in user
        }else{
            // Show the Home Activity
        }

    }
}Code language: Kotlin (kotlin)
Logging out the User
To log out the user from your app, use:
LoginManager.getInstance().logOut()You can find the final project here
If you have any questions, please feel free to leave a comment below