Last updated on: May 27, 2023
In this tutorial, I’m going to show how to make a side menu without using any 3rd party library.
We’re going to build two types of menus:
Slide Out Menu: You probably have seen this type of menu on the Twitter app. The user presses the menu button (or drags their finger from left to right) and moves the main view to the right to reveal the side menu.
On Top Menu: The user presses the menu button (or drags their finger from left to right) and reveals the side menu above the main view.
After finishing the tutorial, you’ll be able to switch between those two types of menus by changing the Boolean variable revealSideMenuOnTop.
Contents
Preparing the View Controllers
In Storyboards (Main.storyboard), select one of your Navigation Controllers (or View Controllers), then from the right side, choose the 4th tab (Identify Inspector), and set a Storyboard ID. For example, I put “HomeNavID” for my Home Navigation Controller

Do the same for all Navigation Controllers/View Controllers you want to have in the side menu.
Creating the Side Menu
In Storyboards again, add two View Controllers, one will be for our side menu, and the other one will be for the main view, which will host the view controllers we prepared before.
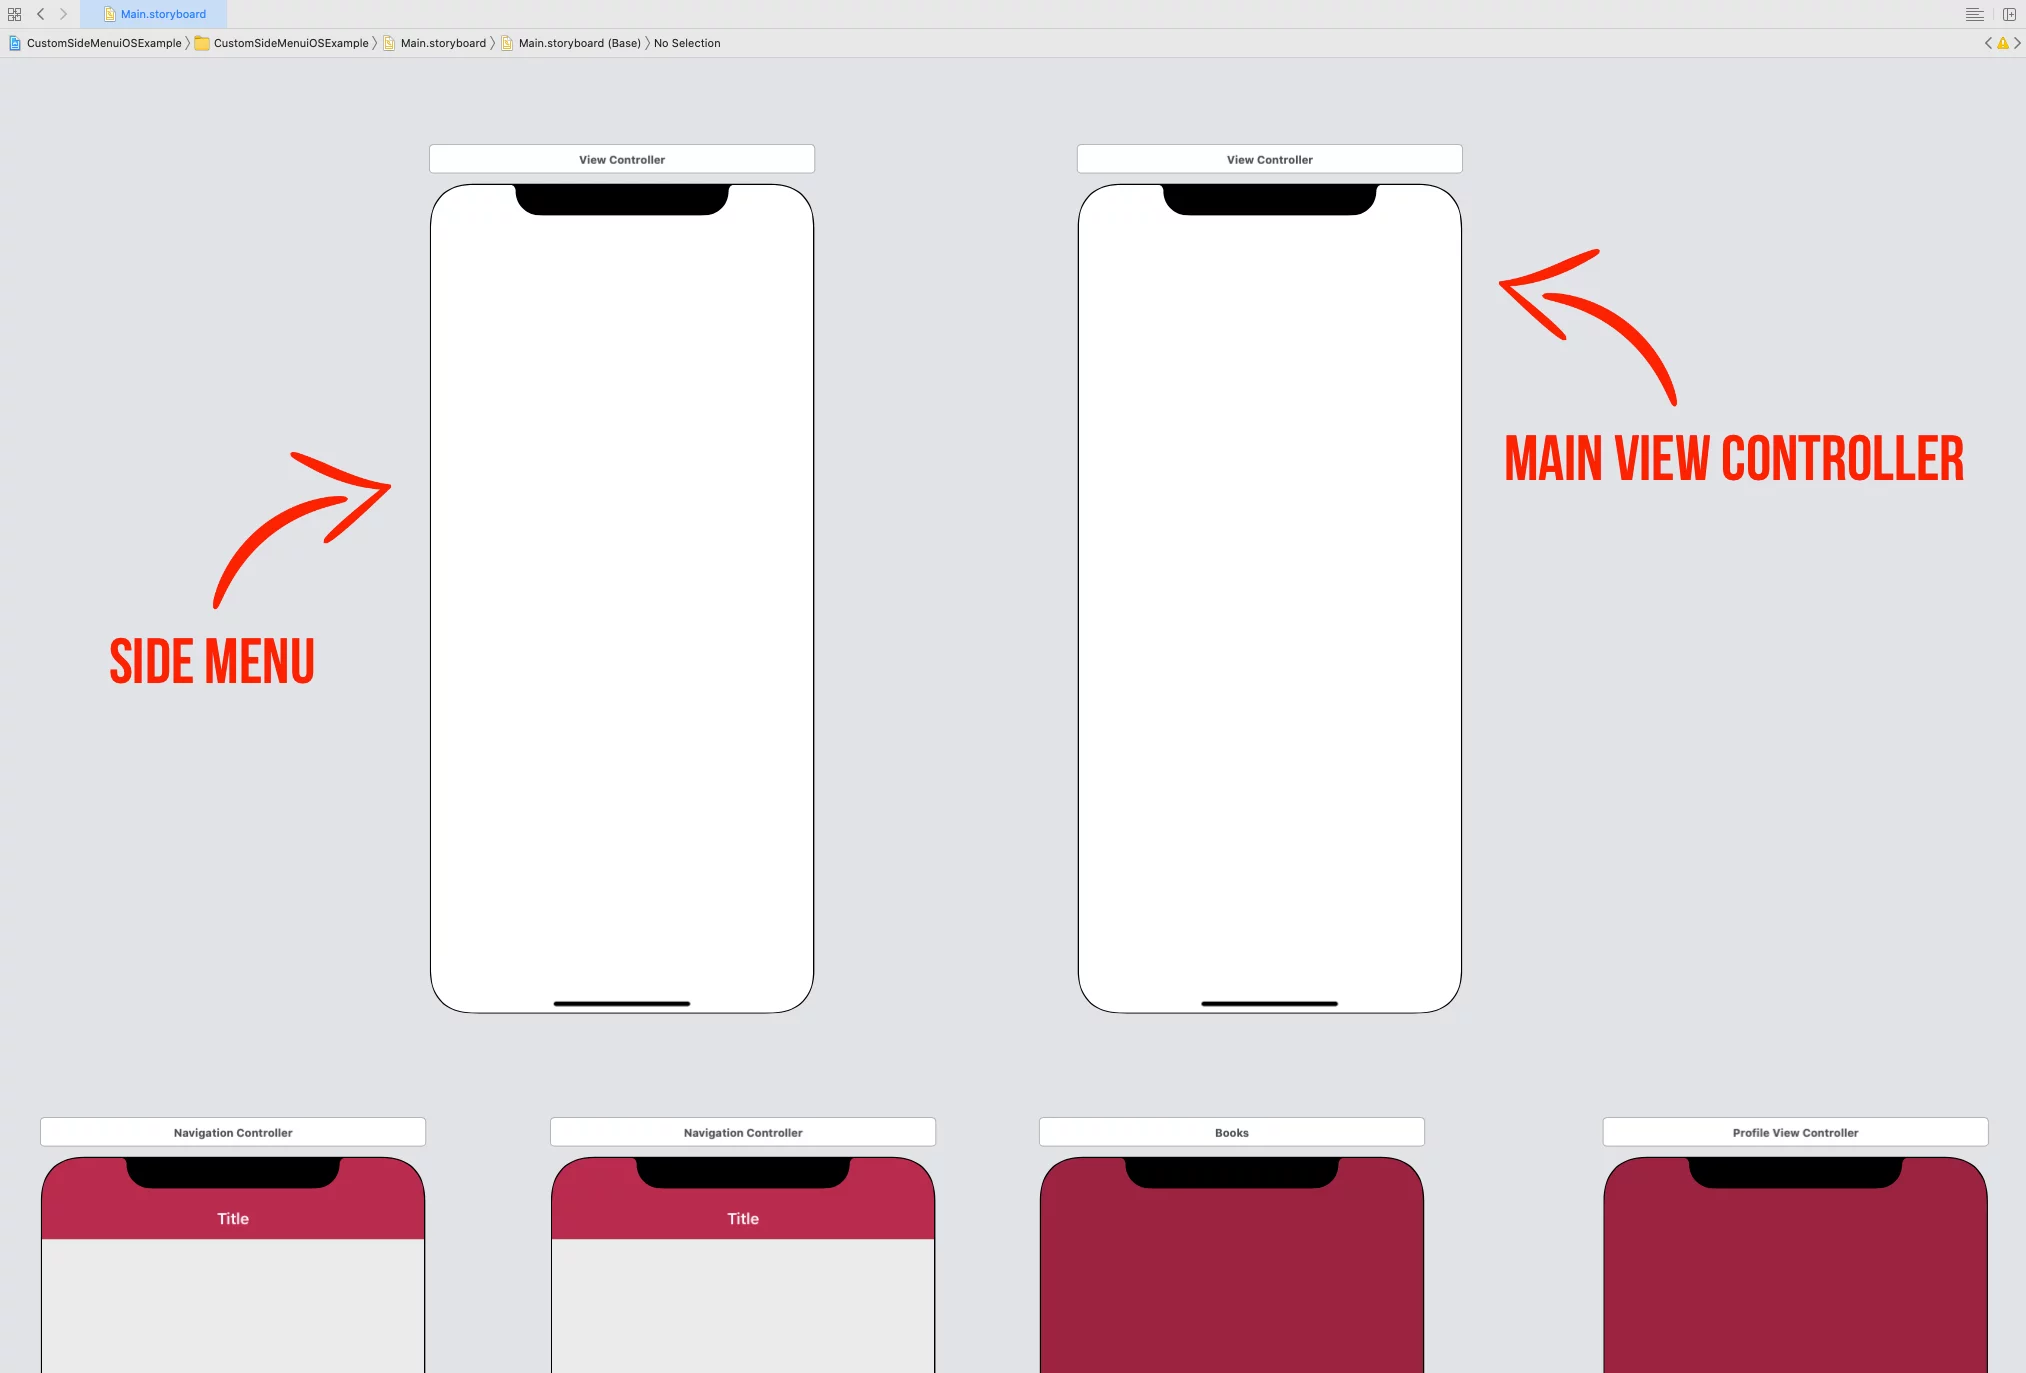
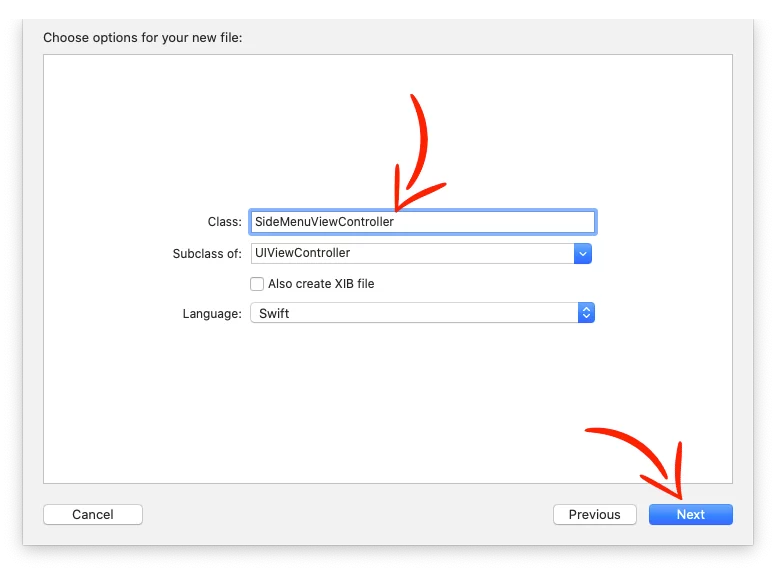
Create a UIViewController swift file and name it SideMenuViewController. Then do the same for the main view and call it MainViewController.
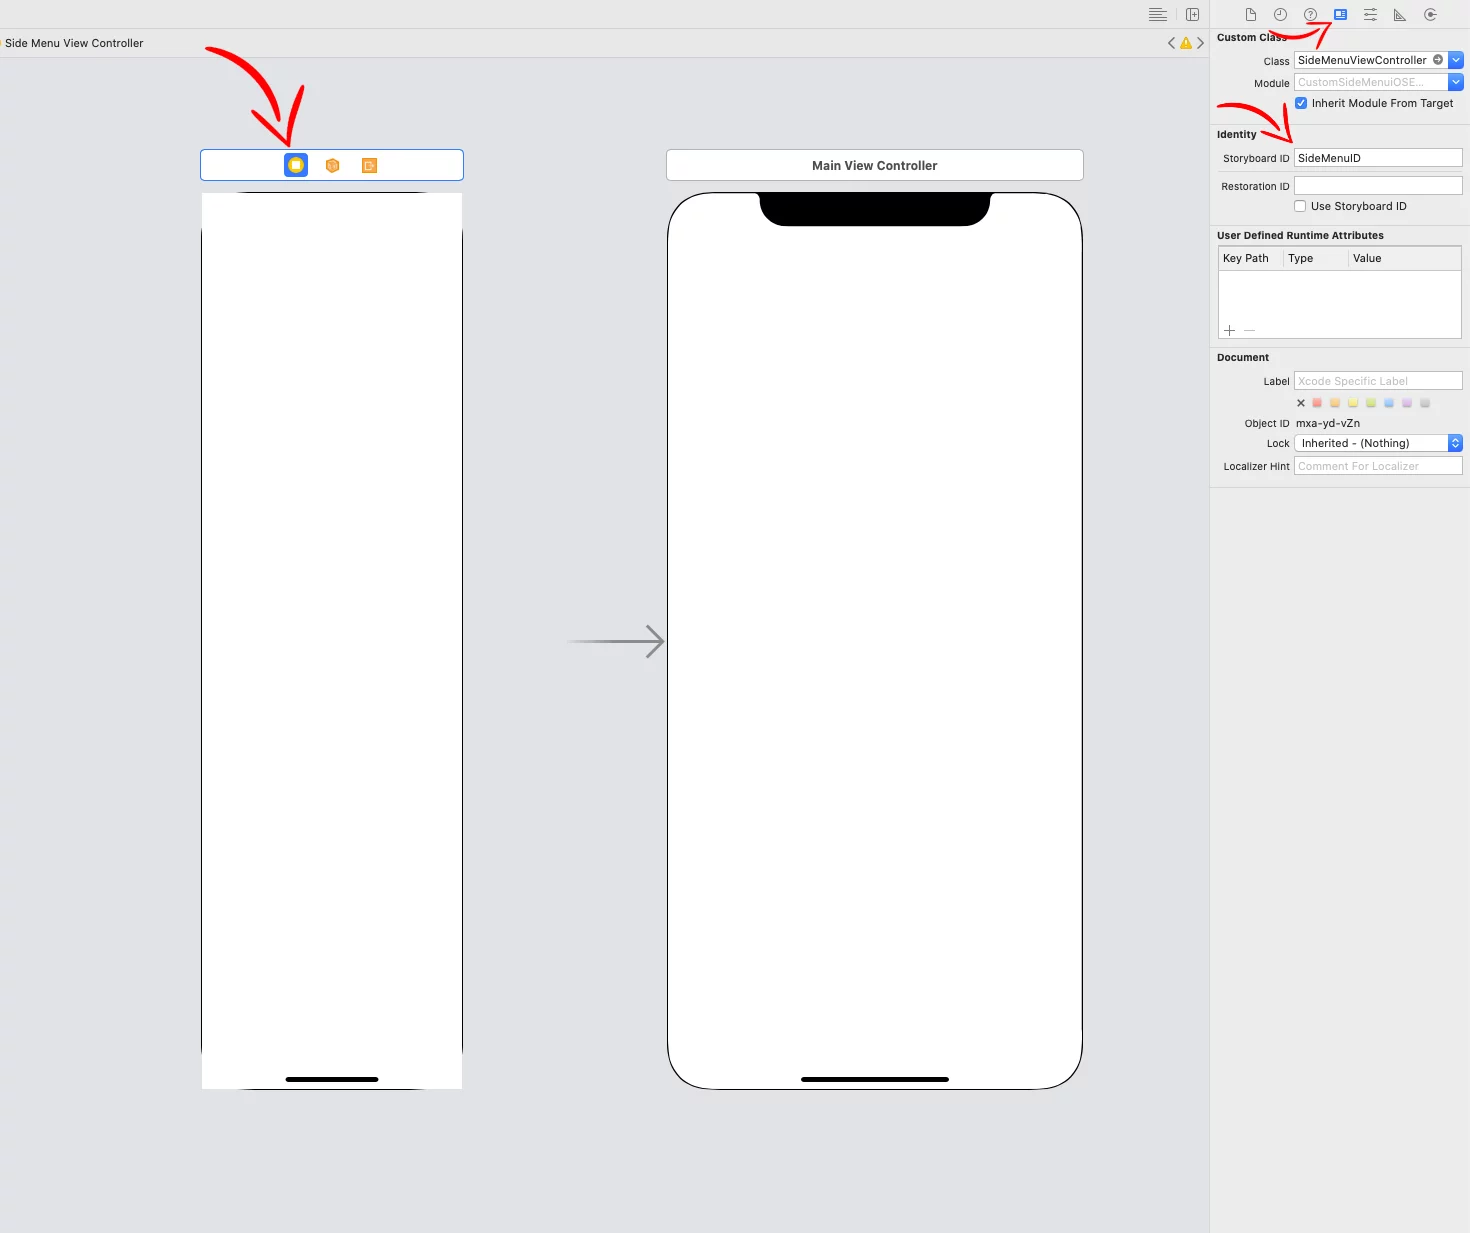
After that, connect the files with the storyboard views


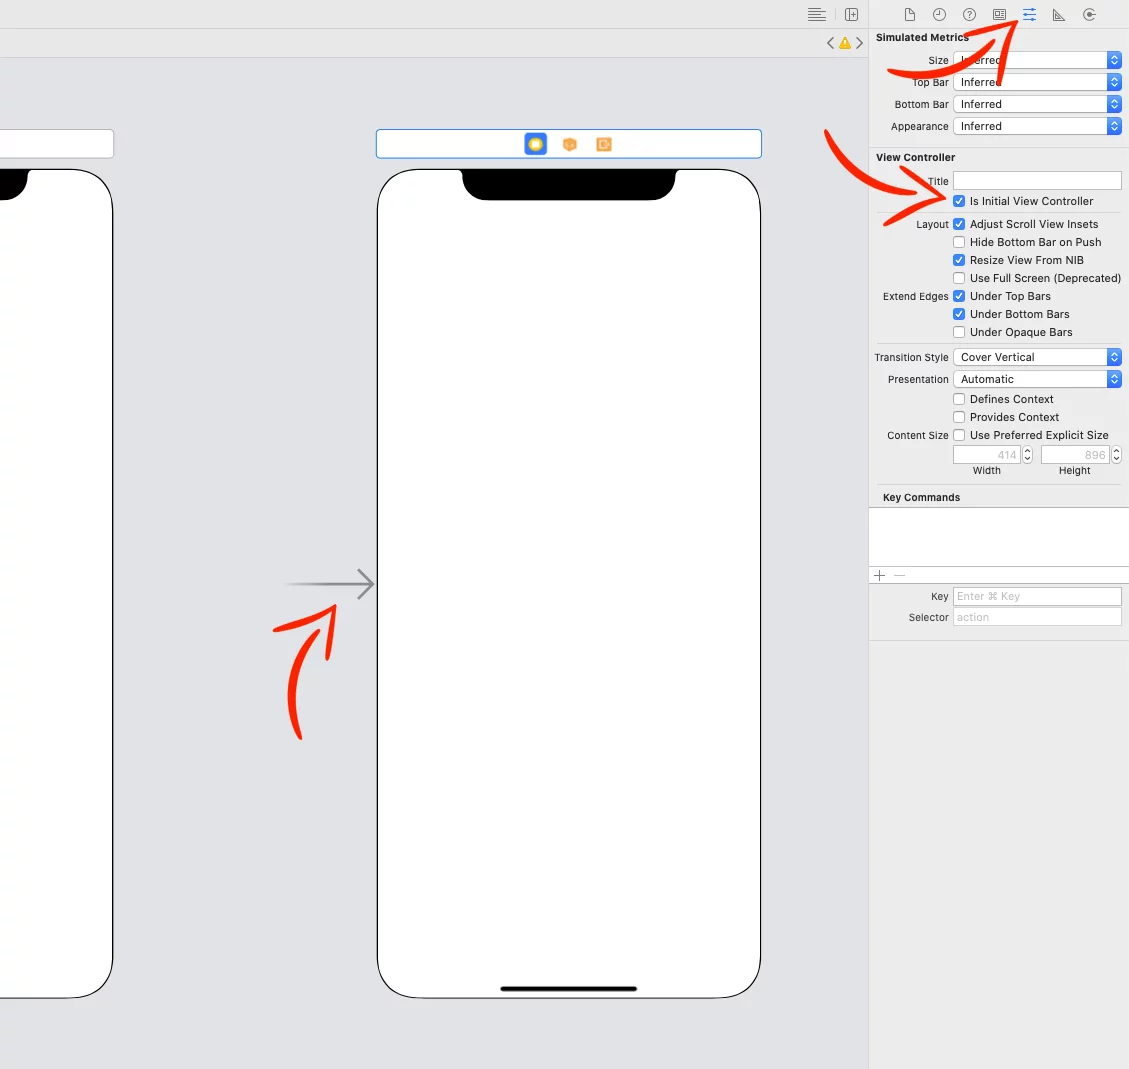
Next, select the main view, choose the 5th tab (Attributes Inspector), and check the Is Initial View Controller.
Now, select the side menu view, choose the 6th tab (Size Inspector), change the Simulation Size from Fixed to Freeform, and set the width to the width you want the side menu to have. In this example, I have 260.

Next, go to the 4th tab (Identify Inspector) and set “SideMenuID” as the Storyboard ID.
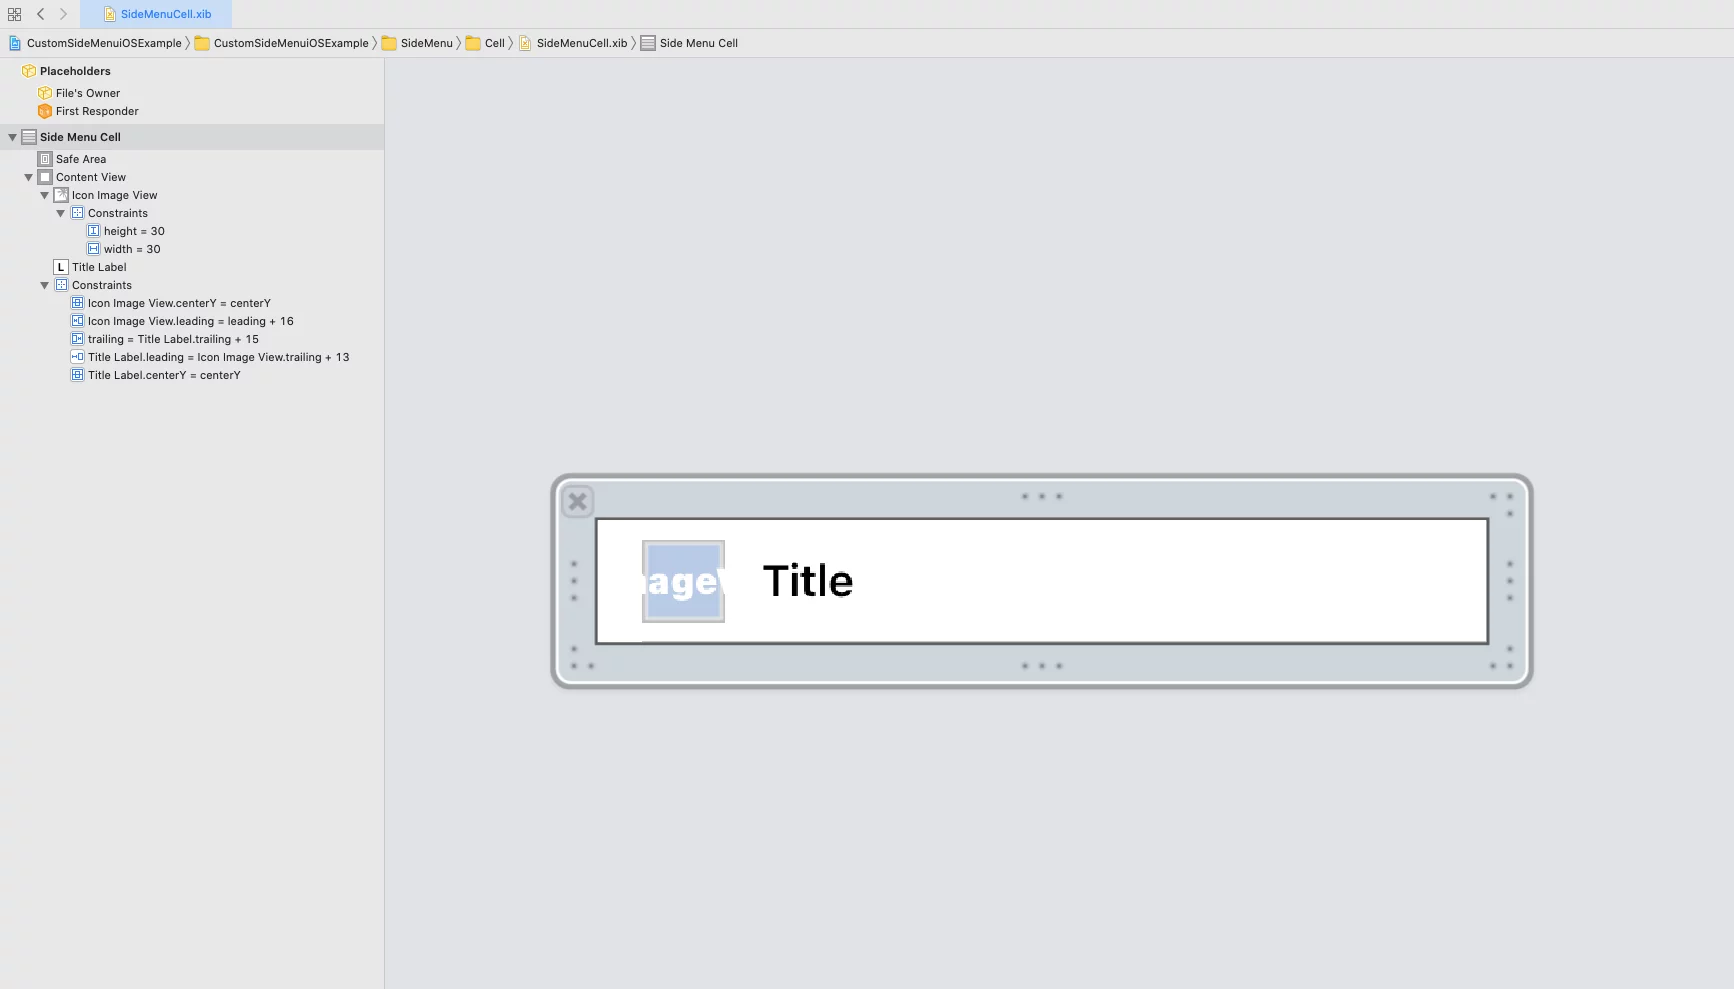
Inside the side menu view, we have a UIImageView on top, a UITableView for the menu, and a UILabel at the bottom.

I’m not going to show you how to set up the UITableView with custom cells, etc. But I’ll show you the code, and later we’ll continue with the connection between the side menu and the main view controller.
SideMenuModel.swift
struct SideMenuModel {
var icon: UIImage
var title: String
}Code language: Swift (swift)SideMenuCell.swift
class SideMenuCell: UITableViewCell {

    class var identifier: String { return String(describing: self) }
    class var nib: UINib { return UINib(nibName: identifier, bundle: nil) }

    @IBOutlet var iconImageView: UIImageView!
    @IBOutlet var titleLabel: UILabel!

    override func awakeFromNib() {
        super.awakeFromNib()

        // Background
        self.backgroundColor = .clear

        // Icon
        self.iconImageView.tintColor = .white

        // Title
        self.titleLabel.textColor = .white
    }
}Code language: Swift (swift)
SideMenuCell.xib
SideMenuViewController.swift
class SideMenuViewController: UIViewController {
    @IBOutlet var headerImageView: UIImageView!
    @IBOutlet var sideMenuTableView: UITableView!
    @IBOutlet var footerLabel: UILabel!

    var defaultHighlightedCell: Int = 0

    var menu: [SideMenuModel] = [
        SideMenuModel(icon: UIImage(systemName: "house.fill")!, title: "Home"),
        SideMenuModel(icon: UIImage(systemName: "music.note")!, title: "Music"),
        SideMenuModel(icon: UIImage(systemName: "film.fill")!, title: "Movies"),
        SideMenuModel(icon: UIImage(systemName: "book.fill")!, title: "Books"),
        SideMenuModel(icon: UIImage(systemName: "person.fill")!, title: "Profile"),
        SideMenuModel(icon: UIImage(systemName: "slider.horizontal.3")!, title: "Settings"),
        SideMenuModel(icon: UIImage(systemName: "hand.thumbsup.fill")!, title: "Like us on facebook")
    ]

    override func viewDidLoad() {
        super.viewDidLoad()

        // TableView
        self.sideMenuTableView.delegate = self
        self.sideMenuTableView.dataSource = self
        self.sideMenuTableView.backgroundColor = #colorLiteral(red: 0.737254902, green: 0.1294117647, blue: 0.2941176471, alpha: 1)
        self.sideMenuTableView.separatorStyle = .none

        // Set Highlighted Cell
        DispatchQueue.main.async {
            let defaultRow = IndexPath(row: self.defaultHighlightedCell, section: 0)
            self.sideMenuTableView.selectRow(at: defaultRow, animated: false, scrollPosition: .none)
        }

        // Footer
        self.footerLabel.textColor = UIColor.white
        self.footerLabel.font = UIFont.systemFont(ofSize: 12, weight: .bold)
        self.footerLabel.text = "Developed by John Codeos"

        // Register TableView Cell
        self.sideMenuTableView.register(SideMenuCell.nib, forCellReuseIdentifier: SideMenuCell.identifier)

        // Update TableView with the data
        self.sideMenuTableView.reloadData()
    }
}

// MARK: - UITableViewDelegate

extension SideMenuViewController: UITableViewDelegate {
    func tableView(_ tableView: UITableView, heightForRowAt indexPath: IndexPath) -> CGFloat {
        return 44
    }
}

// MARK: - UITableViewDataSource

extension SideMenuViewController: UITableViewDataSource {
    func tableView(_ tableView: UITableView, numberOfRowsInSection section: Int) -> Int {
        return self.menu.count
    }

    func tableView(_ tableView: UITableView, cellForRowAt indexPath: IndexPath) -> UITableViewCell {
        guard let cell = tableView.dequeueReusableCell(withIdentifier: SideMenuCell.identifier, for: indexPath) as? SideMenuCell else { fatalError("xib doesn't exist") }

        cell.iconImageView.image = self.menu[indexPath.row].icon
        cell.titleLabel.text = self.menu[indexPath.row].title

        // Highlighted color
        let myCustomSelectionColorView = UIView()
        myCustomSelectionColorView.backgroundColor = #colorLiteral(red: 0.6196078431, green: 0.1098039216, blue: 0.2509803922, alpha: 1)
        cell.selectedBackgroundView = myCustomSelectionColorView
        return cell
    }

    func tableView(_ tableView: UITableView, didSelectRowAt indexPath: IndexPath) {

        // ...

        // Remove highlighted color when you press the 'Profile' and 'Like us on facebook' cell
        if indexPath.row == 4 || indexPath.row == 6 {
            tableView.deselectRow(at: indexPath, animated: true)
        }
    }
}Code language: Swift (swift)
To detect which cell has been selected, we’re going to use a delegate to pass the row number.
In the SideMenuViewController, at the top of the file, add:
protocol SideMenuViewControllerDelegate {
    func selectedCell(_ row: Int)
}

class SideMenuViewController: UIViewController {

    // ...

 }Code language: Swift (swift)
Inside the SideMenuViewController class, declare the delegate:
class SideMenuViewController: UIViewController {

    // ...

    var delegate: SideMenuViewControllerDelegate?

    override func viewDidLoad() {
        super.viewDidLoad()

        // ...

    }
}Code language: Swift (swift)
And in the tableView(_:didSelectRowAt:) method of the UITableViewDataSource add:
extension SideMenuViewController: UITableViewDataSource {

    // ...

    func tableView(_ tableView: UITableView, didSelectRowAt indexPath: IndexPath) {

        self.delegate?.selectedCell(indexPath.row)

        // ...

    }
}Code language: Swift (swift)
Now, in the MainViewController.swift, add the side menu and the default view controller:
class MainViewController: UIViewController {
    private var sideMenuViewController: SideMenuViewController!
    private var sideMenuRevealWidth: CGFloat = 260
    private let paddingForRotation: CGFloat = 150
    private var isExpanded: Bool = false

    // Expand/Collapse the side menu by changing trailing's constant
    private var sideMenuTrailingConstraint: NSLayoutConstraint!

    private var revealSideMenuOnTop: Bool = true

    override public func viewDidLoad() {
        super.viewDidLoad()
        self.view.backgroundColor = #colorLiteral(red: 0.737254902, green: 0.1294117647, blue: 0.2941176471, alpha: 1)

        // ...

        // Side Menu
        let storyboard = UIStoryboard(name: "Main", bundle: Bundle.main)
        self.sideMenuViewController = storyboard.instantiateViewController(withIdentifier: "SideMenuID") as? SideMenuViewController
        self.sideMenuViewController.defaultHighlightedCell = 0 // Default Highlighted Cell
        self.sideMenuViewController.delegate = self
        view.insertSubview(self.sideMenuViewController!.view, at: self.revealSideMenuOnTop ? 2 : 0)
        addChild(self.sideMenuViewController!)
        self.sideMenuViewController!.didMove(toParent: self)

        // Side Menu AutoLayout

        self.sideMenuViewController.view.translatesAutoresizingMaskIntoConstraints = false

        if self.revealSideMenuOnTop {
            self.sideMenuTrailingConstraint = self.sideMenuViewController.view.leadingAnchor.constraint(equalTo: view.leadingAnchor, constant: -self.sideMenuRevealWidth - self.paddingForRotation)
            self.sideMenuTrailingConstraint.isActive = true
        }
        NSLayoutConstraint.activate([
            self.sideMenuViewController.view.widthAnchor.constraint(equalToConstant: self.sideMenuRevealWidth),
            self.sideMenuViewController.view.bottomAnchor.constraint(equalTo: view.bottomAnchor),
            self.sideMenuViewController.view.topAnchor.constraint(equalTo: view.topAnchor)
        ])

        // ...


       // Default Main View Controller
       showViewController(viewController: UINavigationController.self, storyboardId: "HomeNavID")

    }
}Code language: Swift (swift)
At the bottom of the file, extend the MainViewController and add the SideMenuViewControllerDelegate and implement the method:
extension MainViewController: SideMenuViewControllerDelegate {
func selectedCell(_ row: Int) {
switch row {
case 0:
// Home
self.showViewController(viewController: UINavigationController.self, storyboardId: "HomeNavID")
case 1:
// Music
self.showViewController(viewController: UINavigationController.self, storyboardId: "MusicNavID")
case 2:
// Movies
self.showViewController(viewController: UINavigationController.self, storyboardId: "MoviesNavID")
case 3:
// Books
self.showViewController(viewController: BooksViewController.self, storyboardId: "BooksVCID")
case 4:
// Profile
let storyboard = UIStoryboard(name: "Main", bundle: Bundle.main)
let profileModalVC = storyboard.instantiateViewController(withIdentifier: "ProfileModalID") as? ProfileViewController
present(profileModalVC!, animated: true, completion: nil)
case 5:
// Settings
self.showViewController(viewController: UINavigationController.self, storyboardId: "SettingsNavID")
case 6:
// Like us on facebook
let safariVC = SFSafariViewController(url: URL(string: "https://www.facebook.com/johncodeos")!)
present(safariVC, animated: true)
default:
break
}
// Collapse side menu with animation
DispatchQueue.main.async { self.sideMenuState(expanded: false) }
}
func showViewController<T: UIViewController>(viewController: T.Type, storyboardId: String) -> () {
// Remove the previous View
for subview in view.subviews {
if subview.tag == 99 {
subview.removeFromSuperview()
}
}
let storyboard = UIStoryboard(name: "Main", bundle: nil)
let vc = storyboard.instantiateViewController(withIdentifier: storyboardId) as! T
vc.view.tag = 99
view.insertSubview(vc.view, at: self.revealSideMenuOnTop ? 0 : 1)
addChild(vc)
DispatchQueue.main.async {
vc.view.translatesAutoresizingMaskIntoConstraints = false
NSLayoutConstraint.activate([
vc.view.leadingAnchor.constraint(equalTo: self.view.leadingAnchor),
vc.view.topAnchor.constraint(equalTo: self.view.topAnchor),
vc.view.bottomAnchor.constraint(equalTo: self.view.bottomAnchor),
vc.view.trailingAnchor.constraint(equalTo: self.view.trailingAnchor)
])
}
if !self.revealSideMenuOnTop {
if isExpanded {
vc.view.frame.origin.x = self.sideMenuRevealWidth
}
if self.sideMenuShadowView != nil {
vc.view.addSubview(self.sideMenuShadowView)
}
}
vc.didMove(toParent: self)
}
func sideMenuState(expanded: Bool) {
if expanded {
self.animateSideMenu(targetPosition: self.revealSideMenuOnTop ? 0 : self.sideMenuRevealWidth) { _ in
self.isExpanded = true
}
// Animate Shadow (Fade In)
UIView.animate(withDuration: 0.5) { self.sideMenuShadowView.alpha = 0.6 }
}
else {
self.animateSideMenu(targetPosition: self.revealSideMenuOnTop ? (-self.sideMenuRevealWidth - self.paddingForRotation) : 0) { _ in
self.isExpanded = false
}
// Animate Shadow (Fade Out)
UIView.animate(withDuration: 0.5) { self.sideMenuShadowView.alpha = 0.0 }
}
}
func animateSideMenu(targetPosition: CGFloat, completion: @escaping (Bool) -> ()) {
UIView.animate(withDuration: 0.5, delay: 0, usingSpringWithDamping: 1.0, initialSpringVelocity: 0, options: .layoutSubviews, animations: {
if self.revealSideMenuOnTop {
self.sideMenuTrailingConstraint.constant = targetPosition
self.view.layoutIfNeeded()
}
else {
self.view.subviews[1].frame.origin.x = targetPosition
}
}, completion: completion)
}
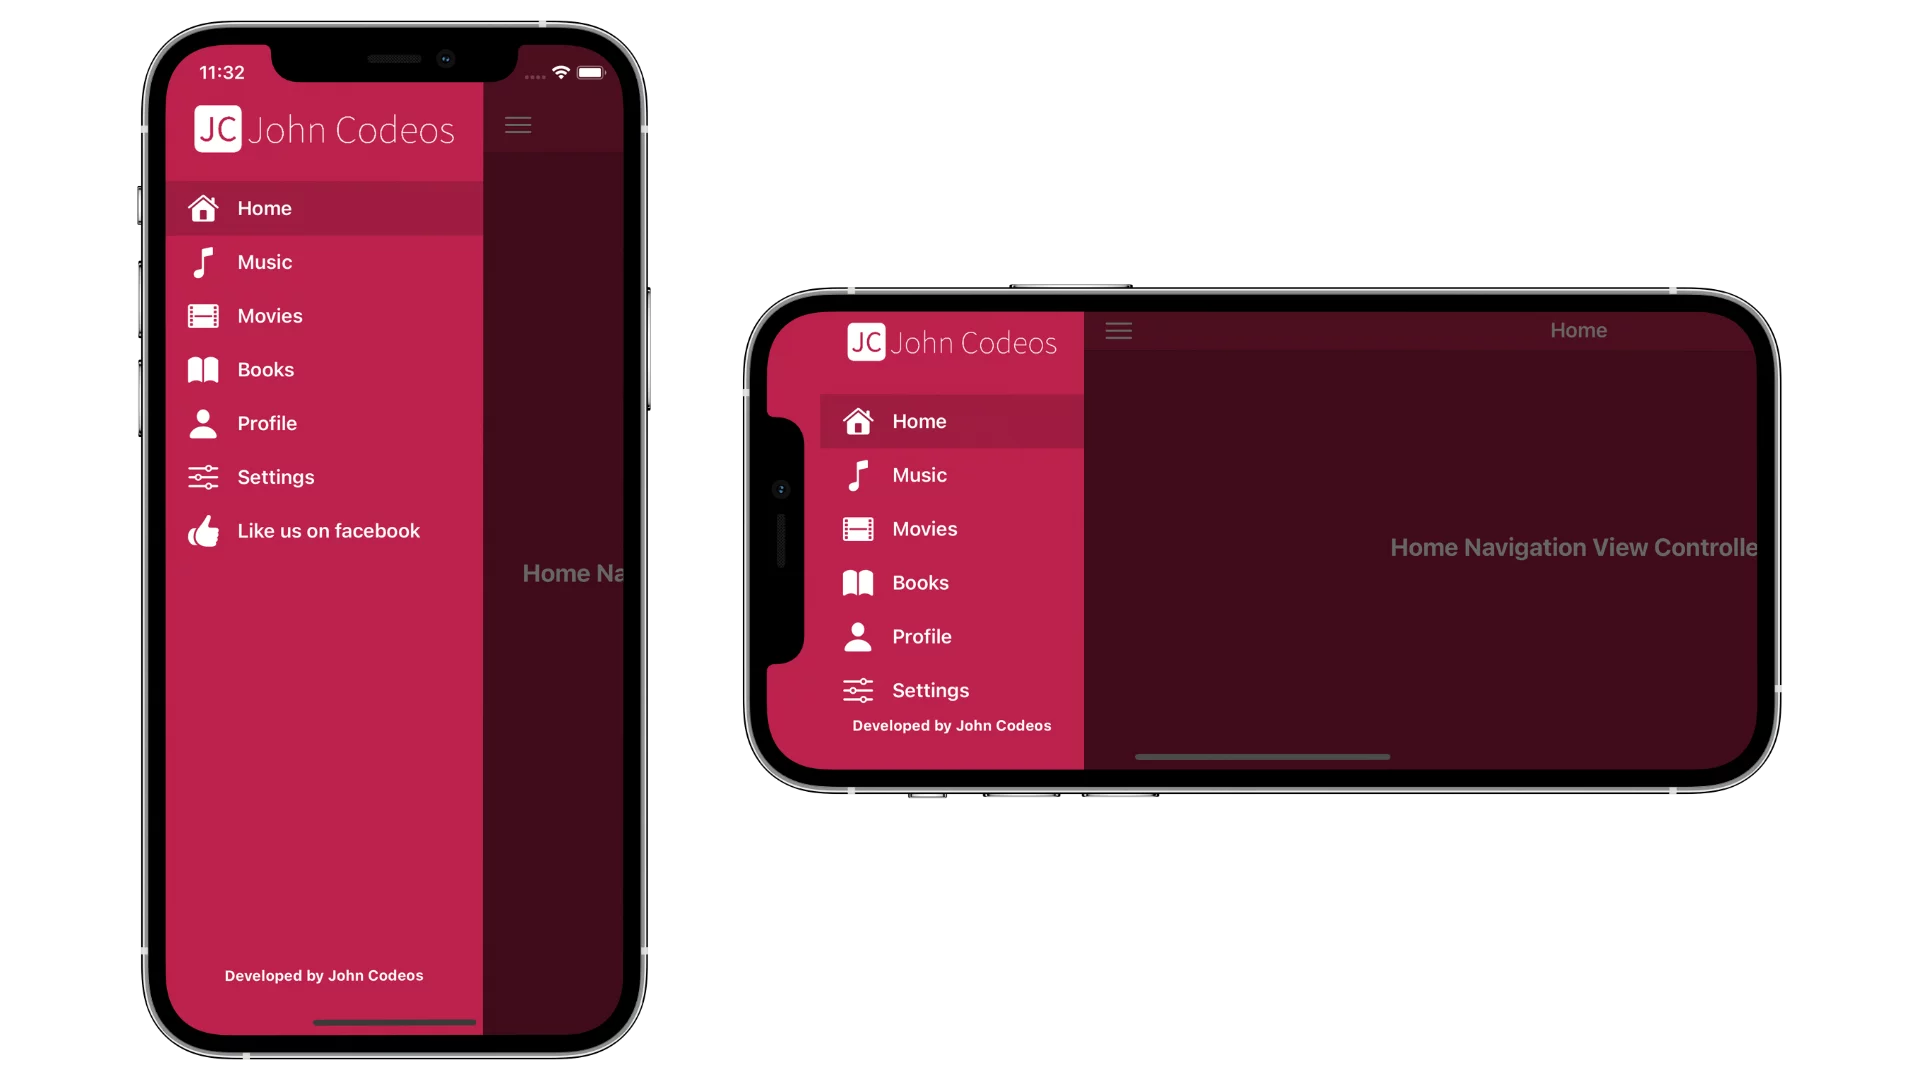
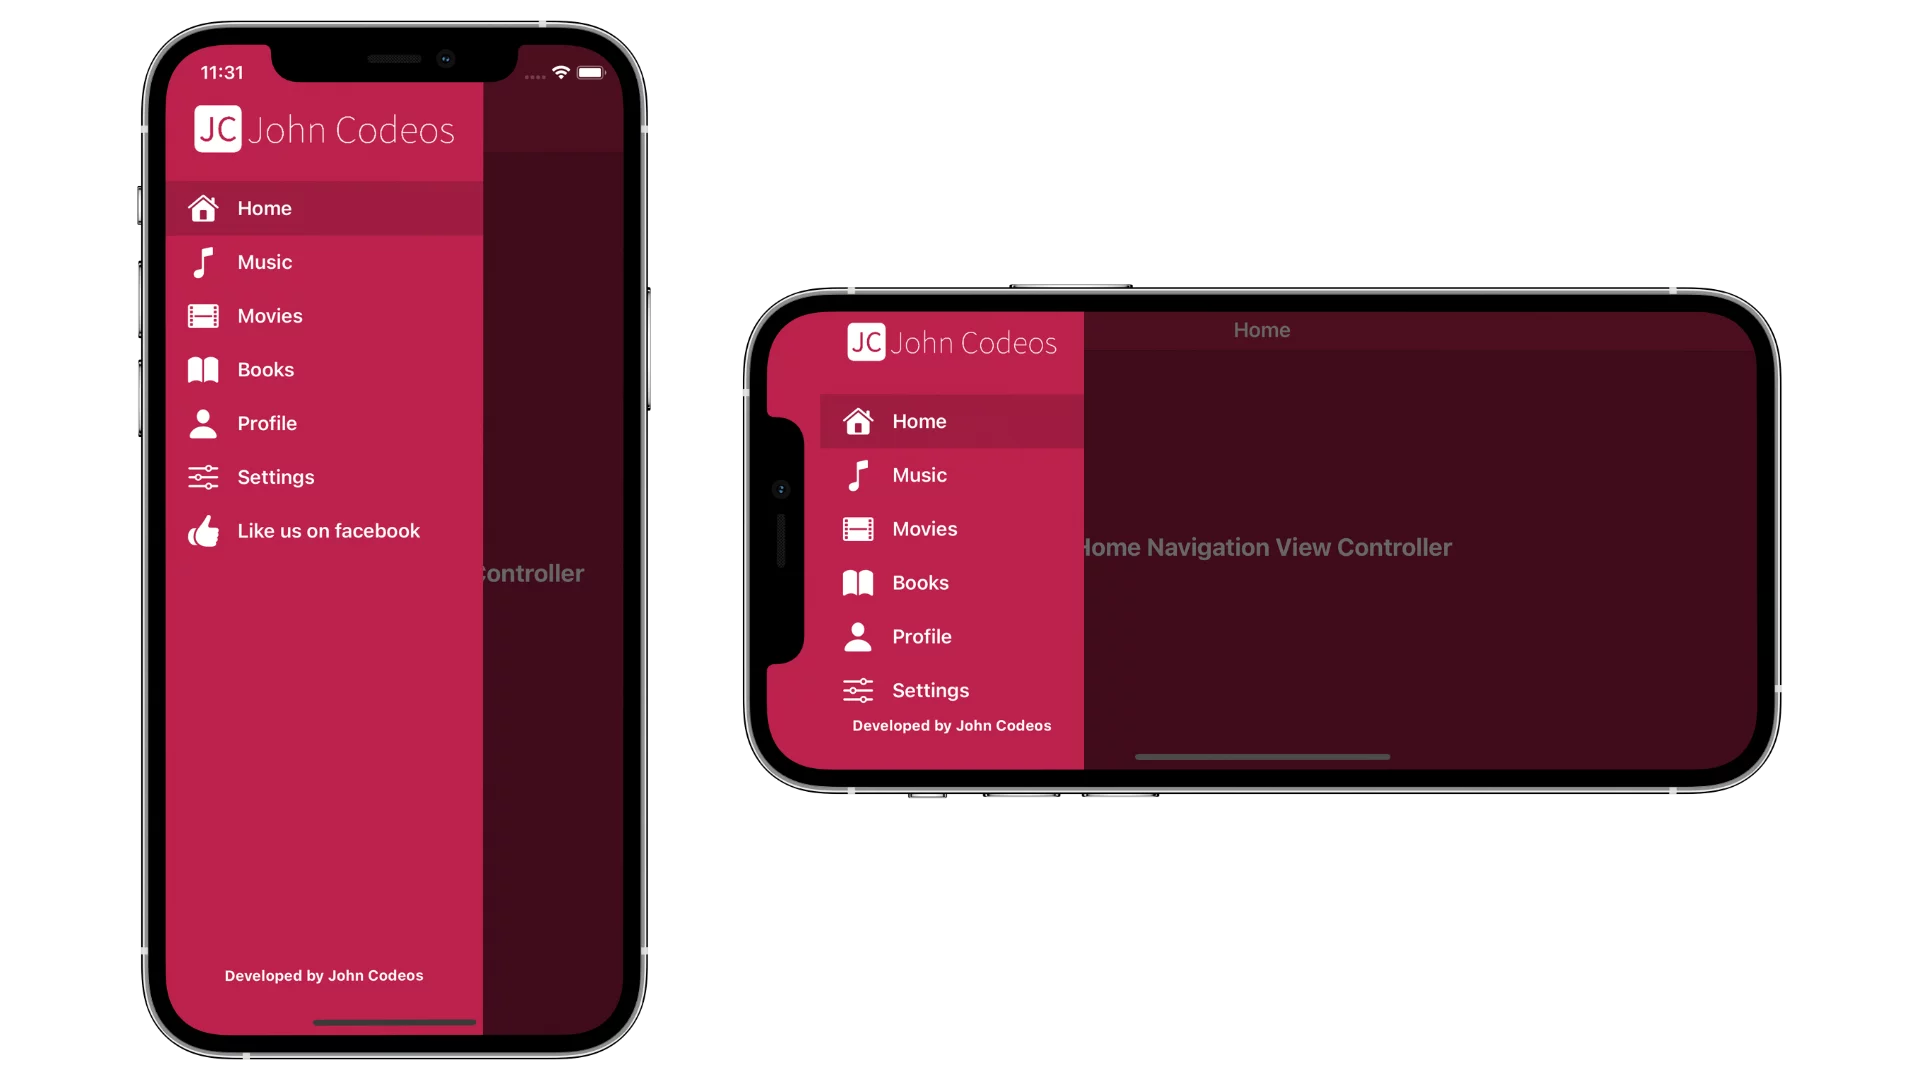
}Code language: Swift (swift)The paddingForRotation variable is used to “push” the side menu more to the left when it’s closed because, during the rotation, it shows up a little bit.
You can see below a snapshot of what it will look like when the paddingForRotation is 0 (left) and when it’s 150 (right)

Adding Expand/Collapse Button
To open/close the side menu, we need to add a menu button to the View Controllers with Navigation Controllers and connect it with an IBAction from the MainViewController.
At the bottom of the MainViewController, add the following UIViewController extension.
This extension helps us to connect the view controllers with our main view controller
extension UIViewController {

    // With this extension you can access the MainViewController from the child view controllers.
    func revealViewController() -> MainViewController? {
        var viewController: UIViewController? = self

        if viewController != nil && viewController is MainViewController {
            return viewController! as? MainViewController
        }
        while (!(viewController is MainViewController) && viewController?.parent != nil) {
            viewController = viewController?.parent
        }
        if viewController is MainViewController {
            return viewController as? MainViewController
        }
        return nil
    }

}Code language: Swift (swift)
In the same file, add the following IBAction method:
// Call this Button Action from the View Controller you want to Expand/Collapse when you tap a button
@IBAction open func revealSideMenu() {
    self.sideMenuState(expanded: self.isExpanded ? false : true)
}Code language: Swift (swift)
Now, we’re going to add the following menu (hamburger) button in each of our view controllers.
Go to one of your view controllers, add a Bar Button Item, and create an IBOutlet. In this example, we call it sideMenuBtn and connect it with the IBAction from the MainViewController.

import UIKit

class HomeViewController: UIViewController {
    @IBOutlet var sideMenuBtn: UIBarButtonItem!

    override func viewDidLoad() {
        super.viewDidLoad()

        sideMenuBtn.target = revealViewController()
        sideMenuBtn.action = #selector(revealViewController()?.revealSideMenu)
    }
}Code language: Swift (swift)
Keeping Side Menu State in Rotation
Go to the MainViewController, and add the following method to keep the menu’s state while you rotate the device.
// Keep the state of the side menu (expanded or collapse) in rotation
override func viewWillTransition(to size: CGSize, with coordinator: UIViewControllerTransitionCoordinator) {
    super.viewWillTransition(to: size, with: coordinator)
    coordinator.animate { _ in
        if self.revealSideMenuOnTop {
            self.sideMenuTrailingConstraint.constant = self.isExpanded ? 0 : (-self.sideMenuRevealWidth - self.paddingForRotation)
        }
    }
}Code language: Swift (swift)
Adding Shadow
In your MainViewController, inside the viewDidLoad() method and before the side menu code, add a UIView for the shadow and set alpha to 0
class MainViewController: UIViewController {

    // ...

    private var sideMenuShadowView: UIView!

    // ...

    override func viewDidLoad() {
        super.viewDidLoad()

        // Shadow Background View
        self.sideMenuShadowView = UIView(frame: self.view.bounds)
        self.sideMenuShadowView.autoresizingMask = [.flexibleWidth, .flexibleHeight]
        self.sideMenuShadowView.backgroundColor = .black
        self.sideMenuShadowView.alpha = 0.0
        let tapGestureRecognizer = UITapGestureRecognizer(target: self, action: #selector(TapGestureRecognizer))
        tapGestureRecognizer.numberOfTapsRequired = 1
        tapGestureRecognizer.delegate = self
        self.sideMenuShadowView.addGestureRecognizer(tapGestureRecognizer)
        if self.revealSideMenuOnTop {
            view.insertSubview(self.sideMenuShadowView, at: 1)
        }

        // ...
    }

    // ...
}Code language: Swift (swift)
Extend the MainViewController and add the UIGestureRecognizerDelegate:
extension MainViewController: UIGestureRecognizerDelegate {
    @objc func TapGestureRecognizer(sender: UITapGestureRecognizer) {
        if sender.state == .ended {
            if self.isExpanded {
                self.sideMenuState(expanded: false)
            }
        }
    }

    // Close side menu when you tap on the shadow background view
    func gestureRecognizer(_ gestureRecognizer: UIGestureRecognizer, shouldReceive touch: UITouch) -> Bool {
        if (touch.view?.isDescendant(of: self.sideMenuViewController.view))! {
            return false
        }
        return true
    }

    // ...
}Code language: Swift (swift)
Now, whenever the side menu is expanded, you can tap the shadow view to close it.
Adding Gestures
You can also make the side menu open/close just by dragging your finger.
In the MainViewController, add the following UIPanGestureRecognizer:
class MainViewController: UIViewController {

    // ...
    private var draggingIsEnabled: Bool = false
    private var panBaseLocation: CGFloat = 0.0

    override func viewDidLoad() {
        super.viewDidLoad()
        // ...

        // Side Menu Gestures
        let panGestureRecognizer = UIPanGestureRecognizer(target: self, action: #selector(handlePanGesture))
        panGestureRecognizer.delegate = self
        view.addGestureRecognizer(panGestureRecognizer)

        // ...
    }

    // ...

}

// ...

extension MainViewController: UIGestureRecognizerDelegate {

    // Dragging Side Menu
    @objc private func handlePanGesture(sender: UIPanGestureRecognizer) {

        // ...

        let position: CGFloat = sender.translation(in: self.view).x
        let velocity: CGFloat = sender.velocity(in: self.view).x

        switch sender.state {
        case .began:

            // If the user tries to expand the menu more than the reveal width, then cancel the pan gesture
            if velocity > 0, self.isExpanded {
                sender.state = .cancelled
            }

            // If the user swipes right but the side menu hasn't expanded yet, enable dragging
            if velocity > 0, !self.isExpanded {
                self.draggingIsEnabled = true
            }
            // If user swipes left and the side menu is already expanded, enable dragging they collapsing the side menu)
            else if velocity < 0, self.isExpanded {
                self.draggingIsEnabled = true
            }

            if self.draggingIsEnabled {
                // If swipe is fast, Expand/Collapse the side menu with animation instead of dragging
                let velocityThreshold: CGFloat = 550
                if abs(velocity) > velocityThreshold {
                    self.sideMenuState(expanded: self.isExpanded ? false : true)
                    self.draggingIsEnabled = false
                    return
                }

                if self.revealSideMenuOnTop {
                    self.panBaseLocation = 0.0
                    if self.isExpanded {
                        self.panBaseLocation = self.sideMenuRevealWidth
                    }
                }
            }

        case .changed:

            // Expand/Collapse side menu while dragging
            if self.draggingIsEnabled {
                if self.revealSideMenuOnTop {
                    // Show/Hide shadow background view while dragging
                    let xLocation: CGFloat = self.panBaseLocation + position
                    let percentage = (xLocation * 150 / self.sideMenuRevealWidth) / self.sideMenuRevealWidth

                    let alpha = percentage >= 0.6 ? 0.6 : percentage
                    self.sideMenuShadowView.alpha = alpha

                    // Move side menu while dragging
                    if xLocation <= self.sideMenuRevealWidth {
                        self.sideMenuTrailingConstraint.constant = xLocation - self.sideMenuRevealWidth
                    }
                }
                else {
                    if let recogView = sender.view?.subviews[1] {
                       // Show/Hide shadow background view while dragging
                        let percentage = (recogView.frame.origin.x * 150 / self.sideMenuRevealWidth) / self.sideMenuRevealWidth

                        let alpha = percentage >= 0.6 ? 0.6 : percentage
                        self.sideMenuShadowView.alpha = alpha

                        // Move side menu while dragging
                        if recogView.frame.origin.x <= self.sideMenuRevealWidth, recogView.frame.origin.x >= 0 {
                            recogView.frame.origin.x = recogView.frame.origin.x + position
                            sender.setTranslation(CGPoint.zero, in: view)
                        }
                    }
                }
            }
        case .ended:
            self.draggingIsEnabled = false
            // If the side menu is half Open/Close, then Expand/Collapse with animationse with animation
            if self.revealSideMenuOnTop {
                let movedMoreThanHalf = self.sideMenuTrailingConstraint.constant > -(self.sideMenuRevealWidth * 0.5)
                self.sideMenuState(expanded: movedMoreThanHalf)
            }
            else {
                if let recogView = sender.view?.subviews[1] {
                    let movedMoreThanHalf = recogView.frame.origin.x > self.sideMenuRevealWidth * 0.5
                    self.sideMenuState(expanded: movedMoreThanHalf)
                }
            }
        default:
            break
        }
    }
}Code language: Swift (swift)
Now, when you drag your finger, you’ll see that the shadow background opacity increases/decreases as you reveal/collapse the side menu.
The side menu will open automatically if you drag your finger very fast.
Disabling Gestures In Certain View Controllers
Suppose you have a view controller that you don’t want to have the side menu’s gesture. In that case, you can disable it by changing the boolean variable gestureEnabled inside the viewWillAppear(_:) and viewWillDisappear(_:) in the view controller you want to be disabled.
First, go to the MainViewController, to add this functionality.
class MainViewController: UIViewController {

    // ...

    var gestureEnabled: Bool = true

    override func viewDidLoad() {
        super.viewDidLoad()
        // ...
    }

    // ...

}

// ...

extension MainViewController: UIGestureRecognizerDelegate {

    // Dragging Side Menu
    @objc private func handlePanGesture(sender: UIPanGestureRecognizer) {

        guard gestureEnabled == true else { return }

        // ...

        switch sender.state {
        case .began:

            // ...

        case .changed:

            // ...

        case .ended:

            // ...

        default:
            break
        }
    }
}Code language: Swift (swift)
And inside the view controller that you want to disable the side menu gesture, add:
class MusicViewController: UIViewController {
    @IBOutlet var sideMenuBtn: UIBarButtonItem!

    override func viewDidLoad() {
        super.viewDidLoad()
        self.sideMenuBtn.target = revealViewController()
        self.sideMenuBtn.action = #selector(self.revealViewController()?.revealSideMenu)
    }

    override func viewWillAppear(_ animated: Bool) {
        super.viewWillAppear(animated)
        self.revealViewController()?.gestureEnabled = false
    }

    override func viewWillDisappear(_ animated: Bool) {
        super.viewWillDisappear(animated)
        self.revealViewController()?.gestureEnabled = true
    }
}Code language: Swift (swift)
Now, you can switch between the two types of menus. (Slide out and On Top) by changing the value of the revealSideMenuOnTop.
You can find the final project here
If you have any questions, please feel free to leave a comment below