Last updated on: May 27, 2023
DISCLAIMER: I’m using ScrollView with VStack instead of List because List made it difficult to remove dividers and use custom highlight colors on cells.
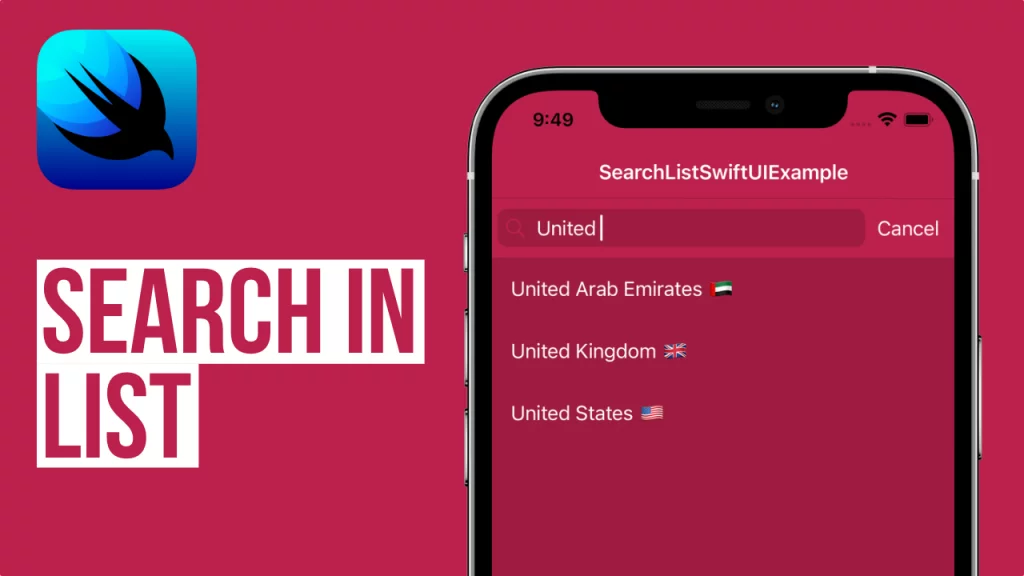
In this example, we have a list of countries, and when we’re typing in the search bar, we’re getting the countries that match the text we searched.
Contents
Creating the Search Bar
In SwiftUI, there’s no View like UISeachBar in UIKit. So we have to create it by ourselves using a TextField as a searching box and a Button for canceling the searching.
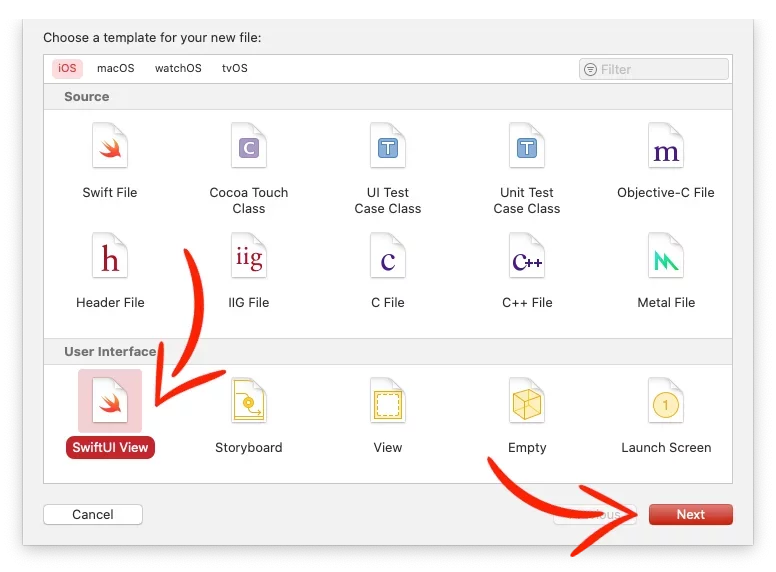
We’re going to create the Search Bar in a new SwiftUI View file
Go to your project folder, Right-Click > New File…

Select SwiftUI View, press Next, and name it SearchBar,
Inside that file, we’re going to have an HStack that contains a magnifying glass icon (It’s an SF Symbol. You don’t need to add it in your Assets folder), a TextField, and a Button.
struct SearchBar: View {
@State private var searchInput: String = ""
@Binding var searching: Bool
@Binding var mainList: [String]
@Binding var searchedList: [String]
var body: some View {
ZStack {
// Background Color
Color(#colorLiteral(red: 0.737254902, green: 0.1294117647, blue: 0.2941176471, alpha: 1))
// Custom Search Bar (Search Bar + 'Cancel' Button)
HStack {
// Search Bar
HStack {
// Magnifying Glass Icon
Image(systemName: "magnifyingglass")
.foregroundColor(Color(#colorLiteral(red: 0.737254902, green: 0.1294117647, blue: 0.2941176471, alpha: 1)))
// Search Area TextField
TextField("", text: $searchInput)
.onChange(of: searchInput, perform: { searchText in
searching = true
searchedList = mainList.filter { $0.lowercased().prefix(searchText.count) == searchText.lowercased() || $0.contains(searchText) }
})
.accentColor(.white)
.foregroundColor(.white)
}
.padding(EdgeInsets(top: 5, leading: 5, bottom: 5, trailing: 5))
.background(Color(#colorLiteral(red: 0.6196078431, green: 0.1098039216, blue: 0.2509803922, alpha: 1)).cornerRadius(8.0))
// 'Cancel' Button
Button(action: {
searching = false
searchInput = ""
// Hide Keyboard
UIApplication.shared.sendAction(#selector(UIResponder.resignFirstResponder), to: nil, from: nil, for: nil)
}, label: {
Text("Cancel")
})
.accentColor(Color.white)
.padding(EdgeInsets(top: 2, leading: 2, bottom: 2, trailing: 8))
}
.padding(EdgeInsets(top: 5, leading: 5, bottom: 5, trailing: 5))
}
.frame(height: 50)
}
}Code language: Swift (swift)The way Search Bar works is that we have a String Array that contains all the countries (mainList) and another String Array that has the countries that their names are matching to the text we’re typing in the TextField (searchedList), and we switch between these two arrays when we start searching.

Creating a Custom Cell
To make the highlight color (The color for when you tap the cell) work correctly, we have to make a new View.
Create a new SwiftUI View file, name it ListCell and paste the following code:
struct ListCell: View {
    var text: String

    var body: some View {
        VStack(spacing: 0) {
            Spacer()
            ZStack {
                HStack {
                    Text(text)
                        .padding(.leading, 15)
                        .foregroundColor(.white)
                    Spacer()
                }
            }
            Spacer()
        }.background(Color(#colorLiteral(red: 0.6196078431, green: 0.1098039216, blue: 0.2509803922, alpha: 1))).ignoresSafeArea()
    }
}Code language: Swift (swift)
Adding the SearchBar to the List
Now that we have created the Search Bar and the List Cell, it’s time to add them to our main View.
Inside this View, add the SearchBar and pass the two arrays and the searching variable:
struct ContentView: View {

    @State private var countryList = [String]()
    @State private var searchedCountryList = [String]()
    @State private var searching = false
    var body: some View {
        NavigationView {
            VStack(spacing: 0) {
                // SearchBar
                SearchBar(searching: $searching, mainList: $countryList, searchedList: $searchedCountryList)
                // ...

            }
            .navigationBarTitleDisplayMode(.inline)
            .navigationTitle("SearchListSwiftUIExample") // Navigation Bar Title
        }
        .onAppear(perform: {
            listOfCountries()
        })
    }
    func listOfCountries() {
        for code in NSLocale.isoCountryCodes as [String] {
            let id = NSLocale.localeIdentifier(fromComponents: [NSLocale.Key.countryCode.rawValue: code])
            let name = NSLocale(localeIdentifier: "en").displayName(forKey: NSLocale.Key.identifier, value: id) ?? "Country not found for code: \(code)"
            countryList.append(name + " " + countryFlag(country: code))
        }
    }
    // Add Flag Emoji
    func countryFlag(country: String) -> String {
        let base: UInt32 = 127397
        var s = ""
        for v in country.unicodeScalars {
            s.unicodeScalars.append(UnicodeScalar(base + v.value)!)
        }
        return String(s)
    }
}Code language: Swift (swift)
The searching variable changes to true when the user starts typing on the search box, and we display the searchedList to show the results.
It’s time now to add the List (ScrollView with VStack, as I said at the beginning)
struct ContentView: View {

    @State private var countryList = [String]()
    @State private var searchedCountryList = [String]()
    @State private var searching = false
    var body: some View {
        NavigationView {
            VStack(spacing: 0) {
                // SearchBar
                SearchBar(searching: $searching, mainList: $countryList, searchedList: $searchedCountryList)
                // List
                ScrollView {
                    VStack(spacing: 0) {
                        ForEach(searching ? (0..<searchedCountryList.count) : (0..<countryList.count), id: \.self) { row in
                            NavigationLink(
                                destination:
                                DetailsView(selectedCountry: searching ? searchedCountryList[row] : countryList[row]),
                                label: {
                                    ListCell(text: searching ? searchedCountryList[row] : countryList[row])
                                        .frame(height: 44)
                                })
                                .simultaneousGesture(TapGesture().onEnded {
                                    // Hide Keyboard after pressing a Cell
                                    UIApplication.shared.sendAction(#selector(UIResponder.resignFirstResponder), to: nil, from: nil, for: nil)
                                })

                                .navigationTitle("SearchListSwiftUIExample") // Title for the back button
                        }
                    }
                }
                .background(Color(#colorLiteral(red: 0.6196078431, green: 0.1098039216, blue: 0.2509803922, alpha: 1)).ignoresSafeArea())
            }
            .navigationBarTitleDisplayMode(.inline)
            .navigationTitle("SearchListSwiftUIExample") // Navigation Bar Title
        }
        .onAppear(perform: {
            listOfCountries()
        })
    }
}Code language: Swift (swift)
If you want to change the cell’s highlight color, add the following code at the bottom of your main View, or make a new swift file, name it ListButtonStyle, and paste inside:
// Highlight Color for Cell
struct ListButtonStyle: ButtonStyle {
    var highlightColor: Color
    func makeBody(configuration: Self.Configuration) -> some View {
        configuration.label.overlay(configuration.isPressed ? highlightColor : Color.clear)
    }}Code language: Swift (swift)
Now, you can add it to the NavigationLink like that (the last line):
NavigationLink(destination:DetailsView(selectedCountry: searching ? searchedCountryList[row] : countryList[row]), label: {
        ListCell(text: searching ? searchedCountryList[row] : countryList[row])
            .frame(height: 44)
    })
    .simultaneousGesture(TapGesture().onEnded {
        // Hide Keyboard after pressing a Cell
        UIApplication.shared.sendAction(#selector(UIResponder.resignFirstResponder), to: nil, from: nil, for: nil)
    })
    .buttonStyle(ListButtonStyle(highlightColor: Color(#colorLiteral(red: 0.6196078431, green: 0.1098039216, blue: 0.2509803922, alpha: 1)).opacity(0.7))) // Highlight ColorCode language: Swift (swift)
In the end, the file will look like that:
struct ContentView: View {
    init() {
        // Navigation Bar Background Color
        UINavigationBar.appearance().barTintColor = UIColor(#colorLiteral(red: 0.737254902, green: 0.1294117647, blue: 0.2941176471, alpha: 1))
        // Navigation Bar Text Color
        UINavigationBar.appearance().titleTextAttributes = [.foregroundColor: UIColor.white]
        // Navigation Bar Back Button Color
        UINavigationBar.appearance().tintColor = UIColor.white
        UINavigationBar.appearance().isTranslucent = false
    }
    @State private var countryList = [String]()
    @State private var searchedCountryList = [String]()
    @State private var searching = false
    var body: some View {
        NavigationView {
            VStack(spacing: 0) {
                // SearchBar
                SearchBar(searching: $searching, mainList: $countryList, searchedList: $searchedCountryList)
                // List
                ScrollView {
                    VStack(spacing: 0) {
                        ForEach(searching ? (0..<searchedCountryList.count) : (0..<countryList.count), id: \.self) { row in
                            NavigationLink(
                                destination:
                                DetailsView(selectedCountry: searching ? searchedCountryList[row] : countryList[row]),
                                label: {
                                    ListCell(text: searching ? searchedCountryList[row] : countryList[row])
                                        .frame(height: 44)
                                })
                                .simultaneousGesture(TapGesture().onEnded {
                                    // Hide Keyboard after pressing a Cell
                                    UIApplication.shared.sendAction(#selector(UIResponder.resignFirstResponder), to: nil, from: nil, for: nil)
                                })
                                .buttonStyle(ListButtonStyle(highlightColor: Color(#colorLiteral(red: 0.6196078431, green: 0.1098039216, blue: 0.2509803922, alpha: 1)).opacity(0.7))) // Highlight Color
                                .navigationTitle("SearchListSwiftUIExample") // Title for the back button
                        }
                    }
                }
                .background(Color(#colorLiteral(red: 0.6196078431, green: 0.1098039216, blue: 0.2509803922, alpha: 1)).ignoresSafeArea())
            }
            .navigationBarTitleDisplayMode(.inline)
            .navigationTitle("SearchListSwiftUIExample") // Navigation Bar Title
        }
        .onAppear(perform: {
            listOfCountries()
        })
    }
    func listOfCountries() {
        for code in NSLocale.isoCountryCodes as [String] {
            let id = NSLocale.localeIdentifier(fromComponents: [NSLocale.Key.countryCode.rawValue: code])
            let name = NSLocale(localeIdentifier: "en").displayName(forKey: NSLocale.Key.identifier, value: id) ?? "Country not found for code: \(code)"
            countryList.append(name + " " + countryFlag(country: code))
        }
    }
    // Add Flag Emoji
    func countryFlag(country: String) -> String {
        let base: UInt32 = 127397
        var s = ""
        for v in country.unicodeScalars {
            s.unicodeScalars.append(UnicodeScalar(base + v.value)!)
        }
        return String(s)
    }
}
struct ContentView_Previews: PreviewProvider {
    static var previews: some View {
        ContentView()
    }
}
// Highlight Color for Cell
struct ListButtonStyle: ButtonStyle {
    var highlightColor: Color
    func makeBody(configuration: Self.Configuration) -> some View {
        configuration.label.overlay(configuration.isPressed ? highlightColor : Color.clear)
    }
}Code language: Swift (swift)
You can find the final project here
If you have any questions, please feel free to leave a comment below