Last updated on: May 27, 2023
Today, I’m going to show you how to create a Google Sign-In button on Android using the Google Play Services Auth library.
Contents
Let’s get started!
First, you need to have a Google account.
Go to https://console.developers.google.com/ and log in with your account.
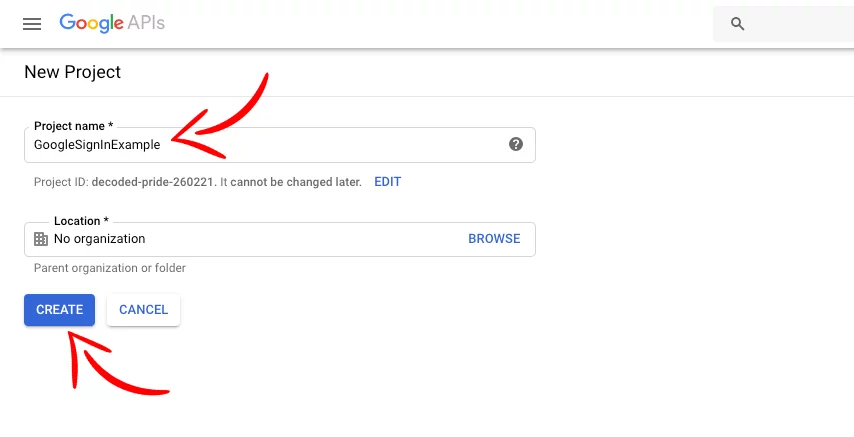
Press Select a project at the top left corner and in the new window press NEW PROJECT.

On the next page, give a name to your project and press CREATE
On the left side menu, go to OAuth consent screen and fill in the required fields, and press SAVE
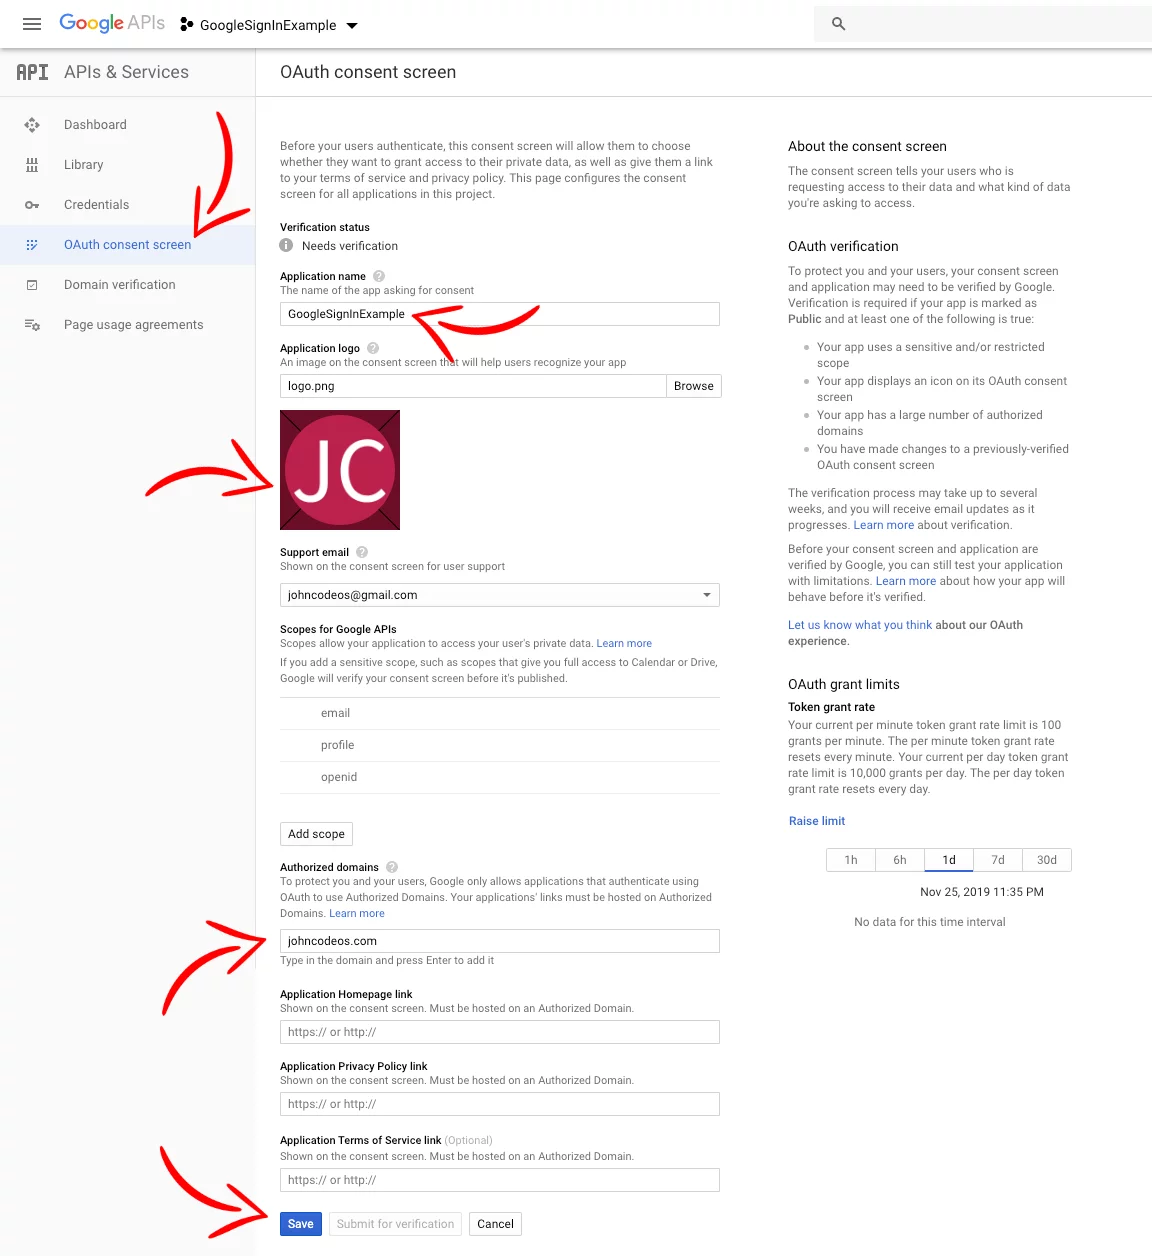
You don’t need to submit for verification because you don’t use any sensitive scope.
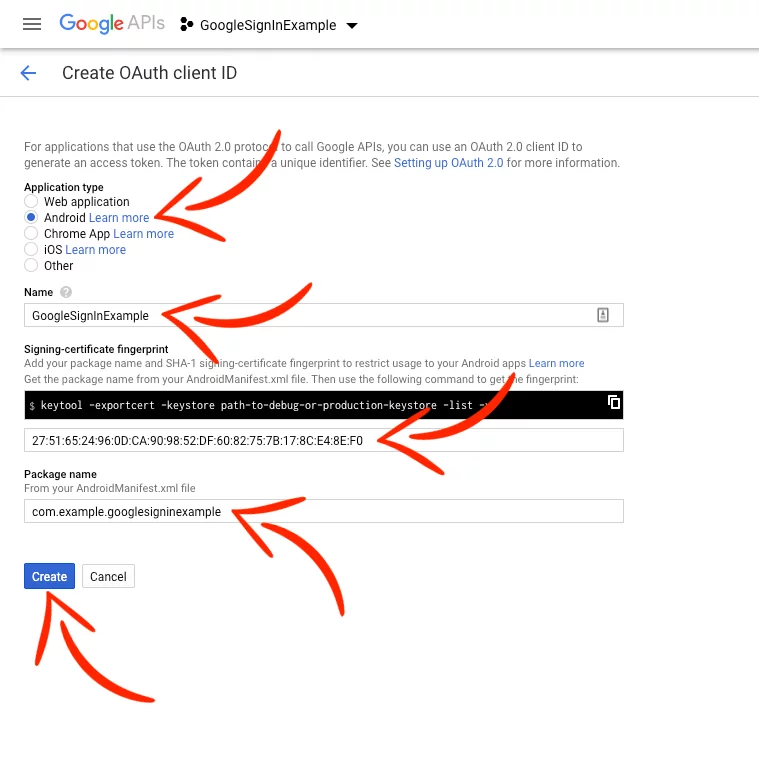
After that, from the left side menu, choose Credentials, press Create credentials and choose OAuth client ID from the dropdown menu.

On the next page, choose Android and give the Name of your app, Signing-certificate fingerprint, Package Name, and press Create
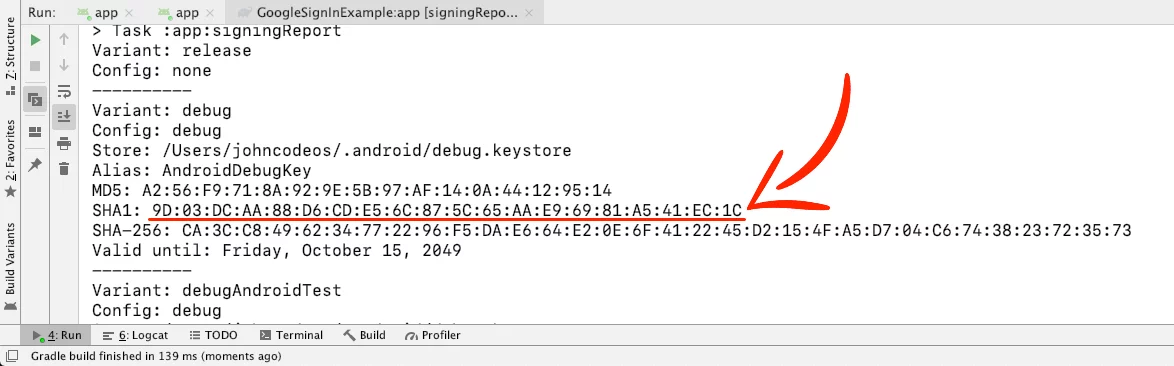
Get SHA-1 signing-certificate fingerprint (Debug)
Go to Android Studio and press the Gradle button on the right side.
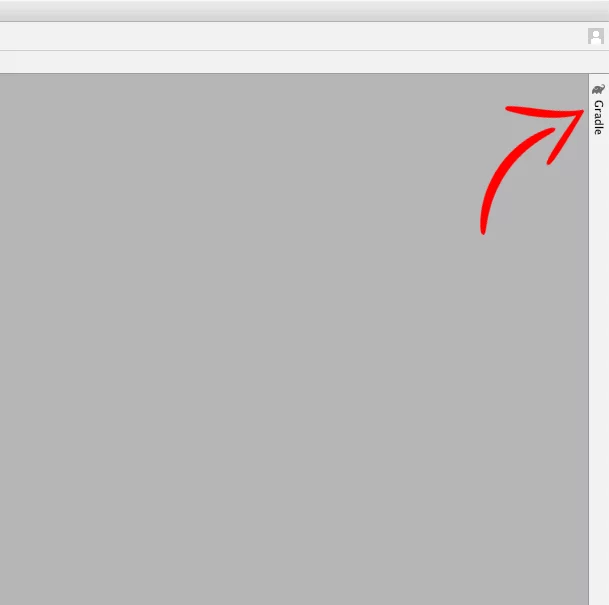
Choose your app module > Tasks > android > signingReport to generate the SHA-1 fingerprint for debug mode.

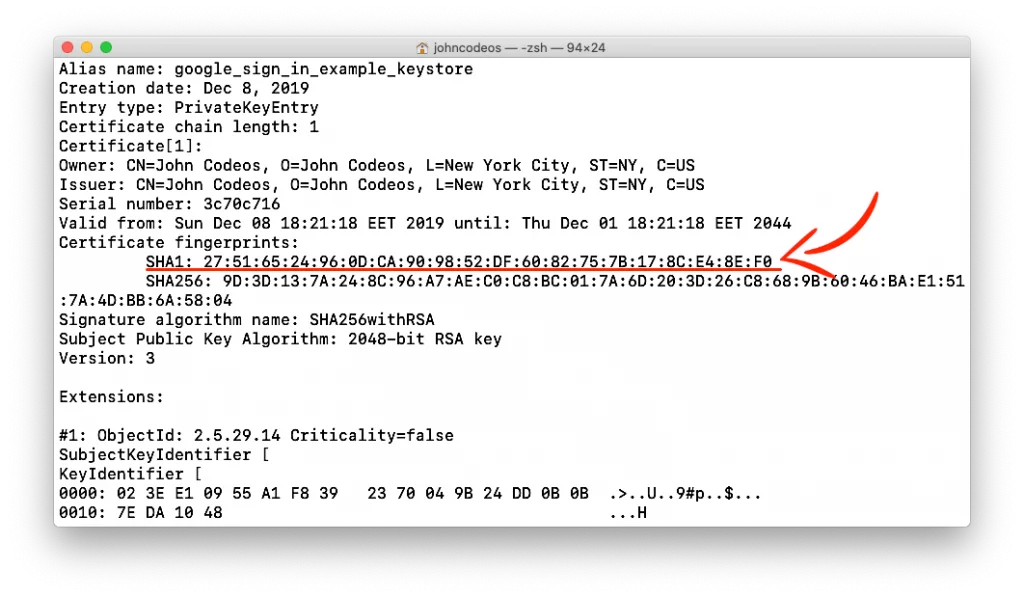
Get SHA-1 signing-certificate fingerprint (Release)
To get the SHA-1 fingerprint for release, go to your terminal and paste the following command.
$ keytool -list -v -keystore <YOUR_KEYSTORE_PATH> -alias <YOUR_APP_ALIAS_IN_KEYSTORE>Code language: HTML, XML (xml)Replace the YOUR_KEYSTORE_PATH with the path where your keystore file is, and the YOUR_APP_ALIAS_IN_KEYSTORE with the alias you gave for your app when you added it to your keystore file.

Now, go back choose again Credentials, press Create credentials and choose OAuth client ID to create a Web application

A new window will pop up with the OAuth Client ID that we are going to use later.

Creating the Google Login Button
First, you need to install Google Services.
Go to your project’s top-level build.gradle and add Google’s Maven repo (if it does not already exist)
allprojects {
    repositories {
        google()
        // ...
    }
}Code language: Swift (swift)
Now, go to your app-level build.gradle and add the Google Play Services Auth dependency.
apply plugin: 'com.android.application'
    // ...
    dependencies {
        implementation 'com.google.android.gms:play-services-auth:20.2.0'
    }Code language: Kotlin (kotlin)
Add a Button to your XML file. In this example, we have a button in the middle of the activity_main.xml.
<?xml version="1.0" encoding="utf-8"?>
<RelativeLayout xmlns:android="http://schemas.android.com/apk/res/android"
    xmlns:tools="http://schemas.android.com/tools"
    android:layout_width="match_parent"
    android:layout_height="match_parent"
    android:background="@color/colorPrimaryDark"
    tools:context=".MainActivity">
    <Button
        android:id="@+id/google_login_btn"
        android:layout_width="wrap_content"
        android:layout_height="wrap_content"
        android:layout_centerInParent="true"
        android:background="@drawable/rounded_corners"
        android:drawableStart="@drawable/google_icon"
        android:drawableLeft="@drawable/google_icon"
        android:drawablePadding="8dp"
        android:padding="8dp"
        android:text="Sign in with Google"
        android:textAllCaps="false"
        android:textColor="@color/GoogleTextColor"
        android:textStyle="bold" />
</RelativeLayout>Code language: HTML, XML (xml)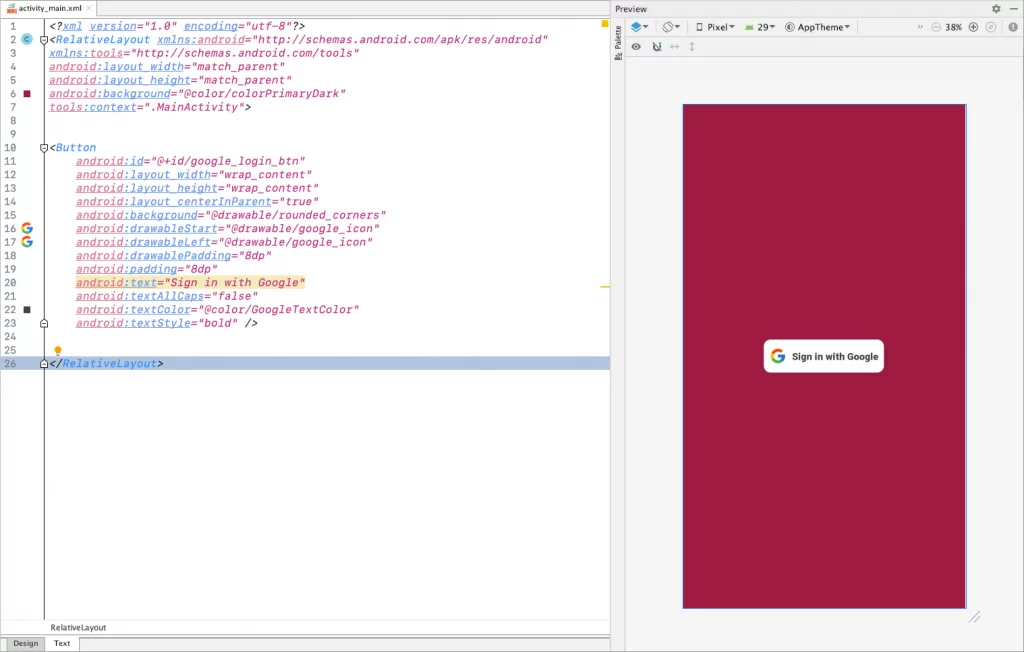
In the Kotlin class of your Activity (In this example is the MainActivity), create the GoogleSignInClient and add a click listener to your button.
IMPORTANT: You need to use the Web Application Client ID and NOT the Android Client ID to avoid the well-known problem error code 10.
private lateinit var mGoogleSignInClient: GoogleSignInClient


override fun onCreate(savedInstanceState: Bundle?) {
    super.onCreate(savedInstanceState)
    setContentView(R.layout.activity_main)

    val gso = GoogleSignInOptions.Builder(GoogleSignInOptions.DEFAULT_SIGN_IN)
                .requestIdToken("YOUR_WEB_APPLICATION_CLIENT_ID")
                .requestEmail()
                .build()

     mGoogleSignInClient = GoogleSignIn.getClient(this, gso)

     val googleLoginButton = findViewById<Button>(R.id.google_login_btn)
     googleLoginButton.setOnClickListener {
             signIn()
     }
}

private fun signIn() {
    val signInIntent = mGoogleSignInClient.signInIntent
    startActivityForResult(
        signInIntent, RC_SIGN_IN
    )
}

// ...

companion object {
         const val RC_SIGN_IN = 9001
}Code language: Kotlin (kotlin)
When the button is clicked, the app starts the sign-in intent, which prompts the user to sign in with a Google account.
After the successful auth, you get back the results with the onActivityResult method.
override fun onActivityResult(requestCode: Int, resultCode: Int, data: Intent?) {
        super.onActivityResult(requestCode, resultCode, data)
        if (requestCode == RC_SIGN_IN) {
            val task =
                GoogleSignIn.getSignedInAccountFromIntent(data)
            handleSignInResult(task)
        }
    }

    private fun handleSignInResult(completedTask: Task<GoogleSignInAccount>) {
        try {
            val account = completedTask.getResult(
                ApiException::class.java
            )
            // Signed in successfully
            val googleId = account?.id ?: ""
            Log.i("Google ID",googleId)
            val googleFirstName = account?.givenName ?: ""
            Log.i("Google First Name", googleFirstName)
            val googleLastName = account?.familyName ?: ""
            Log.i("Google Last Name", googleLastName)
            val googleEmail = account?.email ?: ""
            Log.i("Google Email", googleEmail)
            val googleProfilePicURL = account?.photoUrl.toString()
            Log.i("Google Profile Pic URL", googleProfilePicURL)
            val googleIdToken = account?.idToken ?: ""
            Log.i("Google ID Token", googleIdToken)
        } catch (e: ApiException) {
            // Sign in was unsuccessful
            Log.e(
                "failed code=", e.statusCode.toString()
            )
        }
    }Code language: Kotlin (kotlin)
To sign out the user, call the following method:
private fun signOut() {
        mGoogleSignInClient.signOut()
            .addOnCompleteListener(this) {
                // Update your UI here
            }
    }Code language: Kotlin (kotlin)
..and to revoke access (This can be used when you have the ‘Delete my account’ option in the user’s profile):
private fun revokeAccess() {
        mGoogleSignInClient.revokeAccess()
            .addOnCompleteListener(this) {
                // Update your UI here
            }
    }Code language: Kotlin (kotlin)
Done!
You can find the final project here
If you have any questions, please feel free to leave a comment below